Visualizing Blocked Ads With The Pi Sense Hat

Pi-hole is an open source project to turn that Raspberry Pi collecting dust in your drawer into a whole-network ad blocking appliance. Not only does it stop ads from showing up on all your computers and mobile devices, it also keeps track of how many ads have been blocked and where they came from. Just in case you wanted to know how many thousands of ads you missed out on for a given time period.

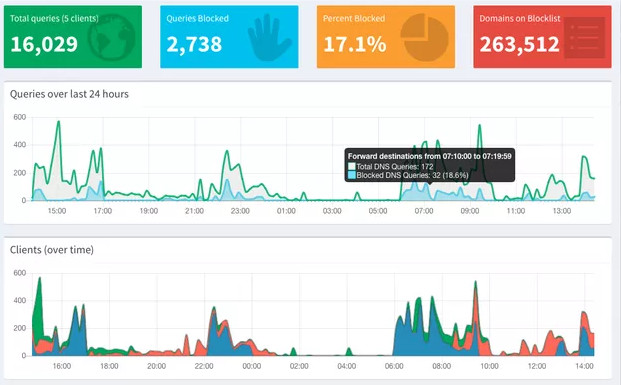
While the graphs generated in the web interface of Pi-hole are slick and all, what if you just wanted a quick way of visualizing how effective your ad blocking system is? You’re not so much worried about the exact figures, you just want something to blink away on your desk and let you know all those ads are going to /dev/null. Enter the aptly named pi-hole-visualizer by [simianAstronaut].

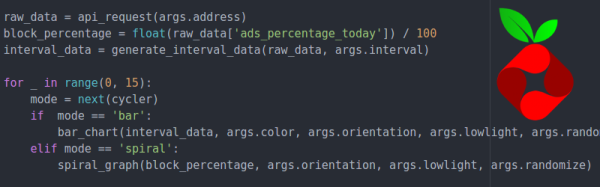
With the addition of a Sense HAT to the Pi running the ad blocking, this Python script will generate an animated visualization that can be easily interpreted even from a distance. The primary display is a bar graph of DNS traffic, where the height and color of each column indicate relative activity within a specific time interval. A second screen shows a spiral graph which gives you an idea of what percentage of ads were blocked before they hit your devices.

An array of options can be given to the script from the command line; controlling both physical aspects of the display like orientation and LED brightness, as well the configurable parameters for the different available visualizations. As an added bonus, there’s also support for using the Sense HAT joystick to switch between modes interactively.

Turning the Raspberry Pi into an ad blocking appliance goes back to the olden days of the original Raspberry Pi, but it’s interesting to see how advanced the concept has become. Just remember, not all ads are bad.

The Raspberry Pi 3B+ As An SDR – Without The SDR!

We’ve become used to software-defined radio as the future of radio experimentation, and many of us will have some form of SDR hardware. From the $10 RTL USB sticks through to all-singing, all-dancing models at eye-watering prices, there is an SDR for everyone.

What about the idea of an SDR without any external hardware? Instead of plugging something into your Raspberry Pi, how about using the Pi itself, unmodified? That’s just what the Nexmon SDR project has achieved, and this has been made possible through clever use of the on-board Broadcom 802.11ac WiFi chip. The result is a TX-capable SDR, albeit one only capable of operating within the 2.4 GHz and 5 GHz spectrum used by WiFi.

The team had previously worked extensively with the chipset in the Nexus 5 phone, and the SDR extension was first available on that platform. Then along came the Raspberry Pi 3 B+ with a similar-enough WiFi chipset that the same hack was portable to that platform, et voilá: WiFi SDR on a Pi 3 B+.

If you’ve not looked at the Pi 3 B+ we’d like to direct you to our review. If you don’t have a Nexus 5 kicking around, and you’d like to do some WiFi-band SDR work, it’s looking like an amazing deal.

Via rtl-sdr.com.

PID Control With Arduino

Experience — or at least education — often makes a big difference to having a successful project. For example, if you didn’t think about it much, you might think it is simple to control the temperature of something that is heating. Just turn on the heater if it is cold and turn it off when you hit the right temperature, right? That is one approach — sometimes known as bang-bang — but you’ll find there a lot of issues with that approach. Best practice is to use a PID or Proportional/Integral/Derivative control. [Electronoob] has a good tutorial about how to pull this off with an Arduino. You can also see a video, below.

The demo uses a 3D printer hot end, a thermocouple, a MAX6675 that reads the thermocouple, and an Arduino. There’s also an LCD display and a FET to control the heater.

Continue reading “PID Control With Arduino”

Portable DVD Player Gets Raspberry Pi Zero Upgrade

You might remember a time when people thought portable DVD players were a pretty neat idea. In the days before netbooks, cheap tablets, and arguably even the widespread adoption of smartphones, it seemed perfectly reasonable to lug around a device that did nothing but play movies. Today we look back at them as we would flip phones: a quaint precursor to the technology overload we find ourselves in currently. But the fact remains that millions of these comical little devices were pumped into the greedy maw of the consumer electronics market. They’re ripe for the hacking, all you need is some inspiration.

So if this grafting of a portable DVD player and the Raspberry Pi Zero W created by [nutsacrilege] doesn’t get you sniffing around your local second-hand store for a donor device, nothing will. By integrating a Pi running Kodi, the player gets a multi-media kick in the pants that arguably makes up for the rather archaic form factor. Not only can it play a wide array of local and online content, but it could even be used as portable game system if you were so inclined.

Rest assured, this isn’t some lazy five-minute mod. All of the original physical controls have been made functional by way of a MCP3008 ADC connected to the Pi’s GPIO and some clever Python scripting. Even the headphone jack was made functional by wiring it up to a USB sound card, and by integrating a tiny stripped down hub he was also able to add an external USB port. Who needs discs when you can plug in a flash drive full of content?

Speaking of which, [nutsacrilege] reports that the original functions of the device are still intact after all his modifications. So if you can get the museum to loan you one, you can even play a DVD on the thing as its creators intended.

With luck, this project will help spur on some more portable DVD player hacking, which we’ve seen precious little of so far. Frankly, it would be nice to see people cramming Raspberry Pi’s into something other than Game Boys for once.

[via /r/raspberry_pi]

HP Inkjet Printer Trains For Space

The International Space Station is one of our leading frontiers of science and engineering, but it’s easy to forget that an exotic orbiting laboratory has basic needs shared with every terrestrial workplace. This includes humble office equipment like a printer. (The ink-on-paper kind.) And if you thought your office IT is slow to update their list of approved equipment, consider the standard issue NASA space printer draws from a stock of modified Epson Stylus 800s first flown on a space shuttle almost twenty years ago. HP signed on to provide a replacement, partnering with Simplexity who outlined their work as a case study upgrading HP’s OfficeJet 5740 design into the HP Envy ISS.

Simplexity provided more engineering detail than HP’s less technical page. Core parts of inkjet printing are already well suited for space and required no modification. Their low power consumption is valued when all power comes from solar panels, and ink flow is already controlled via methods independent of gravity. Most of the engineering work focused on paper handling in zero gravity, similar to the work necessary for its Epson predecessor. To verify gravity-independent operation on earth, Simplexity started by mounting their test units upside-down and worked their way up to testing in the cabin of an aircraft in free fall.

CollectSpace has a writeup with details outside Simplexity’s scope, covering why ISS needs a printer plus additional modifications made in the interest of crew safety. Standard injection-molded plastic parts were remade with an even more fire-resistant formulation of plastic. The fax/scanner portion of the device was removed due to concerns around its glass bed. Absorbent mats were attached inside the printer to catch any stray ink droplets.

NASA commissioned a production run for 50 printers, the first of which was delivered by SpaceX last week on board their CRS-14 mission. When it wears out, a future resupply mission will deliver its replacement drawn from this stock of space printers. Maybe a new inkjet printer isn’t as exciting as 3D printing in space or exploring space debris cleanup, but it’s still a part of keeping our orbital laboratory running.

[via Engadget]


Customize All The Fan Covers You Never Knew You Needed

Do you need a fancy fan cover with precisely specified attributes, but have no desire to design one from scratch? If you answered yes (or no) then [mightynozzle] has the answer. The Customizable Fan Grill Cover is a parametric design in OpenSCAD that allows adjusting the frame style, size, and grill pattern for any fan cover one may possibly need. [mightynozzle] also went the extra mile to provide a large number of pre-made STL files for a variety of designs in a wide range of sizes, so those who don’t want to fuss with customizing can simply download and print.

Normally Thingiverse would allow customizing this model’s attributes with their built-in Customizer, but the functionality and availability of that feature is spotty. Luckily it’s always an option to download the source and do the customizing directly in OpenSCAD. For those who may be intrigued but are not sure where to start, here’s a reminder that we covered how to make a thing with OpenSCAD that demonstrates the whole process.

Hybrid 3D-Printer Creates Complete Circuits, Case And All

The cool kids these days all seem to think we’re on the verge of an AI apocalypse, at least judging by all the virtual ink expended on various theories. But our putative AI overlords will have a hard time taking over the world without being able to build robotic legions to impose their will. That’s why this advance in 3D printing that can incorporate electronic circuits may be a little terrifying, at least to some.

The basic idea that [Florens Wasserfall] and colleagues at the University of Hamburg have come up with is a 3D-printer with a few special modifications. One is a separate extruder than squirts a conductive silver-polymer ink, the other is a simple vacuum tip on the printer extruder for pick and place operations. The bed of the printer also has a tray for storing SMD parts and cameras for the pick-and-place to locate parts and orient them before placing them into the uncured conductive ink traces.

The key to making the hardware work together though is a toolchain that allows circuits to be integrated into the print. It starts with a schematic in Eagle, which joins with the CAD model of the part to be printed in a modified version of Slic3r, the open-source slicing package. Locations for SMD components are defined, traces are routed, and the hybrid printer builds the whole assembly at once. The video below shows it in action, and we’ve got to say it’s pretty slick.

Sure, it’s all academic for now, with simple blinky light circuits and the like. But team this up with something like these PCB motors, and you’ve got the makings of a robotic nightmare. Or not.

Continue reading “Hybrid 3D-Printer Creates Complete Circuits, Case And All”