Building A Cyberpunk Multi-Touch Input Device

This multi-touch touch panel built by [thiagesh D] might look like it came from the retro-futuristic worlds of Blade Runner or Alien, but thanks to a detailed build video and a fairly short list of required parts, it could be your next weekend project.

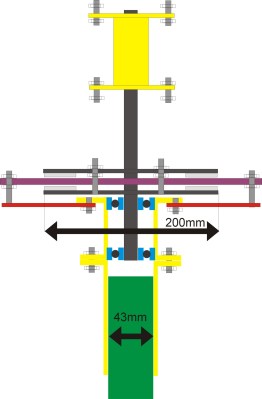
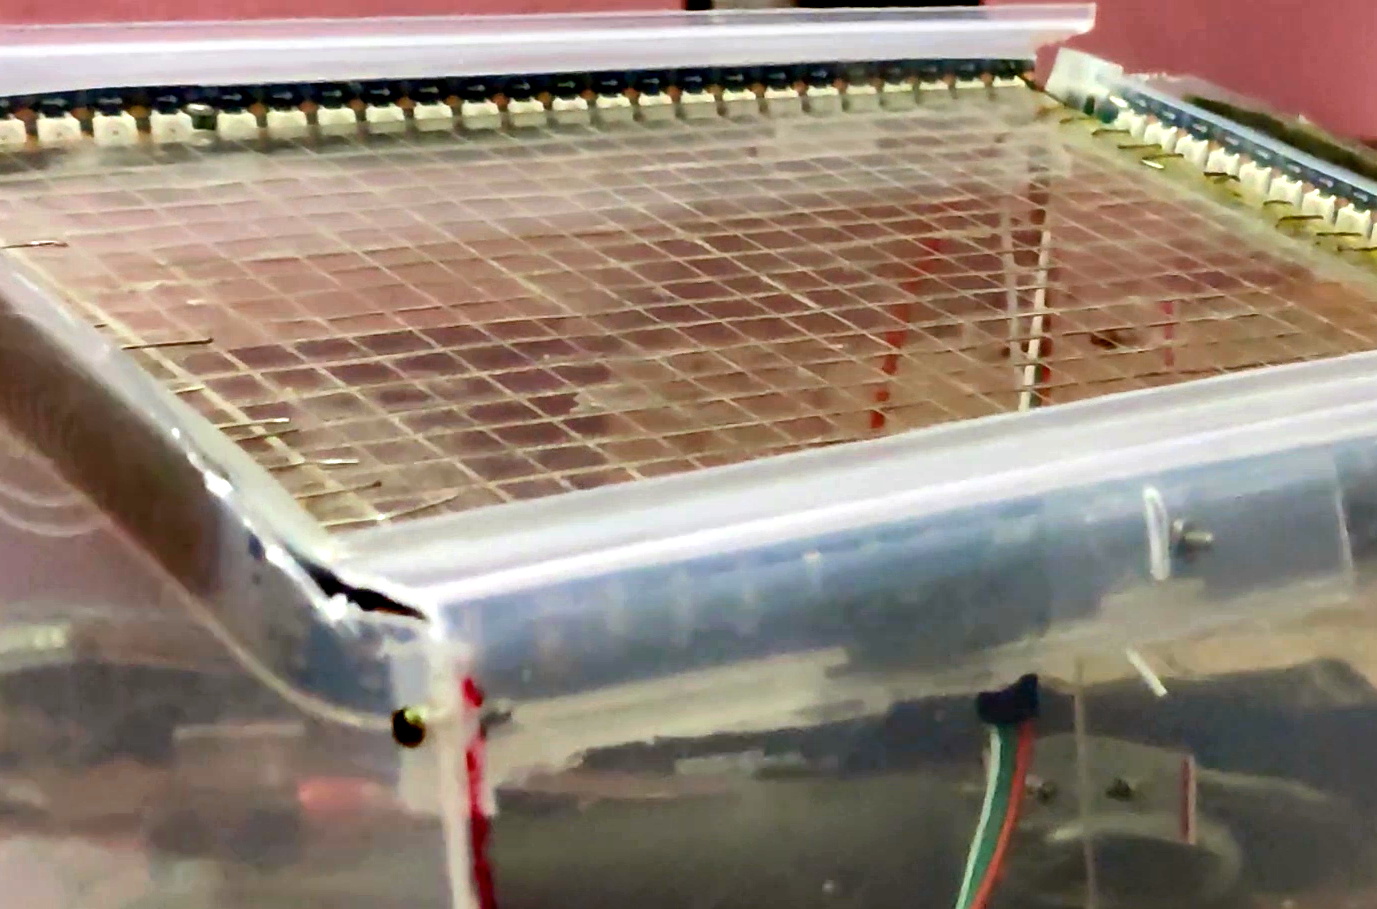
The build starts with a sheet of acrylic, which has a grid pattern etched into it using nothing more exotic than a knife and a ruler. Though if you do have access to some kind of CNC router, this would be a perfect time to break it out. Bare wires are then laid inside the grooves, secured with a healthy application of CA glue, and soldered together to make one large conductive array. This is attached to a capacitive sensor module so it’ll fire off whenever somebody puts a finger on the plastic.

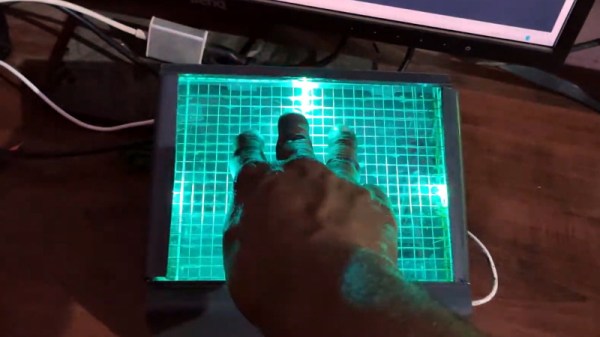
With RGB LED strips added to the edges, you could actually stop here and have yourself a very cool looking illuminated touch sensitive panel. But ultimately, it would just be a glorified button. There’s plenty of interesting applications for such a gadget, but it’s not going to be terribly useful attached to your computer.

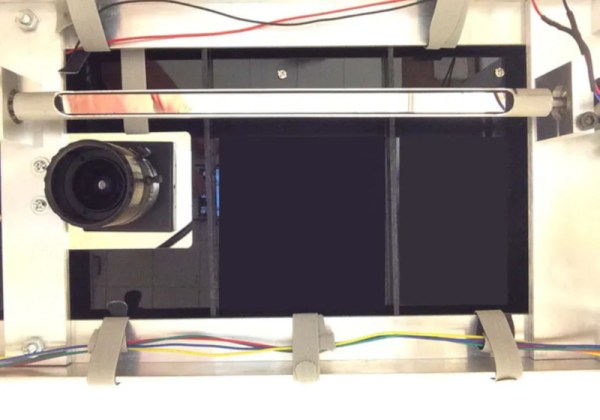
To turn this into a viable input device, [thiagesh D] is using a Raspberry Pi and its camera module to track the number and position of fingertips from the other side of the acrylic with Python and OpenCV. His code will even pick up on specific gestures, like a three finger drag which changes the colors of the LEDs accordingly in the video below. The camera’s field of view unfortunately means the box the panel gets mounted to has to be fairly deep, but if recessed into the surface of a desk, we think it could look incredible.

Custom multi-touch panels have been a favorite project of hackers for years now, and we’ve got examples going all the way back to the old black and white days. But larger and more modern incarnations like this one have the potential to change how we interface with technology on a daily basis.

Continue reading “Building A Cyberpunk Multi-Touch Input Device”

DIY Clapper Lets You Pick Your Components

One thing that always means the end of the year is close is the reappearance of TV ads for “The Clapper.” After all, who needs home automation when you can clap on and clap off? While we’re partial to our usual home automation solutions, [Utsource123] shows us that building a clapper can be a fun and easy project using several similar circuits. One with a few transistors and another one with a 555 because, after all, what can’t a 555 do?

Of course, these circuits usually have a microphone. We were trying to think of how you could make a sound-sensitive element out of common parts. After all, you don’t care about the fidelity of the microphone pickup, just that it hears a loud noise. The circuits are about what you’d expect. The transistor version uses one to amplify the microphone and another to switch on the LED. You’d need a bit more to trigger a relay. The 555 uses an even simpler preamp transistor as a trigger.

While we aren’t bowled over with the idea of a clapper, we imagine these circuits aren’t far removed from the ones you buy in stores. For about $16 you also get enough switching to handle a simple AC load, though. Maybe Alexa and Google should allow making clapping a wake up word?

This is sure simpler than the last clapper clone we saw. Then there’s the deluxe DIY version.

Upgrades Give Crazy Cart XL A Few More X’s

Why should kids have all the newfangled fun? They shouldn’t! Quarter-life crises are on the rise, and those who can are spoiling their inner child with adult-sized Heelys and electric Mario Karts that can drift. [austiwawa] finally got his hands on a used Crazy Cart XL, and while it’s incredibly fun, the puny 500W motor doesn’t quite satisfy his need for speed. A 3x power upgrade should do the trick.

The new 1600W motor is considerably bigger, so [austiwawa] had to grind off part of the front fork to make it fit. He designed a replacement motor support plate and had it cut from quarter-inch steel. Of course, you can’t just drop in a crazy new motor like that and go — you need a battery and controller to match. A couple of attempts and a new spot welder later, [austiwawa] built a 48V battery pack out of 18650s. The cart actually weighs less now, which should make the ride extra insane. Put a helmet on FFS and drift past the break to the build video and demo. Then watch him tear up the mean streets parking lots of Canada and take the kart off some sweet jumps.

We love a good fun-mobile around here, be it scratch-built or hacked OEM. This wasn’t even [austiwawa]’s first rodeo — check out his water-cooled electric drift trike.

Continue reading “Upgrades Give Crazy Cart XL A Few More X’s”

This Hurricane Uses A Novel Technique

You’ve probably heard of the brave pilots, the so-called ‘few’, that took to the air in their Supermarine Spitfires and saved the day during the Battle of Britain. It’s a story that contains a lot of truth, but as is so often the case, it masks a story with a bit more complexity. Those pilots did scramble across the airfields of Southern England back in the summer of 1940, but more of them went into battle behind the controls of a Hawker Hurricane than its more glamorous stablemate.

The Hurricane might have been eclipsed by the Spitfire in the public’s eye, but not for [Marius Taciuc], who’s made a fully-functional RC model of one. Normally that wouldn’t be worthy of our attention, but in this case he’s employed a rather fascinating construction technique. He’s recreated the doped-fabric skin of the original by 3D-printing the frame of the aircraft and covering it in heat-shrink film, making this a very rare bird indeed.

The video below takes us through the steps including the development of the frame in a CAD package based on a tracing of a 2D aircraft picture, fitting the film, and finally attempts at flight that are unfortunately foiled by inappropriate wheel choice. But the short flight and crash does demonstrate that this construction method is durable, which leads on to our interest in it. While it evidently makes a functional aircraft, there are other applications that could benefit from such a lightweight and strong combination of materials.

[Marius] actually created a model of the somewhat more photogenic Spitfire using a similar technique, though as far as we can tell, that one has remained grounded. Incidentally, these pages have been previously graced by Hurricanes of the non-PLA variety. Continue reading “This Hurricane Uses A Novel Technique”

Tracking Ants And Zapping Them With Lasers

Thanks to the wonders of neural networks and machine learning algorithms, it’s now possible to do things that were once thought to be inordinately difficult to achieve with computers. It’s a combination of the right techniques and piles of computing power that make such feats doable, and [Robert Bond’s] ant zapping project is a great example.

The project is based around an NVIDIA Jetson TK1, a system that brings the processing power of a modern GPU to an embedded platform. It’s fitted with a USB camera, that is used to scan its field of view for ants. Once detected, thanks to a little OpenCV magic, the coordinates of the insect are passed to the laser system. Twin stepper motors are used to spin mirrors that direct the light from a 5 mW red laser, which is shined on the target. If you’re thinking of working on something like this we highly recommend using galvos to direct the laser.

Such a system could readily vaporize ants if fitted with a more powerful laser, but [Robert] decided to avoid this for safety reasons. Plus, the smell wouldn’t be great, and nobody wants charred insect residue all over the kitchen floor anyway. We’ve seen AIs do similar work, too – like detecting naughty cats for security reasons.

Continue reading “Tracking Ants And Zapping Them With Lasers”

A Cyberdeck Built With Ergonomics In Mind

With a new decade looming over us, the hot new thing for hackers and makers everywhere is to build cyberdecks to go with the flashy black-and-neon clothing that the sci-fi films of old predicted we’d all be wearing come next year. [Phil Hagelberg] has been designing one based on his own ergonomic keyboard, prioritizing not only form but also function.

The Atreus mechanical keyboard has a split layout that foregoes the traditional typewriter-inherited staggered arrangement in favor of one that better fits the user’s hands. The reduced number of keys limits hand movement for a more comfortable writing experience, however if you use function keys often, the trade-off is that you’ll need to use an auxiliary key to access them.

The deck [Phil] documents for us here is built from the ground up around that same design and aims to be small enough for travel, yet pleasant enough for serious use. It’s gone through four revisions so far, including an interesting one where the keyboard is laid out on the sides for using while standing up. As for the brains of the machine, the past revisions have used different flavors of Raspberry Pi and even a Samsung Galaxy S4 phone, though the latest model has a Pine64 running the show. How much has changed between each finished prototype really goes to show that you don’t have to get it right the first time, and it’s always good to experiment with a new idea to see what works.

[Phil] is now moving onto a fifth prototype, and hopes to eventually sell kits for building the whole cyberdeck along with the kits already available for the standalone keyboard. We’ve been struck by the creativity shown in these cyberdeck builds, which range from reusing retro computer shells to completely printing out a whole new one for a unique look. We can’t say for sure if this custom form-factor will eventually surpass mass-produced laptops, but it sure would be hella cool if it did.

Building A Wind Power Generator In Your Backyard

For many environmental enthusiasts, horizontal-axis wind turbines (HAWTs) — the kind that look like windmills slowly spinning in the distance — are a pretty familiar sight. Unfortunately, there are quite a few caveats that make them harder to adopt despite the fact that harvesting renewable energy sources is more sustainable than relying on natural gas and fuels that can be depleted. Since they face in one axis, they need to be able to track the wind, or else trade off the ability to maximize energy output. In turbulent and gusty conditions, as well, HAWTs face accelerated fatigue when harvesting.

The development of the vertical-axis wind turbine (VAWT) solves several of these issues. In addition, the turbines are typically closer to the ground and the gearbox replacement is simpler and more efficient. Maintenance is more accessible due to the size of the turbines, so no heavy machinery is typically necessary to access crucial components on-site. In addition, the gearbox by nature of its operation takes on less fatigue and is able to function in turbulent winds, which reduces the rate of failure.

For a simple version of a VAWT that you can build yourself, [BlueFlower] has published several mechanical drawings that detail the layout of the design. The wind power generator uses 24 magnets, copper wire fashioned into coils, and a metal plate for the main generator. The coils are arranged in a circular formation on a static plate, while the magnets are equally spaced on a moving circular plate. As the magnets pass over coils, the flux induces a current, which increases as the plates spin faster.

The blades of the generator are made from blue foam with a metal bar running through it for structure. Three of the blades are attached with triangular bars to a central rod, which also holds the spinning magnetic plate.

In [BlueFlower]’s initial trials using the VAWT for charging a battery they were able to generate a max power of 15W on boost mode and 30-70W when charging in PWM mode. Not bad for a home-made wind power generator!

There aren’t only pros to the design, however. While VAWTs may be cheaper, more mobile, and more resistant to wear and tear, there are some design features that prevent the generators from functioning as well as HAWTs at harvesting energy. The blades don’t produce torque at the same time, with some blades simply being pushed along. This produces more drag on the blades when they rotate, limiting the efficiency of the entire system. In addition, higher wind speeds are typically found at higher altitudes, so the VAWTs will perform better if installed on a towering structure. Vibration forces close to the ground can also wear out the bearings, resulting in more maintenance and costs.


Continue reading “Building A Wind Power Generator In Your Backyard”