Ask Hackaday: Get The Lead Out Or Not?

For most of the history of industrial electronics, solder has been pretty boring. Mix some lead with a little tin, figure out how to wrap it around a thread of rosin, and that’s pretty much it. Sure, flux formulations changed a bit, the ratio of lead to tin was tweaked for certain applications, and sometimes manufacturers would add something exotic like a little silver. But solder was pretty mundane stuff.

Source: RoHS Guide

Then in 2003, the dull gray world of solder got turned on its head when the European Union adopted a directive called Restriction of Hazardous Substances, or RoHS. We’ve all seen the little RoHS logos on electronics gear, and while the directive covers ten substances including mercury, cadmium, and hexavalent chromium, it has been most commonly associated with lead solder. RoHS, intended in part to reduce the toxicity of an electronic waste stream that amounts to something like 50 million tons a year worldwide, marked the end of the 60:40 alloy’s reign as the king of electrical connections, at least for any products intended for the European market, when it went into effect in 2006.

Continue reading “Ask Hackaday: Get The Lead Out Or Not?”

Threaded 3D Printed Part Comparison

If you want to make serious assemblies out of 3D printed parts, you’ll eventually need to deal with threading. The easiest way is to make a nut trap that you can either insert a standard nut into after printing or even during printing. However, there are limitations to this method. If you want a real threaded part you can print the thread, cut the thread with a tap or bolt, or use a threaded insert. [Stefan] ran some tests to see how each of those methods held up to real use. (YouTube, embedded below.) He used fifty test parts to generate data for comparison.

We like the threaded insert method where a brass insert is pushed into the plastic while hot. Special features in the insert cause the brass part to grab the plastic, making it difficult to pull the insert out or twist it within the hole. Another thing we liked was that the tests used holes printed in the horizontal and vertical plane. You can clearly see that the orientation does alter how the holes work and fail to work.

Continue reading “Threaded 3D Printed Part Comparison”

Not All Raspberry Pi Laptops Have QWERTY Keyboards And Screens

Our recent coverage of a Raspberry Pi Zero inside the official Pi keyboard prompted a reader to point us to another far more unusual keyboard with a Pi Zero inside it. It may be a couple of years old, but [Mario Lang]’s Braille keyboard and display with built-in Pi is still an interesting project and one that should give sighted readers who have not encountered a Braille display an introduction to the technology.

The model in question is a Handy Tech Active Star 40, which seems to have been designed to have a laptop sit on top of it. A laptop was not the limit of its capabilities, because it also has a compartment with a handy USB connector that was intended to take a smartphone and thus makes a perfect receptacle for a Pi Zero. Sadly the larger boards are a little tall with their connectors.

If this hack were preformed today he would undoubtedly have used a Pi Zero W, but since the Zero he had did not possess WiFi he relied upon a Bluetooth dongle for connectivity to the outside world. The BRLTTY screen reader provides a Braille interface to the Linux console, resulting in an all-in-one Braille computer in a very compact form factor.

This is one portable Braille computer, but it’s by no means the only one we’ve seen. Thanks [Simon Kainz] for the tip, and here’s a nod to the Pi keyboard that inspired him.

WiFi Your Door Lock With An ESP

The Internet of Things is upon us, and with that comes a deluge of smart cameras, smart home monitors, and smart home locks. There actually aren’t many smarts in these smart conveniences, and you can easily build your own. That’s what [MakerMan] did with some off-the-shelf parts and just a little bit of code. Now he can open his door with WiFi, and it’s a nice clean build.

The build process began by first removing the existing barrel bolt on the door. This was replaced by a deadbolt that also had some really neat solenoids inside for remote activation. This was mounted to the door in a way that the door could lock, with a minimal amount of damage from some skillful hacksaw work. The only thing left to do after this was add some electronics and brains to the lock.

For this, [MakerMan] added a button and LED to the outside of the door. Some of these wires were fed into the lock mechanism, with a few more run over to a project enclosure mounted next to a power outlet. The project enclosure holds an ESP-8266, power regulator, and relay board, and the ESP is running code that instantiates a web server that will unlock the door with a few clicks on a web page.

Sure, it’s probably not the most secure lock on the planet, and the 5V linear regulator is held on to the relay board with hot glue, but this is an exceptionally well-documented project, and all the code is available in an archive.

Continue reading “WiFi Your Door Lock With An ESP”

Easy Git Repository Summaries With Web-git-sum

For those hosting their own git repositories there are a number of solutions for creating convenient web-accessible front ends, but [mitxela] wasn’t quite satisfied with any of them. After trying a number of alternatives and reflecting on his requirements, he realized that all he really needed was a summary page listing the latest commits, and a file tree with a list of branches and tags. To accomplish this, he created web-git-sum. It’s a bash script that runs on git’s post-receive hook and generates only two files: a summary page and an index of the repository. You can see a demo of the output at git.mitxela.com.

[mitxela]’s writeup goes into some detail on how git repositories work, how those repositories are served over HTTP, and covers a few of the different options for providing convenient and accessible web front ends. Not all repositories are alike, and what works well for one may not work or scale well for another.

Intrigued by the idea of a private git server? We covered exactly how to set one up (spoiler: it’s really easy.)

Testing A Battery-Powered Mini Spot Welder

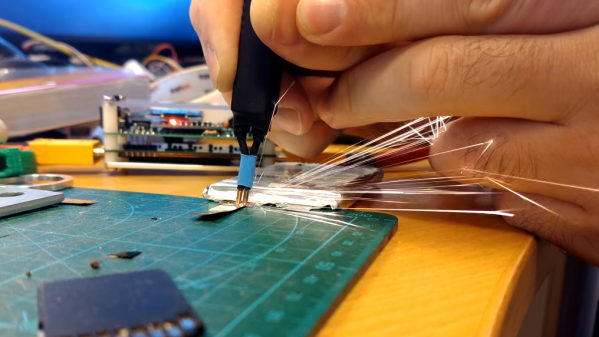
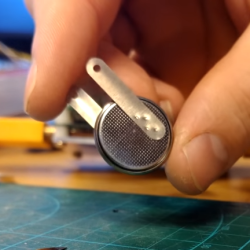
Did you ever see a thin metal tab bonded to a battery terminal with little pock marks? That’s the work of a spot welder. Spot welding is one of those processes that doesn’t offer much in the way of alternatives; either one uses a spot welder to do the job right, or one simply does without. That need is what led [Erwin Ried] to purchase a small, battery-powered spot welder from a maker in Korea and test it out on nickel strips.

The spot welder [Erwin] used is the work of a user by the name of [aulakiria] (link is Korean, machine translation here) and is designed to be portable and powered by batteries commonly used for RC. [Erwin] is delighted with the results, and demonstrates the device in the video embedded below.

Spot welder projects see a lot of DIY, some of which are successful while others are less so. Our own [Sean Boyce] even gave making a solar-powered spot welder a shot, the results of which he described as “nearly practical!”

Continue reading “Testing A Battery-Powered Mini Spot Welder”

This Force Controlled Robot Gripper Is Less Likely To Break Stuff

While robotic arms can handle a wide variety of tasks, the specific job at hand will have a major influence on the type of end effector used. For sorting ferromagnetic parts an electromagnet might be enough, while for more accurate location a mechanical gripper could be employed. If you’re working with particularly delicate objects or in concert with human beings, it may be desired to have a force controlled gripper to avoid damage. [James Bruton] has been whipping up a design of his own for just this purpose.

The basic gripper is 3D printed, with 3 fingers consisting of two joints each. Retraction of each finger is courtesy of bungee cord, while extension is via a servo attached to the finger through a spring. The position of each finger is measured with a resistive flex sensor. An Arduino Uno is employed to run the servos and read the attached sensors.

As force is applied by the servo, the spring begins to stretch. This leads to a greater difference between the servo position and the finger position as the applied force increases. By calculating this difference, it’s possible to determine the force applied by the fingers. This can then be used to limit the applied force of the gripper, to avoid breaking delicate objects or crushing soft, fleshy humans.

[James] notes that there are some drawbacks to the current design. The force required to move the fingers is inconsistent along their travel, and this interferes somewhat with accurate measurement. Overall though it’s a solid proof of concept and a good base for further revisions. Files are on Github for those who wish to tinker at home.

Being aware of the forces applied in mechanical settings can be key to getting good results. We’ve even seen arbor presses modified for just such a purpose. Video after the break.

Continue reading “This Force Controlled Robot Gripper Is Less Likely To Break Stuff”