Object Tracking Camera Slider Gets The Nice Shots

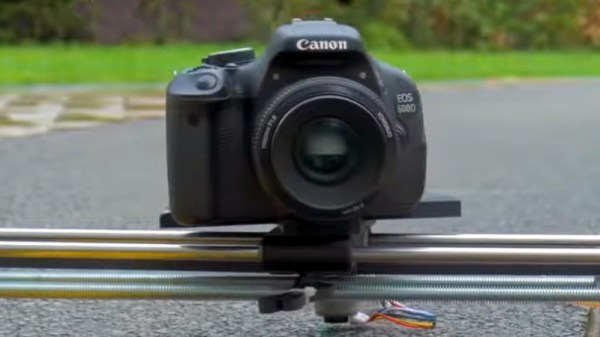
In this day and age, where all leisure activities must be duly captured and monetized online, camera sliders are hot items. Many start with a simple manual build, before graduating to something motorized for more flexibility. [Saral Tayal] took things a step further, implementing a basic tracking mode for even sweeter shots. 

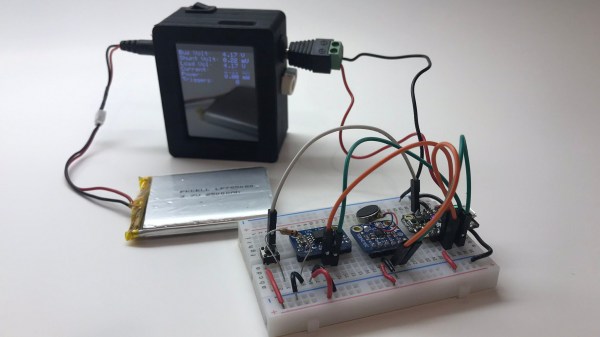
The build is mechanically simple, relying on 8mm steel rods and linear bearings more typically found in 3D printers. An Arduino Uno is pressed into service to run the show, outfitted with an OLED screen to run the interface. A RoboClaw motor controller is used to control the geared DC motors used, one controlling the linear motion, the other the rotation of the camera.

With encoders fitted to the motors, the RoboClaw controller enables the Arduino to track the position and rotation of the slider as it moves. The slider then can be given the position of an object relative to itself. With a little maths, it will rotate the camera to track the object as it moves along.

It’s a simple addition to the typical slider build that greatly increases the variety of shots that can be achieved. There are plenty of ways to go about building a slider, too, as we’ve seen before. Video after the break.
Continue reading “Object Tracking Camera Slider Gets The Nice Shots”

Mimic Artfully Employs LEDs In Fashion

Any science fiction piece set in the near-future involves clothes that light up or otherwise have some form of electronics inside. This hasn’t happened in mainstream fashion just yet, but [Amped Atelier] are doing serious work in the field. Mimic was their entry for the 2016 MakeFashion Gala, serving as a great example of LEDs in fashion done right.

Mimic consists of two pieces, designed as cocktail dresses that mimic their surroundings, in much the same way as a chameleon. LEDs are controlled by an Arduino, fitted with a colour sensor. When activated, the Arduino can change the color of the LEDs to match whatever is presented to the sender. This technology could serve as a great way to avoid clashing with a friend’s outfit, or to send a surreptitious signal to your ride that you’re ready to leave.

The LEDs are hidden beneath attractive geometric diffusers, which are 3D printed directly on to the fabric of the outfit. This gives an attractive, finished look to the garment, and allows the diffusers to naturally flow with the lines of the piece.

These pieces show that it’s possible to create glowable night wear that is as stylish as it is high tech. If you’re looking for something a little edgier however, we’ve got that too. Video after the break.

Continue reading “Mimic Artfully Employs LEDs In Fashion”

Dambusting, R/C Style

Disclaimer: no dams were actually busted in the making of the video below. But that doesn’t mean that a scale-model homage to the WWII Dam Busters and their “Bouncing Bombs” isn’t worth doing, of course.

In a war filled with hacks, [Barnes Wallis]’ Bouncing Bomb concept might just be the hackiest. In the video below, [Tom Stanton] explains that [Wallis] came up with the idea of skipping a bomb across the surface of a lake to destroy enemy infrastructure after skipping marbles across the water. Using barrel-shaped bombs, he built a rig that could give them the proper amount of backspin and release them at just the right time, letting them skip across the surface of the lake while the bomber made an escape. Upon hitting the rim of the dam, the bomb would sink to explode near the base, maximizing damage.

[Tom]’s scale rig ended up being a clever design with spring-loaded arms to release a 3D-printed barrel after being spun up by a brushless motor. He teamed up with R/C builder [James Whomsley], who came up with a wonderful foam-board Lancaster bomber, just like RAF No. 617 Squadron used. With a calm day and smooth water on the lake they chose for testing, the R/C Lanc made a few test runs before releasing the first barrel bomb. The first run was a bit too steep, causing the bomb to just dive into the water without skipping. Technical problems and a crash landing foiled the second run, but the third run was perfect – the bomb skipped thrice while the plane banked gracefully away. [Tom] also tried a heavy-lift quadcopter run with the bomb rig, something [Barnes Wallis] couldn’t even have dreamed of back in the day.

Hats off to [Tom] and [James] for collaborating on this and getting the skipping to work. It reminds us a bit of the engineered approach to rock-skipping, though with less deadly intentions.

Continue reading “Dambusting, R/C Style”

Hacking Surgery: Suspended Animation May Be Here

Suspended animation is a staple of science fiction. Need to take a 200 year trip to another star system? Go to sleep in some sort of high-tech coccoon and wake up at your destination. We saw it in Star Trek, 2001, and many other places. Doctors at the University of Maryland have reprtedly put at least one patient in suspended animation, and it isn’t to send them to outer space. The paper (behind a paywall, of course) is available if you have the medical background to wade through it. There’s also a patent that describes the procedure.

Trauma surgeons are frustrated because they often see patients who have been in an accident or have been shot or stabbed that they could save if they only had the time. A patient arriving at an ER with over half their blood lost and their heart stopped have a less than 5% chance of leaving the ER without a toe tag. By placing the patient in suspended animation, doctors can gain up to two hours to work on injuries that previously had to be repaired in mere minutes.

Continue reading “Hacking Surgery: Suspended Animation May Be Here”

A 3D Printer Scratch Built For Your Viewing Pleasure

Today it’s almost always cheaper to buy an imported 3D printer kit than it is to source your own parts and build one yourself. But that doesn’t stop people from doing it anyway. Whether they’re looking for something a bit more solid, or just want to do things their own way, there are still valid reasons to design and build your own machine. Luckily for us in the audience, [Rob Mech] decided to document the build of his custom “LayerFused C201” printer on his YouTube Channel.

If you’ve ever dreamed of taking the plunge and building a 3D printer exactly the way you want, but were never able to manage the time, this seven video series might be the next best thing. Each video takes you through a different step of the construction, from building the frame out of aluminum extrusion all the way to wiring up the endstop switches and the 32-bit SKR v1.3 controller. There’s even a video that introduces the viewer to the concept of a “Frankenstein” printer that uses cobbled together parts just long enough to produce its own final components.

All told, [Rob] says the Bill of Materials for the LayerFused C201 comes to at least $200, but that’s going to take shopping around for the lowest possible prices and potentially even salvaging some components from other machines and projects. Like we said, building a cheap printer is absolutely not the goal here; it’s all about building a printer you want to use. Continue reading “A 3D Printer Scratch Built For Your Viewing Pleasure”

If You Need A Measurement Tool Just Build A Measurement Tool

[Darlan Johnson] was working on a wearable project and needed a way to measure the change in voltage and current over time. 

Most measurement tools are designed to take snapshots of a system’s state in a very small window of time, but there are few common ones designed to observe and log longer periods. It’s an interesting point, for example, many power supply related failures such as resets occur sporadically. Longer timescale measuring devices could pick these up.

[Darlan] had a ton of Feathers and shields lying around, and combined them into the needed instrument. An INA219 current sensor records the measurements. They are then displayed on a TFT and logged to an SD card. Everything is bundled into a neat 3D printed case along with a battery for wireless operation. A set of barrel connectors provide the breakout to split the wires for the current measurement.

It’s a neatly done hack and we can see it as a nice addition to any hacker’s measurement drawer.

New Part Day: The Bizen Transistor

If we had a dollar for every exciting new device that’s promised to change everything but we never hear of beyond the initial hoopla, we’d own our own private islands in the sun from the beaches of which we’d pick out Hackaday stories with diamond-encrusted keyboards. The electronic engineering press likes to talk about new developments, and research scientists like a bit of publicity to help them win their next grant.

The Bizen transistor however sounds as though it might have some promise. It’s a novel device which resembles a bipolar transistor in which the junctions exhibit Zener diode-like properties, and in which the mechanism is through quantum tunneling rather than more conventional means. If this wasn’t enough, its construction is significantly simpler than conventional semiconductors, requiring many fewer support components to make a logic gate than traditional CMOS or TTL, and requires only eight mask steps to manufacture. This means that lead times are slashed, and that the cost of producing devices is much reduced.

The device’s originator has partnered with a semiconductor fab house to offer a service in which custom logic chips can be produced using the new devices in a series of standard building blocks. This is likely to be only of academic interest to the hacker at the moment, however the prospect of this cost reducing as the technology matures does show promise of reaching the means of some more well-funded hacker projects. It will be a while before we can order a chip with the same ease as a PCB, but this makes that prospect seem just a little bit closer.

Thanks [Ken Boak] for the tip.