Rolling Your Own LED Matrix Driver, With Copper Foil Tape To The Rescue

It all started when [Damien Walsh] got his hands on some surplus LED boards. Each panel contained 100 mini-PCBs hosting a single bright LED that were meant to be to be snapped apart as needed. [Damien] had a much better idea: leave them in their 20×5 array and design a driver allowing each LED to be controlled over WiFi. He was successful (a brief demo video is embedded down below after the break) and had a few interesting tips to share about the process of making it from scratch.

The first hurdle he ran into was something most of us can relate to; it’s difficult to research something when one doesn’t know the correct terms. In [Damien]’s case, his searches led him to a cornucopia of LED drivers intended to be used for room lighting or backlights. These devices make a large array of smaller LEDs act like a single larger light source, but he wanted to be able to individually address each LED.

Eventually he came across the IS32FL3738 6×8 Dot Matrix LED Driver IC from ISSI which hit all the right bases. Three of these would be enough to control the 100-LED panel; it offered I2C control and even had the ability to synchronize the PWM of the LEDs across multiple chips, so there would be no mismatched flicker between LEDs on different drivers. As for micontroller and WiFi connectivity, we all have our favorites and [Damien] is a big fan of Espressif’s ESP32 series, and used the ESP32-WROOM to head it all up.
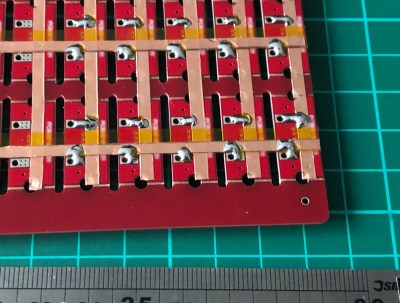
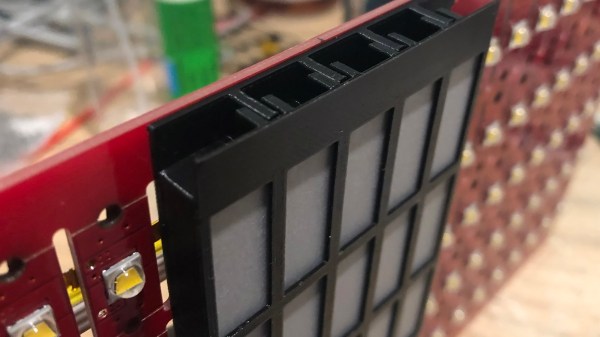
LED pads bridged to copper tape, with Kapton (polyimide) tape insulating any crossovers.

The other issue that needed attention was wiring. Each of the LEDs is on its own little PCB with handy exposed soldering pads, but soldering up 100 LEDs is the kind of job where a little planning goes a long way. [Damien] settled on a clever system of using strips of copper tape, insulated by Kapton (a super handy material with a sadly tragic history.) One tip [Damien] has for soldering to copper tape: make sure to have a fume extractor fan running because it’s a much smokier process than soldering to wires.

A 3D-printed baffle using tracing paper to diffuse the light rounds out the device, yielding a 20 x 5 matrix of individually-controlled rectangles that light up smoothly and evenly. The end result looks fantastic, and you can see it in action in the short video embedded below.

Continue reading “Rolling Your Own LED Matrix Driver, With Copper Foil Tape To The Rescue”

Job Application Script Automates The Boring Stuff With Python

Job hunting can certainly require a good amount of hoop-jumping in today’s age. Even if you’re lucky enough to have your application read by an actual human, there’s no guarantee the person on the other end has much of an understanding about your skill set. Oftentimes, the entire procedure is futile from the start, and as a recent graduate, [harshibar] is well aware of the soul-crushing experience investing a lot of time in it can be. Well, as the saying goes: if you can’t beat them, join them — and if you can’t join them, automate the hell out of the application process.

As the final piece of a “5 Python Projects in 5 Days” challenge [harshibar] set for herself — which also spawned a “Tinder for Netflix” for the web development section of it — she essentially created a web-scraper that gathers job openings for a specific search term, and automatically sends an application to each and every one of them. Using Beautiful Soup to parse the scraped pages of a certain job portal, Selenium’s browser automation functionality to fill out the online application forms, she can get all her information into the form saving countless hours in comparison to the manual alternative. The program even hits the apply button.

While the quantity-over-quality approach may not be for everyone, there’s of course room for more filtering and being more selective about the job openings beforehand, which [harshibar] also addresses in her video about the project (embedded below). And while this won’t fix the application process itself, we can definitely see the satisfaction a beating-them-at-their-own-game might provide — plus, it can’t have a worse miss rate than your typical LinkedIn “recruiter”. Still, if you’re looking for a more systematic approach, have a look at [Lewin Day]’s view on the subject, he even has advice job hunting is still further down the road for you.

Continue reading “Job Application Script Automates The Boring Stuff With Python”

Creating Surreal Short Films From Machine Learning

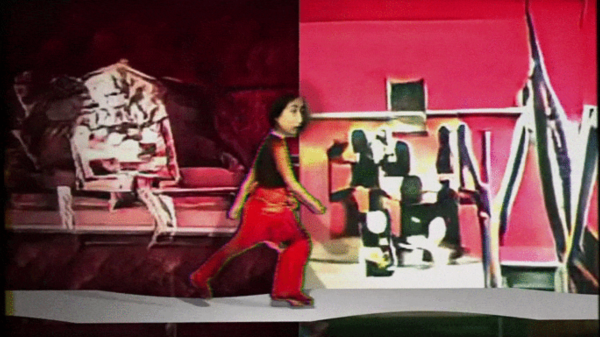
Ever since we first saw the nightmarish artwork produced by Google DeepDream and the ridiculous faux paintings produced from neural style transfer, we’ve been aware of the ways machine learning can be applied to visual art. With commercially available trained models and automated pipelines for generating images from relatively small training sets, it’s now possible for developers without theoretical knowledge of machine learning to easily generate images, provided they have sufficient access to GPUs. Filmmaker [Kira Bursky] took this a step further, creating a surreal short film that features characters and textures produced from image sets.

She began with about 150 photos of her face, 200 photos of film locations, 4600 photos of past film productions, and 100 drawings as the main datasets.

via [Kira Bursky]
Using GAN models for nebulas, faces, and skyscrapers in RunwayML, she found the results from training her face set disintegrated, realistic, and painterly. Many of the images continue to evoke aspects of her original face with distortions, although whether that is the model identifying a feature common to skyscrapers and faces or our own bias towards facial recognition is up to the viewer.

On the other hand, the results of training the film set photos on models of faces and bedrooms produced abstract textures and “surreal and eerie faces like a fever dream”. Perhaps, unlike the familiar anchors of facial features, it’s the lack of recognizable characteristics in the transformed images that gives them such a surreal feel.

[Kira] certainly uses these results to her advantage, brainstorming a concept for a short film that revolves around her main character experiencing nightmares. Although her objective was to use her results to convey a series of emotionally striking scenes, the models she uses to produce these scenes are also quite interesting.

She started off by using the MiDaS model, created by a team of researchers from ETH Zurich and Intel, for generating monocular depth maps. The results associated levels inside of an image with their appropriate depth in relation to one another. She also used the MASK R-CNN for masking out the backgrounds in generated faces and combined her generated images in Photoshop to create the main character for her short film.

via [Vox]
In order to simulate the character walking, she used the Liquid Warping GAN, a framework for human motion imitation and appearance transfer, created by a team from ShanghaiTech University and Tencent AI Lab. This allowed her to take her original images and synthesize results from reference poses of herself going through the motions of walking by using a 3D body mesh recovery module. Later on, she applied similar techniques for motion tracking on her faces, running them through the First Order Motion Model to simulate different emotions. She went on to join her facial movements with her character using After Effects.

Bringing the results together, she animated a 3D camera blur using the depth map videos to create a less disorienting result by providing anchor points for the viewers and creating a displacement map to heighten the sense of depth and movement within the scenes. In After Effects, she also overlaid dust and film grain effects to give the final result a crisper look. The result is a surprisingly cinematic film entirely made of images and videos generated from machine learning models. With the help of the depth adjustments, it almost looks like something that you might see in a nightmare.

Check out the result below:

Continue reading “Creating Surreal Short Films From Machine Learning”

WiFi Goes Open

For most people, adding WiFi to a project means grabbing something like an ESP8266 or an ESP32. But if you are developing your own design on an FPGA, that means adding another package. If you are targeting Linux, the OpenWifi project has a good start at providing WiFi in Verilog. There are examples for many development boards and advice for porting to your own target on GitHub. You can also see one of the developers, [Xianjun Jiao], demonstrate the whole thing in the video below.

The demo uses a Xilinx Zynq, so the Linux backend runs on the Arm processor that is on the same chip as the FPGA doing the software-defined radio. We’ll warn you that this project is not for the faint of heart. If you want to understand the code, you’ll have to dig into a lot of WiFi trivia.

Continue reading “WiFi Goes Open”

Build Your Own Grid Tie Inverter

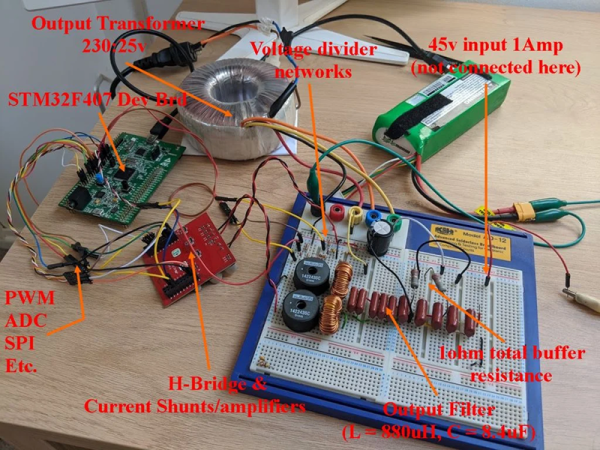
Inverters that convert DC into AC are pretty commonplace, some cars even have standard AC receptacles in them for you to plug in your favorite appliance. However, there’s a particular type of inverter called a grid tie inverter that allows you not only to make AC, but also inject it back through an AC outlet to power other devices in conjunction with the normal AC service. Why? Maybe you want to use your own generator or solar power. In some cases, the power company will pay you if you produce more power than you consume. Maybe you just want to know you can do it. That seems to be the motivation behind [fotherby’s] build, which is quite substantial.

The setup only handles about 60 watts, but it does all the functions you need: DC to AC conversion as well as phase and voltage matching. Actually, just converting DC to AC is almost trivial if you don’t care about the waveform. But in this case, you do care that you can create an AC signal to match the one already on the line.

Continue reading “Build Your Own Grid Tie Inverter”

Cheap Speakers Sound Good With Easy Open Baffle Design

If you’ve spent any time around audio gear at all, you’ll know that enclosure design is as critical as the speaker drivers themselves. [Frank Olson] demonstrates this ably, with his open baffle design for some cheap off-the-shelf speakers.

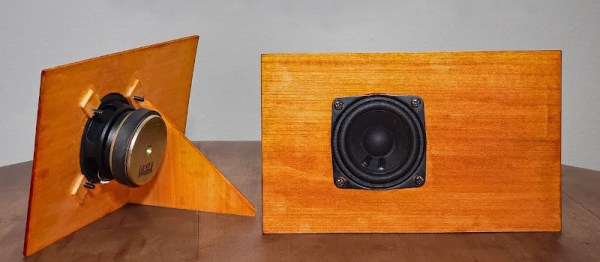
[Frank]’s aim was to do a comparison between using no enclosure, and an open baffle design, with a pair of 2″ full-range speakers. These drivers are nothing special; just a low-cost part that you’d find in any cheap set of computer speakers. [Frank] screws the drivers into a thin, flat wooden board, and then adds a supporting strut to allow the speakers to stand on their own.

The comparison makes it clear that even this basic baffle design makes a big difference to perceived sound quality. Bass is fuller, and the sound is far improved thanks to the baffle blocking out of phase sounds from the rear of the speaker.

It’s a technique that could prove useful to anyone quickly trying to rig up an audio setup for the workshop or makerspace out of leftover parts. We’ve featured similar projects before that espouse the benefit of enclosure design when using even very affordable speakers. Video after the break.

Continue reading “Cheap Speakers Sound Good With Easy Open Baffle Design”

Tarot Machine Flips Through Fate’s Rolodex

Were tarot card readers deemed non-essential in your part of the world (and do you think they saw it coming?) More than ever, we all need diversions that are for entertainment purposes only. And what better basis for entertainment than a mystical fortune-telling robot that can read your tarot cards?

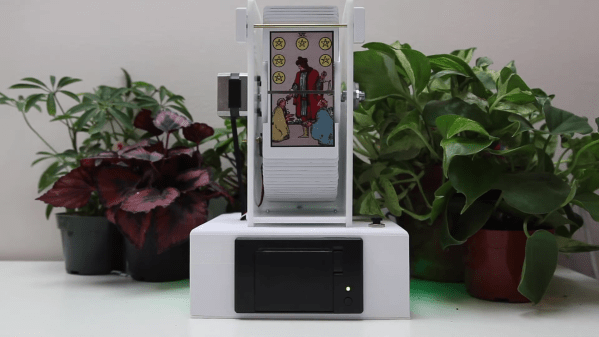
This fantastic-looking ‘bot stands on the shoulders of [Scott Bezak]’s trailblazing method for easy DIY split-flap displays. Push the rather inviting-looking button on the top, and the flaps start flipping around to find your fortune. Once the fates have aligned, a thermal printer on the front spits out an image of your card along with an interpretation.

It’s obvious that [i_mozy] put quite a lot of effort into this slick machine, and we think the stickers look especially great. All the details of physical tarot card readings are accounted for, including a random number to decide the card’s position, and LEDs to represent the card’s element. Suspend your disbelief and check out the demo/promo video after the break.

Split-flap displays are a great choice no matter what you want to show. We’ve seen them used to display everything from the weather to the current Spotify track.

Continue reading “Tarot Machine Flips Through Fate’s Rolodex”