Conduit, Birdhouse, And Skateboard Become Giant Pen Plotter

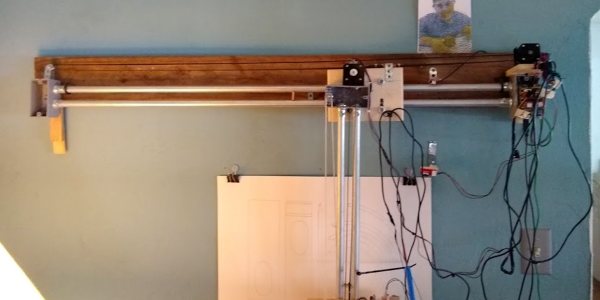
If you think you need fancy parts to build a giant robot drawing machine, think again! [Cory Collins] shows you how he built his Big-Ass Wall Plotter v.2 out of stuff around the house or the hardware store, including electrical conduit, gang boxes, scrap wood, and skateboard bearings, alongside the necessary stepper motors, drivers, and timing belt. (You should consider having this trio of parts on hand as well, in our opinion.) With a span of 48″ (1.2 m) on a side, you probably don’t have paper that’s this big.
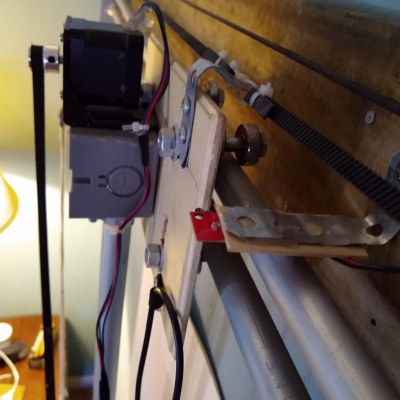
And while the construction is definitely rough-and-ready, there are a ton of details that turn this pile of parts into a beautifully working machine in short order. For instance, making the rails out of electrical conduit has a few advantages. Of course it’s cheap and strong, but the availability of off-the-shelf flanges makes assembly and disassembly easy. It also hangs neatly on the wall courtesy of some rubber cuphooks.

Note also the use of zip-tie belt tensioners: a simple and effective solution that we heartily endorse. [Corey] makes good use of custom 3D printed parts where they matter, like the compliant pen holder and linear mechanism for the z-axis, but most of the mechanical accuracy is courtesy of wooden shims and metal strapping.

[Corey] uses the machine to make patterns for his paper sculptures that are worth a look in their own right, and you can see the machine in action, sped up significantly, in the video below. This is the perfect project if you have a DIY eggbot that’s out of commission post-Easter: it reuses all the same parts, just on a vastly different scale. Heck, [Corey] even uses the same Inkscape Gcodetools extension as we did in that project. Now you know what we’re up to this weekend.

Can’t get enough pen plotters? Check out this one that lets you write whatever you want!

Continue reading “Conduit, Birdhouse, And Skateboard Become Giant Pen Plotter”

Resistors Sorter Measures Values

We’ve all been there. A big bag of resistors all mixed up. Maybe you bought them cheap. Maybe your neatly organized drawers spilled. Of course, you can excruciatingly read the color codes one by one. Or use a meter. But either way, it is a tedious job. [Ishann’s] solution was to build an automatic sorter that directly measures the value using a voltage divider, rather than rely on machine vision as is often the case in these projects. That means it could be modified to do matching for precise circuits (e.g., sort out resistors all marked 1K that are more than a half-percent away from one nominal value).

There is a funnel that admits one resistor at a time into a test area where it is measured. A plate at the bottom rotates depending on the measured value. In the current implementation, the resistor either falls to the left or the right. It wouldn’t be hard to make a rotating tray with compartments for different values of resistance. It looks like you have to feed the machine one resistor at a time, and automating that sounds like a trick considering how jumbled loose axial components can be. Still, its a fun project that you probably have all the parts to make.

An Arduino powers the thing. An LCD screen and display control the action. If you want some practice handling material robotically, this is a great use of servos and gravity and it does serve a practical purpose.

We have seen many variations on this, including ones that read the color code. If you ever wanted to know where the color code for resistors came from, we took a trip to the past to find out earlier this year.

Continue reading “Resistors Sorter Measures Values”

An Arduino As A PLL

At the heart of many amateur radio and other projects lies the VFO, or Variable Frequency Oscillator. Decades ago this would have been a free-running LC tuned circuit, then as technology advanced it was replaced by a digital phase-locked-loop frequency synthesiser and most recently a DDS, or Direct Digital Synthesis chip in which the waveform is produced directly by a DAC. The phase-locked loop (PLL) remains a popular choice due to ICs such as the Si5351 but is rarely constructed from individual chips as it once might have been. [fvfilippetti] has revisited this classic circuit by replacing some of its complexity with an Arduino (Spanish language, Google Translate link).

The internals of a PLL frequency synthesiser
The internals of a PLL frequency synthesiser. Image by Chetvorno – CC0

A PLL is a simple circuit in which one oscillator is locked to another by controlling it with a voltage derived from comparing the phase of the two. Combining a PLL with a set of frequency dividers creates a frequency synthesiser, in which a variable frequency oscillator can be locked to a single frequency crystal with the output frequency set by the division ratios. The classic PLL chip is the CMOS 4046 which would have been combined with a pile of logic chips to make a frequency synthesiser. The Arduino version uses the Arduino’s internal peripherals to take the place of crystal oscillator, dividers, and phase comparator, resulting in an extremely simple physical circuit of little more than an Arduino and a VCO for the 40 metre amateur band. The code can be found on GitLab, should you wish to try for yourself.

It would be interesting to see how good this synthesiser is at maintaining both a steady frequency and minimal phase noise. It’s tempting to think of such things as frequency synthesisers as a done deal, so it’s always welcome to see somebody bringing something new to them. Meanwhile if PLLs are new to you, we have just the introduction for you.

Rocking Out On A Limb With LE STRUM

It’s hard to imagine 80s Synth-pop without the keytar, and yet this majestic Centaur of a musical instrument rarely gets much love, and their players are often the target of ridicule. It almost seems as if being hung around the neck should be a privilege solely reserved for stringed instruments. Well, [midierror] has at least that part somewhat right then, with the Full On MIDI Leg that is guaranteed to make every keytarist look like a prestigious cellist in comparison.

What looks like the 1987 movie Mannequin taking a dark, Mengelesque turn, is as awesome as it is bizarre, thanks to building the concept of the LE STRUM into, well, a leg. LE STRUM itself is an open source MIDI instrument built by [Jason Hotchkiss], who describes it as “a cross between a Stylophone and an Omnichord”. It consists of a set of buttons to select different combinations of chords, that can than be strummed by scratching an attached stylus over an array of contact pads. However, [midierror], who also distributes a pre-assembled version of the LE STRUM, uses strings instead of contact pads, and a pick for the actual strumming, turning this into a close-enough string instrument.

The only thing missing now is a functioning knee joint, and maybe some inspiration from this MIDI-controlled concertina, and we’d be ready to revolutionize the accordion world with the, uhm, kneetar? And since it’s built around a PIC16, this thigh-slapper won’t even cost you an ARM, just the leg — but enough already with these toe-curling puns.

Continue reading “Rocking Out On A Limb With LE STRUM”

Adding MIDI To An Old Casio Keyboard

Not content to rule the world of digital watches, Casio also dominated the home musical keyboard market in decades past. If you wanted an instrument to make noises that sounded approximately nothing like what they were supposed to be, you couldn’t go past a Casio. [Marwan] had just such a keyboard, and wanted to use it with their PC, but the low-end instrumented lacked MIDI. Of course, such functionality is but a simple hack away.

The hack involved opening up the instrument and wiring the original keyboard matrix to the digital inputs of an Arduino Uno. The keys are read as a simple multiplexed array, and with a little work, [Marwan] had the scheme figured out. With the Arduino now capable of detecting keypresses, [Marwan] whipped up some code to turn this into relevant MIDI data. Then, it was simply a case of reprogramming the Arduino Uno’s ATMega 16U2 USB interface chip to act as a USB-MIDI device, and the hack was complete.

Now, featuring a USB-MIDI interface, it’s easy to use the keyboard to play virtual instruments on any modern PC DAW. As it’s a popular standard, it should work with most tablets and smartphones too, if you’re that way inclined. Of course, if you’re more into modular synthesizers, you might want to think about working with CV instead!

Start Your Engines!

Here we go again: The 2020 Hackaday Prize has just been announced! And as usual, we want to see you all using your powers for good, to help make the world a better place. The twist this year is that four nonprofits have been selected, and your job is to help them with their goals: developing solutions to aid ocean conservation, creating or redesigning open-source assistive tools for people with cerebral palsy, designing modular housing for communities in need, and engineering open-source medical and technical tools that can be easily built in the field.

How often have you wanted to help, but been held back by lacking the background knowledge of which problems to tackle, or where to start? That’s the point of teaming up with non-profits that already have a very tangible need right now.

Oh, and did we mention the prize money? Not only can you do good, but you’ll also do well! The Best All Around Solution gets $50,000, there are four $10,000 prizes, one for each non-profit, $3,000 honorable mentions, a $5,000 wildcard, twenty $500community-chosen prizes, and then the twelve two-month Dream Team grants.

Pshwew! There’s something for everyone, and that’s made possible by our sponsors:Supplyframe, Digi-Key, Microchip, and ARM.

We’ve got four good ways for you to do good. Get out there and get hacking!

This article is part of the Hackaday.com newsletter, delivered every seven days for each of the last 200+ weeks. It also includes our favorite articles from the last seven days that you can see on the web version of the newsletter.

Want this type of article to hit your inbox every Friday morning? You should sign up!

A 4-bit Random Number Generator

Randomness is a pursuit in a similar vein to metrology or time and frequency, in that inordinate quantities of effort can be expended in pursuit of its purest form. The Holy Grail is a source of completely unpredictable randomness, and the search for entropy so pure has taken experimenters into the sampling of lava lamps, noise sources, unpredictable timings of user actions in computer systems, and even into sampling radioactive decay. It’s a field that need not be expensive or difficult to work in, as [Henk Mulder] shows us with his 4-bit analogue random number generator.

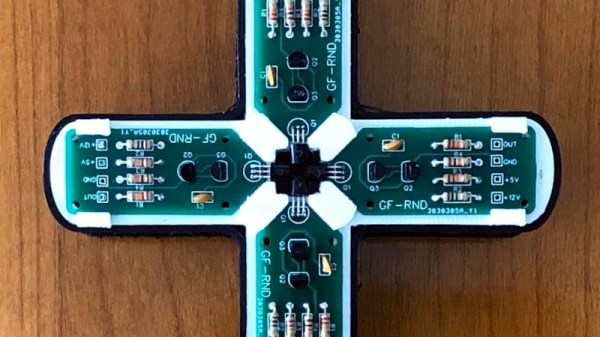
One of the simplest circuits for generating random analogue noise involves a reverse biased diode in either Zener or avalanche breakdown, and it is a variation on this that he’s using. A reverse biased emitter junction of a transistor produces noise which is amplified by another transistor and then converted to a digital on-off stream of ones and zeroes by a third. Instead of a shift register to create his four bits he’s using four identical circuits, with no clock their outputs randomly change state at will.

A large part of his post is an examination of randomness and what makes a random source. He finds this source to be flawed because it has a bias towards logic one in its output, but we wonder whether the culprit might be the two-transistor circuit and its biasing rather than the noise itself. It also produces a sampling frequency of about 100 kbps, which is a little slow when sampling with he Teensy he’s using.

An understanding of random number generation is both a fascinating and important skill to have. We’ve featured so many RNGs over the years, here’s one powered by memes, and another by a fish tank.