A particularly nasty 0-day was discovered in the wild, CVE-2021-40444, a flaw in how Microsoft’s MSHTML engine handled Office documents. Not all of the details are clear yet, but the result is that opening a office document can trigger a remote code execution. It gets worse, though, because the exploit can work when simply previewing a file in Explorer, making this a potential 0-click exploit. So far the attack has been used against specific targets, but a POC has been published.
It appears that there are multiple tricks that should be discrete CVEs behind the exploit. First, a simple invocation of mshtml:http in an Office document triggers the download and processing of that URL via the Trident engine, AKA our old friend IE. The real juicy problem is that in Trident, an iframe can be constructed with a .cpl URI pointing at an inf or dll file, and that gets executed without any prompt. This is demonstrated here by [Will Dormann]. A patch was included with this month’s roundup of fixes for Patch Tuesday, so make sure to update. Continue reading “This Week In Security: Office 0-day, ForcedEntry, ProtonMail, And OMIGOD”→
The dramatic price reductions we’ve seen on resin 3D printers over the last couple of years have been very exciting, as it means more people are finally getting access to this impressive technology. But what newcomers might not realize is that the cost of the printer itself is only part of your initial investment. Resin printed parts need to be washed and cured before they’re ready to be put into service, and unless you want to do it all by hand, that means buying a second machine to do the post-printing treatment.
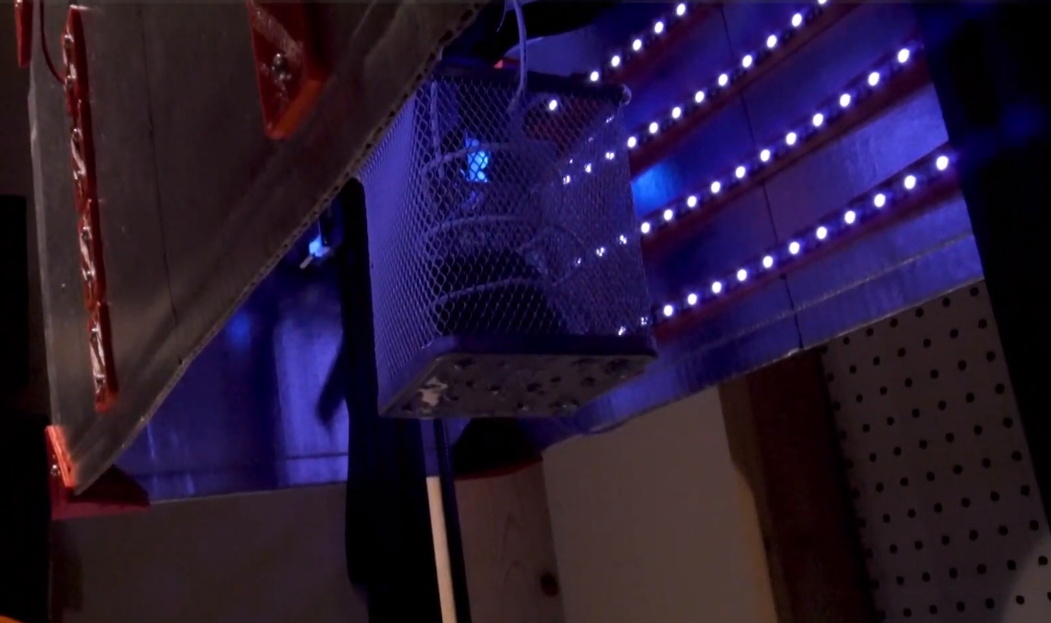
Not sure he wanted to spend the money on a dedicated machine just yet, [Chris Chimienti] decided to take an unusual approach and modify one of his filament-based 3D printers to handle wash and cure duty. His clever enclosure slips over the considerable Z-axis of a Anet ET5X printer, and includes banks of UV LEDs and fans to circulate the air and speed up the drying process.
Looking up into the curing chamber.
The curing part is easy enough to understand, but how does it do the washing? You simply put a container of 70% isopropyl alcohol (IPA) on the printer’s bed, and place the part to be washed into a basket that hangs from the printer’s extruder. Custom Python software is used to generate G-code that commands the printer to dip the part in the alcohol and swish it back and forth to give it a good rinse.
Once the specified time has elapsed, the printer raises the part up into the enclosure and kicks on the LEDs to begin the next phase of the process. The whole system is automated through an OctoPrint plugin, and while the relatively low speed of the printer’s movement means the “washing” cycle might not be quite as energetic as we’d like, it’s definitely a very slick solution.
[Chris] provides an extensive overview of the project in the latest video on his YouTube channel, Embrace Racing. In it he explains that the concept could certainly be adapted for use on printers other than the Anet ET5X, but that it’s considerable build volume makes it an ideal candidate for conversion. Of course it’s also possible to use the foam board enclosure by itself as a curing chamber, though you’ll still need to wash the part in IPA ahead of time.
This is perhaps one of the most unusual wash and cure systems we’ve seen here at Hackaday, but we appreciate the fact that [Chris] based the whole thing on the idea that you’ve probably got a FDM printer sitting nearby that otherwise goes unused when you’re working with resin. If that’s not the case for you, putting together a more traditional UV curing chamber is an easy enough project.
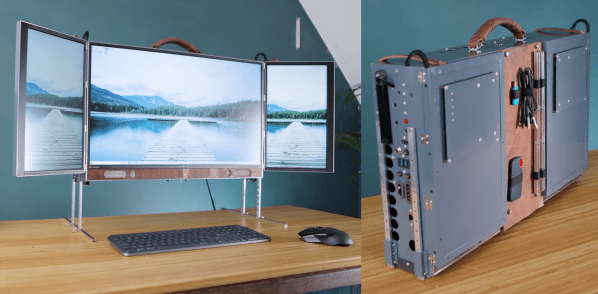
[Matt] from [DIY Perks] has made a name for himself building nice custom computing machines, and his latest triple-monitor luggable PC (video after the break) is sure to give most high-performance desktop machines a run for their money.
The large central monitor folding laptop monitors mounted vertically on either size look impressive, but only just scratches the surface of this build. Hidden behind aluminum panels are Ryzen 5950X CPU and RTX 3080 GPU with water cooling, 64 GB of RAM, and two 8 TB SSDs. A set of high-quality speaker drivers, subwoofer, and audio amps is also included. All this hardware pulls about 600 W of power from a large DC-DC converter block, which in turn receives power from either a pair of onboard AC-DC converters or a 16 V – 63 V DC source, like a battery system.
To mount everything to the back of the main monitor, [Matt] created 3D printed adaptor blocks with threaded inserts which slide under existing hooks on the back of the monitor. Aluminum angles screw to these blocks to cover the edges of the display panel, together with a large mounting plate with pre-drilled holes to mount all the components on standoffs. A set of adjustable and removable legs mount to the side of the PC. A hinged door in the back cover allows storage space for a keyboard and mouse during transport. When folded, the laptop monitors don’t fully cover the main monitor, so [Matt] created a leather cover that doubles as a cable and accessory organizer.
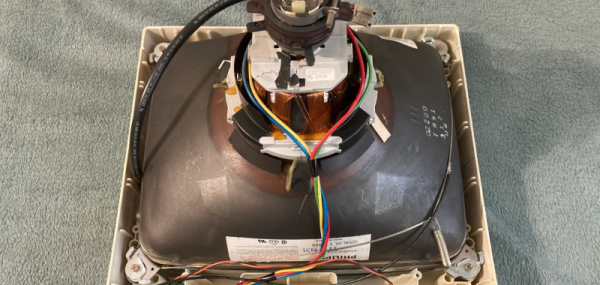
Nothing quite says vintage computer like a dedicated glass terminal. We enjoyed [Adam]’s restoration of an Acorn CRT monitor. The 14 inch display had a common problem: a defective power switch. Replacing a switch shouldn’t be a big deal, of course, but these old CRT monitors have exciting voltages inside and require special care.
One common issue, for example, is the fact that the old CRTs are really large capacitors and can hold a dangerous charge for some time. The easiest way to handle the potential problem is to make sure the device is unplugged, ground a screwdriver blade, and push the blade under the second anode cap. Most of the time, nothing happens. Once in a while, though, you’ll hear a loud pop and you just saved yourself a nasty shock.
Even though the actual repair was pretty mundane, the teardown was a great nostalgia trip and while we don’t want to give up our LCD, we do like the old glass. CRTs have a long history and came a long way before their last gasps. They even took a turn as mass storage devices.
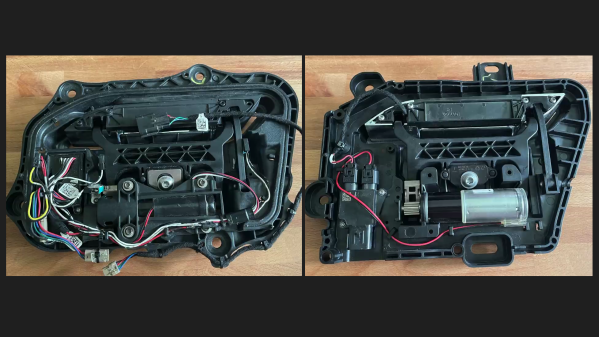
Automotive engineer and former Tesla employee [SuperfastMatt] takes at look at the notorious Tesla door handle design and how it’s changed over the years (see the video below the break). The original handle design consisted of many moving parts, switches and wires which were prone to failure. Strictly speaking, the door handle is located on the outside of the car’s interior. While it’s sheltered from direct exposure to the elements, it still experiences the extremes of temperature, humidity, and condensation. The handles were so prone to failure that a cottage industry sprang up to provide improved parts and replacements.
Tesla made various improvements over the years, culminating in the latest version which [Matt] reviews in this video. Nearly all the failure points have been eliminated, and the only moving parts, other than the handle itself, is a magnetic sensor to detect handle motion (previously this was sensed by microswitches). [Matt] indelicately opens up the control module, and discovers an NXP programmable angle sensor ( KMA215 ). This all-in-one sensor detects the angle of a magnetic field, and reports it over an automotive communications bus that’s become more and more common over the last ten years: Single Edge Nibble Transmission (SENT) aka SAE J2716. SENT is a low-cost, transmit-only protocol designed for sensors to send data to the ECU. Check out [Matt] decoding it on the oscilloscope and Raspberry Pi in the video — it looks pretty simple at first glance.
We agree with [Matt]’s conclusion that the door handle design has been significantly improved with this latest iteration, questions of whether one needs a retracting door handle aside. If you’d like to learn more about SENT, here is a tutorial written by IDT (now Renasas) applications engineer Tim White. This isn’t [Matt]’s first encounter with a Tesla door handle — back in 2012 we covered his project which used one to dispense beer. Thanks to [JohnU] for sending in this tip.
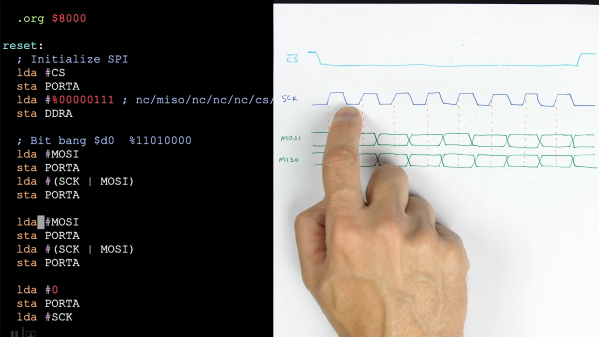
With the prevalence of libraries, it has never been easier to communicate with hundreds of different sensors, displays, and submodules. But what is really happening when you type SPI.begin() into the Arduino IDE? In his most recent video, [Ben Eater] explores the Serial Peripheral Interface (SPI) and how it really works.
Most Hackaday readers probably know [Ben] from his breadboard-based computers, such as the 6502 build we featured in 2019. Since then he has been hard at work, adding new and interesting additions to his breadboard computer, as well as diving into different communication protocols to better understand and implement them. For this video, [Ben] set the goal of connecting the BME280, a common pressure, temperature, and humidity sensor with an SPI interface, to his breadboard 6502 computer. Along the way, [Ben] discusses how exactly SPI works, and why there is so much conflicting nomenclature and operations when looking at different SPI devices.
It is with sadness that we note the passing of the British writer, engineer, home computer pioneer, and entrepreneur, Sir Clive Sinclair, who died this morning at the age of 81 after a long illness. He is perhaps best known among Hackaday readers for his ZX series of home computers from the 1980s, but over a lifetime in the technology industry there are few corners of consumer electronics that he did not touch in some way.
Sinclair’s first career in the 1950s was as a technical journalist and writer, before founding the electronics company Sinclair Radionics in the 1960s. His output in those early years was a mixture of miniature transistor radios and Hi-Fi components, setting the tone for decades of further tiny devices including an early LED digital watch at the beginning of the 1970s, miniature CRT TVs in the ’70s and ’80s, and another tiny in-ear FM radio which went on sale in the ’90s.