High temperature 3D printer

Extreme Thermal Mods For 3D Printing Exotic Materials

For general everyday use, there’s nothing wrong with the standard selection of plastics that most 3D printer filaments are available in. PLA, ABS, PETG — they’ve all got their place, and they’re all pretty easy to work with. But if you need to work with more exotic materials, you might need to go to extremes and modify an off-the-shelf printer for high-temperature work.

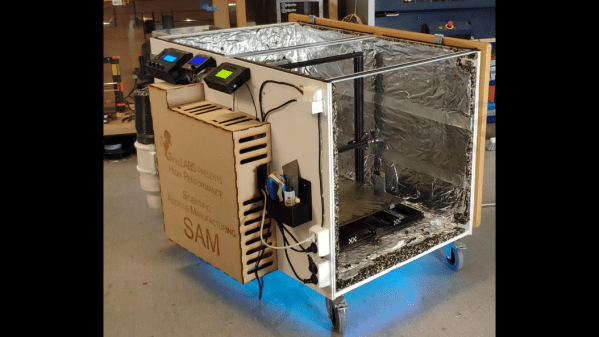
For the team led by [Andreas Hagerup Birkelid] at the Norwegian University of Science and Technology, the standard menu of printer chow wasn’t up to the jobs they had in mind. They wanted to print using polyether ether ketone, or PEEK, a high-performance thermoplastic with useful mechanical and thermal properties, in addition to chemical resistance. Trouble is, the melting point of PEEK is a whopping 343°C (649°F), making it necessary to turn up the heat — a lot. A standard Creality CR-10 printer was upgraded to withstand not only the 500°C max temperature of the new hot end and 200° printed bed, but also to survive operating in what amounts to an oven — a balmy 135° in a chamber made from IKEA cabinets. That entailed replacing plastic parts with metal ones, upgrading belts, pulleys, and wires, and moving all the electronics outside the enclosure. Even the steppers got special treatment, with water cooling to keep their magnets from reaching the Curie point.

The mods seemed to do the trick, because a Benchy printed in a carbon-fiber PEEK filament came out pretty good. It seems like a long way to go and kind of pricey — $1,700 for the printer and all the mods — but if you have a need to print exotic materials, it’s way cheaper than a commercial high-temp printer.

[via 3D Printing Industry]

Drilling A Well With A Well Drill

Drill Does Well In Double Duty As Well Drilling Drill

There are a large number of methods commercially used to bore a hole into the ground for the sake of extracting drinking water, and the all require big loud equipment. But what if you just want a small well? Do you really have to call in the big guns? [The Working Group on Development Techniques] is a student association at the University of Twente in the Netherlands who shows in the video below the break that some simple homemade fixtures and a powerful hand drill are quite enough to do the job!

There's more to drilling a drill than drilling with a drill
There’s more to drilling a well than just drilling well

Chief among these fixtures is a swiveling mechanism that serves to hold the drill and its weight, give control over the drill, and inject water into the pipe that the drill bit is attached to. Plans for the swivel are made available on [WOT]’s website. What looks to be a DIY drill bit uses commercially available diamond tips for hardness.

What makes the video remarkable is that it discusses every stage of drilling the bore hole, lining it with casing, and then making it suitable for pumping water from. The video also discusses the chemicals and methods involved in successfully drilling the hole, and gives an overview of the process that also applies to commercially drilled wells.

Naturally you’ll want to make sure your drill is corded so that you can drill for long periods, but also so that it doesn’t grow wings and fly away!

Continue reading “Drill Does Well In Double Duty As Well Drilling Drill”

Longer Range EVs Are On The Horizon

When electric cars first started hitting the mainstream just over a decade ago, most criticism focused on the limited range available and the long recharge times required. Since then, automakers have been chipping away, improving efficiency here and adding capacity there, slowly pushing the numbers up year after year.

Models are now on the market offering in excess of 400 miles between charges, but lurking on the horizon are cars with ever-greater range. The technology stands at a tipping point where a electric car will easily be able to go further on a charge than the average driver can reasonably drive in a day. Let’s explore what’s just around the corner.

Continue reading “Longer Range EVs Are On The Horizon”

Dirty faders.

Giving Vintage Synths New Life In A Potentiometer Cleaning Showdown

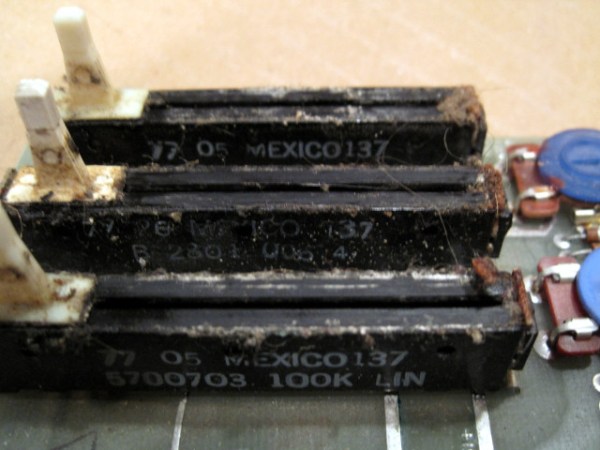
As anyone who has ever owned a piece of older equipment that has a potentiometer in it can attest to, these mechanical components do need their regular cleaning ritual. Whether it’s volume knobs on a receiver or faders on a mixer, over time they get crackly, scratchy and generally imprecise due to the oxidation and gunk that tends to gather inside them.

This is your potentiometer caked with gunk.

In this blast from the past, [Keith Murray] shows a few ways in which fader-style potentiometers can be cleaned, and how well each cleaning method works by testing the smoothness of the transition over time with an oscilloscope. It’s enlightening to see just how terrible the performance of a grimed-up fader is, and how little a blast of compressed air helped. Contact cleaner works much better, but it’s essential to get all of the loosened bits of gunk out of the fader regardless.

In the end, a soak in isopropyl alcohol (IPA), as well as a full disassembly followed by manual cleaning were the only ones to get the fader performance back to that of a new one. Using contact cleaner followed by blasting the fader out with compressed air seems to be an acceptable trade-off to avoid disassembly, however.

What is your preferred way to clean potentiometers to keep that vintage (audio) gear in peak condition? Let us know in the comments below.

Thanks, [Grant Freese], for the tip!

Identifying Malware By Sniffing Its EM Signature

The phrase “extraordinary claims require extraordinary evidence” is most often attributed to Carl Sagan, specifically from his television series Cosmos. Sagan was probably not the first person to put forward such a hypothesis, and the show certainly didn’t claim he was. But that’s the power of TV for you; the term has since come to be known as the “Sagan Standard” and is a handy aphorism that nicely encapsulates the importance of skepticism and critical thinking when dealing with unproven theories.

It also happens to be the first phrase that came to mind when we heard about Obfuscation Revealed: Leveraging Electromagnetic Signals for Obfuscated Malware Classification, a paper presented during the 2021 Annual Computer Security Applications Conference (ACSAC). As described in the mainstream press, the paper detailed a method by which researchers were able to detect viruses and malware running on an Internet of Things (IoT) device simply by listening to the electromagnetic waves being emanated from it. One needed only to pass a probe over a troubled gadget, and the technique could identify what ailed it with near 100% accuracy.

Those certainly sound like extraordinary claims to us. But what about the evidence? Well, it turns out that digging a bit deeper into the story uncovered plenty of it. Not only has the paper been made available for free thanks to the sponsors of the ACSAC, but the team behind it has released all of code and documentation necessary to recreate their findings on GitHub.

Unfortunately we seem to have temporarily misplaced the $10,000 1 GHz Picoscope 6407 USB oscilloscope that their software is written to support, so we’re unable to recreate the experiment in full. If you happen to come across it, please drop us a line. But in the meantime we can still walk through the process and try to separate fact from fiction in classic Sagan style.

Continue reading “Identifying Malware By Sniffing Its EM Signature”

Arduino Meets Quantum Computer

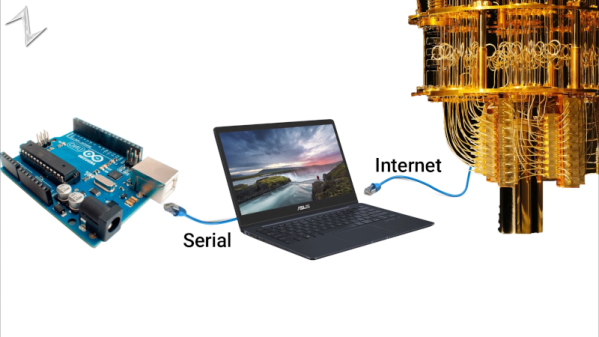
Quantum computers aren’t quite ready for the home lab, but since there are ways to connect to some over the Internet, you can experiment with them more easily than you might think. [Norbert] decided to interface a giant quantum computer to an ordinary Arduino. Why? Well, that isn’t necessarily clear, but then again, why not? He explains basic quantum computing and shows his setup in the video below.

Using the IBM quantum computer and the open source Qiskit makes it relatively easy, with the Python code he’s using on the PC acting as a link between the Arduino and the IBM computer. Of course, you can also use simulation instead of using the real hardware, and for such a simple project it probably doesn’t matter.

Granted, the demo is pretty trivial, lighting an LED with the state of qubit. But the technique might be useful if you wanted to, say, gather information from the real world into a quantum computer. You have to start somewhere.

We’ve looked at quantum computers before. They tell us it is the next big thing, so we want to be prepared. Qiskit is one of several options available today to make it easier.

Continue reading “Arduino Meets Quantum Computer”

Adding WiFi Remote Control To Home Electronics? Be Prepared To Troubleshoot

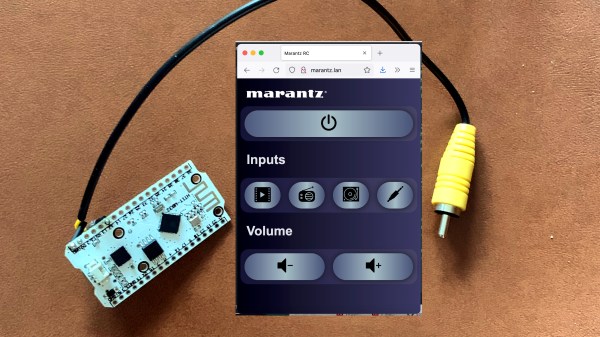
[Alex] recently gave a Marantz audio amplifier the ability to be remotely-controlled via WiFi by interfacing an ESP32 board to a handy port, but the process highlights how interfacing to existing hardware often runs into little, unforeseeable problems that can sink the project unless solved.

At its core, the project uses an ESP32 and the ESPAsyncWebServer project to create a handy web interface that is accessible over WiFi. Then, to actually control the amplifier, [Alex] decoded the IR-based remote signals by watching the unit’s REMOTE ports, which are intended as a pass-through and repeater for IR signals to other Marantz units. This functionality can be exploited; by sending the right signals to the REMOTE IN port, the unit can be controlled by the ESP32. With the ESP32 itself accessible by just about any WiFi device, [Alex] gains the freedom to control his amplifier with much greater flexibility than just the IR remote would offer.

Sounds fairly straightforward, but as usual when interfacing to an existing piece of electronics, there were a few glitches. The first was that high and inconsistent latency (from 10 ms to 100 ms) made controlling the amplifier a sometimes frustrating experience, but that was solved by disabling power saving on the WiFi interface. Another issue was that sending signals by connecting a GPIO pin to the REMOTE IN port of the amplifier worked, but had the side effect of causing the amplifier to no longer listen to the IR remote. Apparently, current flowing from the REMOTE port to the ESP32’s GPIO pin was to blame, because adding a diode in between fixed the problem.

The GitHub repository holds the design files and code. This kind of project can be pretty complex, because the existing hardware doesn’t always play nice, and useful boards like a modern ESP32 aren’t always available. Adding a wireless interface to vintage audio equipment has in the past involved etching circuit boards and considerably more parts.