90s PC With Modern Parts Throws Many Off Track

When building a desktop computer, usually the budget is the limiting factor. Making sacrifices on one part in order to improve another without breaking the bank is part of the delicate balance of putting together a capable PC. If you’re lucky enough to have the sponsors that [Shank] has though, caution can be thrown to the wind with regards to price for some blisteringly fast parts. Putting them in a ’90s Hot Wheels case to build the ultimate sleeper PC, though, is just icing on the top.

This isn’t quite as simple as replacing a motherboard in a modern PC case, though. The Hot Wheels PC used a mini-ITX standard and is quite a bit smaller than most modern computers outside of something like a Mac Mini. To get the RTX 3060 GPU into the computer the shrouds needed to be removed to save space, plus an unusual 92mm form factor liquid CPU cooler needed to be installed. An equally obscure power supply was included to round out the Ryzen 9 build and after a lot of tinkering eventually all the parts were fitted into this retro case including the original, working floppy disk drive. After that some additional case modding was installed such as RGB lighting, wheels with spinning rims, a spoiler, and an exhaust pipe.

The main issue with this build was temperatures, and both the CPU and GPU were topping out at dangerously high temperatures until [Shank] installed a terrifying 11,000 RPM case fan. With a series of original CRT monitors to go along with this sleeper PC he can have up to 9 displays with surprisingly high video quality thanks to the fundamental properties of CRTs. The video is definitely worth a watch and falls right in line with some of [Shank]’s other console mods that he is famous for such as this handheld Virtual Boy.

Thanks to [Fast Rock Productions] for the tip!

Continue reading “90s PC With Modern Parts Throws Many Off Track”

the Caps Wiki logo, showing a few bulging capacitors, with "Caps Wiki" text under it

Caps Wiki: Place For You To Share Your Repair Notes

A right-to-repair battle is being waged in courts. The results of it, we might not see for a decade. The Caps Wiki is a project tackling our repairability problem from the opposite end – making it easy to share information with anyone who wants to repair something. Started by [Shelby], it’s heavily inspired by his vintage tech repairs experience that he’s been sharing for years on the [Tech Tangents] YouTube channel.

When repairing a device, there are many unknowns. How to disassemble it? What are the safety precautions? Which replacement parts should you get? A sporadic assortment of YouTube videos, iFixit pages and forum posts might help you here, but you have to dig them up and, often, meticulously look for the specific information that you’re missing.

The Caps Wiki talks a lot about capacitor replacement repairs – but not just that. Any device, even modern ones, deserves a place on the Caps Wiki, only named like this because capacitor repairs are such a staple of vintage device repair. You could make a few notes about something you’re fixing, and have them serve as help and guideline for newcomers. With time, this won’t just become a valuable resource for quick repairs and old tech revival, but also a treasure trove of datapoints, letting us do research like “which capacitors brands or models tend to pass away prematurely”. Plus, it also talks about topics like mains-powered device repair safety or capacitor nuances!

Continue reading “Caps Wiki: Place For You To Share Your Repair Notes”

A Gameport Joystick To USB-MIDI Converter

These days, live music performance often involves electronic synthesizers and computers rather than traditional instruments played by hand. To aid in his own performances, [alekappa] built a special interface to take signals from a joystick and convert them to MIDI messages carried over USB.

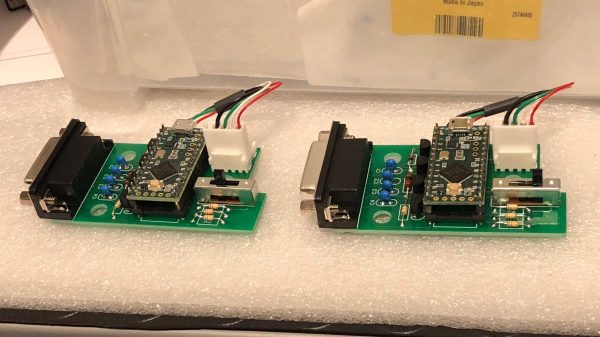
The build is simple and straightforward, using a Teensy LC to interface with a simple gameport joystick. With a smattering of simple components, it’s easy to read the outputs of the joystick with only a little debounce code needed to ensure the joystick’s buttons are read accurately. Similarly, analog axes are read using the analog-to-digital converters onboard the microcontroller.

This data is then converted into control changes, note triggers and velocity levels and sent out over the Teensy LC’s USB interface. A mode switch enables changes to the system’s behaviour to be quickly made. The device is wrapped up in a convenient housing nabbed from an old Gameport-to-USB converter from many years ago.

It’s a neat project and we’re sure the joystick allows [alekappa] to add a new dimension to his performances on stage. We’ve seen other great MIDI controllers, too, from the knitted keyboard to the impressive Harmonicade. If you’ve got your own mad musical build under construction, don’t hesitate to drop us a line!

Prototype Robot For Omniwheel Bicycle

For all its ability to advance modern society in basically every appreciable way, science still has yet to explain some seemingly basic concepts. One thing that still has a few holes in our understanding is the method by which a bicycle works. Surely, we know enough to build functional bicycles, but like gravity’s inclusion into the standard model we have yet to figure out a set of equations that govern all bicycles in the universe. To push our understanding of bicycles further, however, some are performing experiments like this self-balancing omniwheel bicycle robot.

Functional steering is important to get the bicycle going in the right direction, but it’s also critical for keeping the bike upright. This is where [James Bruton] is putting the omniwheel to the test. By placing it at the front of the bike, oriented perpendicularly to the direction of travel, he can both steer the bicycle robot and keep it balanced. This does take the computational efforts of an Arduino Mega paired with an inertial measurement unit but at the end [James] has a functional bicycle robot that he can use to experiment with the effects of different steering methods on bicycles.

While he doesn’t have a working omniwheel bicycle for a human yet, we at least hope that the build is an important step on the way to [James] or anyone else building a real bike with an omniwheel at the front. Hopefully this becomes a reality soon, but in the meantime we’ll have to be content with bicycles with normal wheels that can balance and drive themselves.

Continue reading “Prototype Robot For Omniwheel Bicycle”

A mailbox with a solar cell on top

IoT-Enabled Mailbox Lets You Check Your Mail Without Leaving Your House

Whether you live in an apartment downtown or in a detached house in the suburbs, if your mailbox is not built into your home you’ll have to go outside to see if anything’s there. But how do you prevent that dreadful feeling of disappointment when you find your mailbox empty? Well, we’re living in 2022, so today your mailbox is just another Thing to connect to the Internet of Things. And that’s exactly what [fhuable] did when he made a solar powered IoT mailbox.

The basic idea was to equip a mailbox with a camera and have it send over pictures of its contents. An ESP32-Cam module could do just that: with a 1600 x 1200 camera sensor, a 160 MHz CPU and an integrated WiFi adapter, [fhuable] just needed to write an Arduino sketch to have it take a picture every few hours and upload it to an FTP server.

A pile of components making up an IoT Mailbox
The components inside: a solar cell, battery, power controller, LDO and ESP32-Cam module with WiFi antenna

But since running a long cable all the way from the house was not an attractive option, the whole module had to be completely wireless. [fhuable] decided to power it using a single 18650 lithium ion cell, which gets topped up continuously thanks to a 1.5 W solar panel mounted on the roof of the mailbox. The other parts are housed in a 3D-printed enclosure that’s completely sealed to keep out moisture.

The enclosure had to be made from a material that does not degrade in direct sunlight, which is why [fhuable] decided to try ASA filament; this should be very resistant against UV rays, but proved tricky to process. It warped so much during cooling that the only way to get a solid piece out of the printer was to enclose the entire machine in a cardboard box to keep it warm inside.

The end result was worth it though: a neat little extension on the back of the mailbox that should keep sending photos of its insides for as long as the Sun keeps shining. The camera should also give a good indication as to the contents of the mailbox, allowing the user to ignore any junk mail; this is a useful improvement over previous IoT-enabled mailboxes that use proximity sensors, microswitches or optical sensors.

Continue reading “IoT-Enabled Mailbox Lets You Check Your Mail Without Leaving Your House”

Remoticon 2021 // Joey Castillo Teaches Old LCDs New Tricks

Segmented liquid crystal displays are considered quite an old and archaic display technology these days. They’re perhaps most familiar to us from their use in calculators and watches, where they still find regular application. [Joey Castillo] decided that he could get more out of these displays with a little tinkering, and rocked up to Remoticon 2021 to share his findings.

[Joey’s] talk is a great way to learn the skills needed to reverse engineer a typical segment LCD.
[Joey] got his start hacking on these displays via his Sensor Watch project –  a board swap for the venerable Casio F-91W wristwatch, with the project now available on CrowdSupply. It kits out the 33-year-old watch design with a modern, low-power ARM Cortex M0+ microcontroller running at 32 MHz that completely revolutionizes what the watch can do. Most importantly, however, it repurposes the watches original segmented monochrome LCD.

Segment LCDs are usually small monochrome devices made out of glass, that have the benefit of using very little power in their operation. They come with a fixed layout, which cannot be changed – so they’re often designed specifically for a given purpose. A calculator will have segments laid out to display numbers, often in the usual 7-segment fashion, while a watch may add dedicated segments for displaying things like “AM,” “PM,” or “ALARM.” Continue reading “Remoticon 2021 // Joey Castillo Teaches Old LCDs New Tricks”

How To Get Your Diffraction Grating 3D Prints Right The First Time

Diffraction gratings are beautiful things, bending transmitted and reflected light and splitting it into its component wavelengths to create attractive iridescent rainbow patterns. It’s the same effect you see on the bottom of a CD!

You can 3D print a functional diffraction grating, too, with the right techniques, as it turns out! The average 3D printer can’t recreate the tiny-scaled patterns of a diffraction grating directly; a typical diffraction grating may have up to 1000 lines per mm. Instead, by 3D printing onto an existing diffraction grating, the print can pick up the texture on its base layer. It’s a great way to add iridescence and shine to a print.

We’ve seen similar work before, but the guide from [All3DP] goes into greater detail on how to get the effect to work just right. Getting the bed as close to perfectly level is key here, as is the first layer height. This is because the first layer of plastic has to meld perfectly with the diffraction grating to pick up the pattern. Too high and the grooves won’t transfer to the plastic, and too low, and it’s likely you’ll just melt the grating itself. Setting the Z-offset appropriately can help here.

Choosing the right bed temperature is also important to ensure the molten plastic is able to flow into the grooves of the grating. Again, the temperature at which the diffraction grating itself can survive is important to take into account; going above 90 degrees can be risky here. The guide also shows two methods of achieving the goal: one can either use an off-the-shelf grating, or one can prepare a no-longer-wanted CD into a suitable print surface.

Naturally, removing the print must be done delicately, lest one disturb the delicate structures key to generating the iridescent effect. [All3DP] recommends using a freezer to help separate the parts from the grating surface. It also bears noting that the print won’t survive excessive handling, as the grating structures will get damaged by physical touch.

It’s a great in-depth guide on how to get diffraction grating prints right. Meanwhile, consider diving deeper into the world of 3D printed optics!