No-Laser CNC Engraver Is Something New Under The Sun

Hooking up a laser to a CNC gantry isn’t exactly an Earth-shattering innovation, but it does make for a useful tool. Even a cheap diode laser mounted to an old 3D printer can do engraving, marking, or even light-duty cutting. But what about a laser engraver without the laser? Can that be of any use?

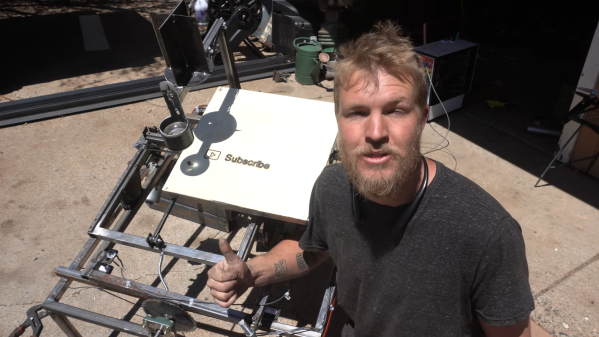
Apparently, the answer is yes, if you can harness the power of the sun. That’s what [Lucas] did with his solar-tracking CNC engraver, the build of which is shown in the video below. The idea is pretty simple — mount a decent-sized magnifying lens where the laser optics would normally go on a laser engraver, and point the thing at the sun. But as usual, the devil is in the details. The sun has a nasty habit of moving across the sky during the day, or at least appearing to, so [Lucas] has to add a couple of extra degrees of freedom to a regular X-Y CNC rig to track the sun. His tracking sensor is simplicity itself — four CdS photocells arranged with a pair of perpendicular shades, and an Arduino to drive the gimbals in the correct direction to keep all four sensors equally illuminated. He had some initial problems getting the jerkiness out of the control loop, but the tracker eventually kept the whole thing pointing right at the Sun.

So how does it work? Not bad, actually — [Lucas] managed to burn some pretty detailed designs into a piece of wood using just the sun. He mentions adding a shutter to douse the cutting beam to allow raster patterns, but even better might be a servo-controlled iris diaphragm to modulate beam intensity and control for varying sun conditions. He might also check out this solar engraver we covered previously for some more ideas, too.

Continue reading “No-Laser CNC Engraver Is Something New Under The Sun”

The State Of Play In Solid State Batteries

Electric vehicles are slowly but surely snatching market share from their combustion-engined forbearers. However, range and charging speed remain major sticking points for customers, and are a prime selling point for any modern EV. Battery technology is front and center when it comes to improving these numbers.

Solid-state batteries could mark a step-change in performance in these areas, and the race to get them to market is starting to heat up. Let’s take a look at the current state of play.

Continue reading “The State Of Play In Solid State Batteries”

NASA’s Giant SLS Rocket Rolled Back For Repairs

There’s little debate that the most exciting move in a rocket’s repertoire is when it launches itself skywards on a column of flame. But failing that, it’s still pretty interesting to see how these massive vehicles get juggled around down here on terra firma before getting fired off into the black. Which is great for anyone interested in NASA’s towering Space Launch System (SLS), as it’s been doing an awful lot of milling about on the ground for a vehicle designed to return humanity to the Moon.

Most recently, the SLS completed a trek from the iconic Vehicle Assembly Building (VAB) to launch pad 39B and back again aboard the same “crawler” that moved the Space Shuttle and Saturn V before it. While the nearly 60-year-old tracked vehicle has received some updates to carry the 98 meter (322 ft) tall booster, clearly the space agency subscribes to the “if it ain’t broke, don’t fix it” school of thought.

The ICPS being loaded onto the SLS

The SLS itself however is definitely in need of some work. The rocket was brought out to the pad for the first time on March 18th, where it was to conduct what’s known as a “wet dress rehearsal” — a test of the pre-flight operations, propellant loading, and countdown that includes everything except engine ignition. Unfortunately, the test was plagued with technical issues, and after three attempts, it was decided to bring the rocket back into the VAB to make the necessary repairs to both it and the ground support equipment.

One issue involves a valve in the Interim Cryogenic Propulsion Stage (ICPS), a propulsion module that’s being used on the early SLS flights to provide the trans-lunar injection (TLI) burn that will send the Orion spacecraft on a course towards the Moon. As the name implies, the ICPS is destined to be replaced with the larger Exploration Upper Stage on later missions. There’s also a leak on the launch tower itself that will need to be addressed. After the identified problems are repaired and some adjustments are made, the SLS will once again be rolled out to the pad to reattempt the launch rehearsal.

Now in development for over a decade, the Space Launch System has been plagued with technical issues and delays. At the same time, commercial launch providers like SpaceX have moved the state of the art forward considerably, leading many to wonder if the mind-bogglingly expensive rocket will be able to compete with in-development vehicles such as Starship and New Glenn. The fact that missions which were previously assigned to the SLS have started to get shifted over to commercial rockets would seem to indicate that even NASA is losing confidence in their flagship program.

Building Reaction Wheels With Python And LEGO

Reaction wheels are useful things, typically used by satellites to keep themselves oriented the right way up in space. Turning the reaction wheel creates an equal and opposite torque in the spacecraft, allowing it to point and rotate itself accurately. The same technique also works here on Earth, and [Brick Experiment Channel] decided to build one out of LEGO to control an inverted pendulum.

The initial design using a small LEGO wheel on an inverted pendulum was only able to work reliably over a 4-degree angle from the vertical. Upgrading the wheel to a larger, heavier one enabled the wheel to instead work over a 28-degree range instead.

A MPU9250 inertial measurement unit was pressed into service for control of the reaction wheel, fitted to the base of the pendulum and read by a Raspberry Pi. The Pi takes accelerometer and gyroscope readings, and then controls the motor on the pendulum with a PID controller to keep the inverted pendulum upright.

The video goes into a great deal of detail on what it takes to make the pendulum run smoothly. From changes to the control coefficients to measuring the motor’s back EMF, [Brick Experiment Channel] demonstrates everything required to make the pendulum robust to outside perturbances.

The inverted pendulum is a great way to learn about control theory, as we’ve seen time and again.

Continue reading “Building Reaction Wheels With Python And LEGO”

Genaille’s Rods: When Paint Sticks Do Math

What is a hacker, if not somebody who comes up with solutions that other just don’t see? All the pieces may be in place, but it takes that one special person to view the pieces as greater than the sum of their parts. As [Chris Staecker] explains in the video below the break, Henri Genaille was one such person.

When French mathematician Edouard Lucas (himself well known for calculating the longest prime number found by hand) posed a mathematical problem at the French Academy, a French railway engineer named Henri Genaille developed the rods we’re discussing now.

Genaille’s Rods are designed to perform multiplication. But rather than require computation by the user, the rods would simply need to be laid out in the correct order. The solution could readily be found by just following the lines in the correct pattern. This might sound a lot like cheating, and that’s exactly what it is. No manual math needed to be done. Genaille also created rods for doing long division, which we’re sure were every bit as enthralling as the multiplication rods. Demonstrations of both are included in the video below.

While Genaille’s Rods have gone the way of the slide rule, we can’t help but wonder how many engineers and scientists carried around a set of marked up wooden sticks in their pocket protector.

If designing and building manual mathematical machines is something that you think really adds up to a good time, check out this post on how to design and build your own circular slide rule!

Continue reading “Genaille’s Rods: When Paint Sticks Do Math”

Backyard with a squirrel maze

Fort Knutz – Squirrels Go All Mission Impossible

[Mark Rober] has a bird feeder in his back yard. Also, squirrels who eat the seed. So, as one does, he built a nine part squirrel obstacle course with a reward of walnuts at the end, and filmed them beating the course.

(Spoiler – this is all much better in the video, which we’ve placed below the break).

His four backyard squirrels enter a ‘Casino’ and avoid the plushie ‘security’.  From there it’s across a rod mounted on bearings, leap into a crate under a helicopter, which zip-lines to a brick wall with randomly moving bricks, and into their hideout.

A squirrel at a model buffet in a casino
Security is about to get him.

The hideout elevator shaft leads to a sewer, which leads to the famous room from Mission Impossible where [Tom Cruise] has to avoid the floor, but to get to the hatch in the top they have to lower a ladder by ‘hacking into’ the control system (by pushing a keyboard shaped button) and lowering a rope ladder.

Next they go through a tube maze to a room full of laser beams (3D printer filament) and finally they can jump onto the platform with Fort Knutz. If they get the vault door open, they’re rewarded with a shower of walnuts.

Continue reading “Fort Knutz – Squirrels Go All Mission Impossible”

Simple Photo Enlarger Makes Great Addition To Any Darkroom

Chemical-based photography can seem like a dark art at times, but it needn’t be so. [Dan K] developed the Simple Enlarger to help spread the idea that classical photographic darkroom tools are fundamentally quite easy to understand and build.

The assembled enlarger.

A photographic enlarger illuminates a negative with light, and focuses this light on a sheet of photographic paper which can then be developed. [Dan’s] enlarger design is intended to be built using materials readily available from any dollar store or stationer’s shop, and can be built in just a few short hours. It’s built to work with a single film format and with a fixed size of photographic paper for simplicity’s sake.

A simple M-mount camera lens is pressed into service for the main optic, with the ex-Soviet part chosen for its easy focusing and cheap price. A small plywood box makes a decent body, and a white phosphor LED provides  the light source. The final rig is designed to print 35mm negatives on to standard 8×10 paper.

If you want to get into developing your own negatives and don’t want to buy a commercial enlarger, [Dan]’s build could be just the way to go. We’ve seen some other similar builds before, too. Meanwhile, if you’ve got your own nifty darkroom hacks, be sure to drop us a line!