Performing Magic With A Little High-Tech Help

Doing magic with cards involves a lot of precise dexterity to know which card is where. For plenty of tricks, this is often knowledge and control of a single card or a small number of cards. But knowing the exact position of every single card in the deck could certainly be helpful, so the Nettle Magic Project was created to allow magicians to easily identify the location of cards in the deck.

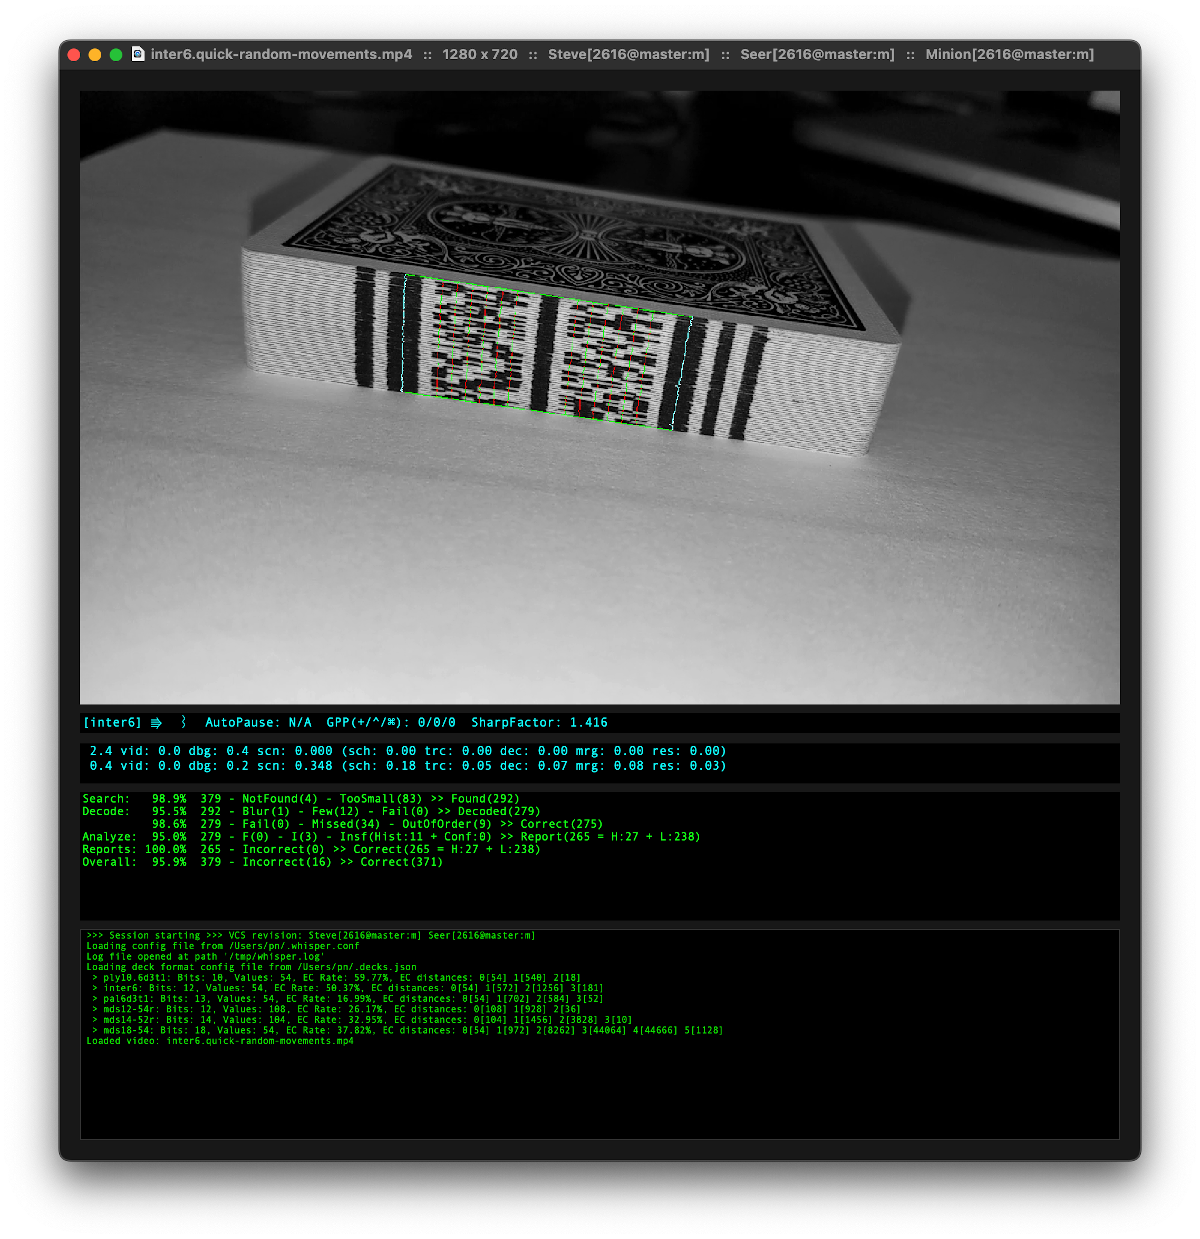
The system works through the use of computer vision to identify a series of marks on the short edge of a stack of cards. The marks can be printed in IR- or UV-sensitive ink to make them virtually invisible, but for demonstration these use regular black ink. Each card has landmarks printed on either side of a set of bit markers which identify the cards. A computer is able to quickly read the marks and identify each card in order while the deck is still stacked, aiding the magician in whichever trick they need to perform.

The software only runs on various Apple devices right now, including iPhones and iPads, but the software is readily available fore experimentation if you are a magician looking to try something like this out. Honestly, we don’t see too many builds focusing on magic, sleight-of-hand or otherwise, and we had to go back over a decade to find a couple of custom magical builds from a magician named [Mario].

Thanks to [Tim] for the tip!

Raspberry Pi Pico W Adds Wireless

News just in from the folks at Raspberry Pi: the newest version of their Pico has WiFi and is called, obviously, the Pico W. We were going to get our hands on a sample unit and kick its tires, but it’s stuck in customs. Boo! So until it shows up, here’s what we can glean from the press releases and documentation.

The Pico is, of course, the Raspberry Pi microcontroller dev board based on their RP2040 microcontroller. This in turn has two Cortex M0+ cores and a good chunk of onboard RAM, which has made it a popular target for MicroPython. They had some extra real estate on the PCB, so they’ve added an Infineon CYW43439 WiFi chip, and voila: Pico W.

As of now, the WiFi is supported in both the C SDK and the pre-baked MicroPython image. It looks trivially easy to get it working, and it’s based on the time-tested lwIP stack, a classic in the embedded world. The CYW43439 is also Bluetooth capable, but there’s no firmware support for that yet, but we wouldn’t be surprised if it showed up soon.

The price? $6 for the whole shooting match. You can view this two ways: a small $2 premium over the old Pico, or a price increase of 50%. How you see things probably depends on your order quantity. Either way, it’s firmly in the ESP32 module price range, so you’ve got some comparison shopping to do if your project needs a microcontroller and WiFi. And in these days of silicon shortages, it’s nice to have a couple of options.

Gym Equipment Converted To Generator

Energy cannot be created or destroyed, but the most likely eventual conclusion of changing it from one form or another will be relatively useless heat. For those that workout with certain gym equipment, the change from chemical energy to heat is direct and completely wasted for anything other than keeping in shape. [Oliver] wanted to add a step in the middle to recover some of this energy, though, and built some gym equipment with a built-in generator.

Right now he has started with the obvious exercise bike stand, which lends itself to being converted to a generator quite easily. It already had a fairly rudimentary motor-like apparatus in it in order to provide mechanical resistance, so at first glance it seems like simply adding some wires in the right spots would net some energy output. This didn’t turn out to be quite so easy, but after a couple of attempts [Oliver] was able to get a trickle of energy out to charge a phone, and with some more in-depth tinkering on the motor he finally was able to get a more usable amount of energy to even charge a laptop.

He estimates around 30 watts of power can be produced with this setup, which is not bad for a motor that was never designed for anything other than mechanical resistance. We look forward to seeing some other equipment converted to produce energy too, like a rowing machine or treadmill. Or, maybe take a different route and tie the exercise equipment into the Internet connection instead.

Record-Setting Jumper Tosses Biomimicry Out The Window

How can a few grams of battery, geared motor, and some nifty materials get a jumping robot over 30 meters into the air? It wasn’t by copying a grasshopper, kangaroo, or an easily scared kitty. How was it done, then?

It’s been observed that of all the things that are possible in nature, out of all the wonderful mechanisms, fluid and aerodynamics, and chemistry, there’s one thing that is so far undiscovered in a living thing: continuous rotation. Yes, that’s right, the simple act of going roundy-round is unique to mechanical devices rather than biological organisms. And when it comes to jumping robots, biomimicry can only go so far.

With this distinct mechanical advantage in mind, [Elliot Hawkes] of the University of California Santa Barbara decided to look beyond biomimicry. As explained in the paper in Nature and demonstrated in the video below the break,  the jumping robot being considered uses rubber bands, carbon fiber bows, and commodity items such as a geared motor and LiPo batteries to essentially wind up the spring mechanism and then, like a trap being sprung, release the pent up energy all at once. The result? The little jumper can go almost 100 feet into the air. Be sure to check it out!

Continue reading “Record-Setting Jumper Tosses Biomimicry Out The Window”

Owen with his laser cutter

A Home Made Laser Cutter For $700

While some decent lasers are out there for under $400 USD, they tend to be a little small. What if you wanted something a little nicer but didn’t want to jump to the $2,000 category? The answer for [Owen Schafer] was to build it with parts he had lying around and a few strategic purchases.

While he was initially planning on using a diode laser, doing anything more than engraving is tricky. He purchased a cheap 40 W CO2 laser tube, but it meant that he needed water cooling, mirrors, and more complex stuff that a diode doesn’t need. The frame is aluminum extrusion held together with 3D printed plates. Given there was a powerful laser bouncing around with mirrors, a plywood box formed the enclosure.

The stepper controller is an Arduino Mega running the Marlaser firmware, though [Owen] admits perhaps a laser cutter-specific driver board would have been better as he spent many hours trying to get the Arduino to do what he wanted. Air ventilation is a tube with a fan that vents out a nearby window. Water cooling is just a bucket of water with a pump in it. A simple nylon hose connected to a compressor with a maximum airflow valve provides an air assist while cutting. Finally, we’re happy to report that [Owen] bought safety glasses specific to his laser to protect his eyes and researched how to ground the high voltages generated.

We particularly loved seeing all of [Owen’s] test cuts. He proudly displayed his boxes, sharks, and lamp shades like anyone with their new laser cutter is wont to do. If you’re looking to upgrade your laser, there’s an add-on for detecting materials optically or a relatively cheap laser bed you can throw in your laser.

Continue reading “A Home Made Laser Cutter For $700”

A plastic steel drum toy

Odd Inputs And Peculiar Peripherals: Miniature Steel Drums Become Rotary Mouse Controllers

When [bornach] browsed through his office’s free-cycling box he found an old novelty toy that lets you play simple tunes on miniature steel drums. Such a thing is probably fun for about five minutes – if it’s working, which this one wasn’t. But instead of throwing it away, [bornach] spotted an opportunity in the capacitive touch pads on top of those little drums: they looked perfect to be modified into an unusual mouse cursor controller.

A steel drum toy being used to control a mouse cursorThe operation started with [bornach] ripping out the original PCB and replacing it with an ESP32 D1 Mini. That board has a handy stack of touch-sensitive pins which could interface directly with the drums’ touch pads. He then programmed the ESP32 to interpret the signals as mouse movements and button presses, and send the results to a computer through a BlueTooth connection.

Operating the mouse drums is so straightforward that they almost appear made for this purpose: you slide your finger in circles along the touch pads to move the cursor in the X or Y direction, and touch the center pad to click. The left drum moves the cursor horizontally while the right one moves it vertically, but there’s also a mode to use the right drum as a scroll wheel.

The rotary X/Y controls are reminiscent of an Etch-a-Sketch; while probably too clumsy for everyday use, they might come in handy in some circumstances where you need to make single-pixel-accurate motions, if only to click those miniscule “close” buttons on some online ads.

Amazingly, this isn’t the first Etch-a-Sketch style mouse we’ve featured: this cute little wooden device works in a similar way.

Continue reading “Odd Inputs And Peculiar Peripherals: Miniature Steel Drums Become Rotary Mouse Controllers”

A PCB carrying several Atari 2600 chips

Hackaday Prize 2022: The Baffatari 2600 Adds Atari Compatibility To Retrocomputers

Like today’s Intel-AMD duopoly, the market for home computer CPUs in the 1970s and ’80s was dominated by two players: Zilog with their Z80, and MOS Technology with their 6502 processor. But unlike today, even if two computers had the same CPU, it didn’t mean the two were software compatible: differences in memory layout, video interfaces, and storage media meant that software developed for an Atari 2600 wouldn’t run on an Apple I, despite the two sharing the same basic CPU architecture.

[Augusto Baffa]’s latest modern retrocomputer design, the Baffatari 2600, cleverly demonstrates that the difference between those two computers really is only skin-deep. The Baffatari is a plug-in board that adds Atari 2600 functionality to [Augusto]’s earlier Baffa-6502 system, which was designed to be Apple I-compatible. Since both the Apple and the Atari are powered by 6502 CPUs, only a few peripherals need to be swapped to change one into the other.

Sitting on the Baffatari board are two chips essential to the Atari 2600’s architecture: the 6532 RAM I/O Timer (RIOT) that contains the RAM and joystick interface, and the Television Interface Adapter (TIA) that handles the graphics and audio. These chips connect to the Baffa-6502’s system bus, enabling the main CPU to communicate with them and run Atari 2600 software titles. In the video embedded below, you can see several classic games running on the Baffa system.

The basic idea is similar to this RC2014 plug-in board that enables a Z80-based retrocomputer to run MSX and Colecovision titles. In fact, [Augusto] also built such a board for his earlier Z80 project.

Continue reading “Hackaday Prize 2022: The Baffatari 2600 Adds Atari Compatibility To Retrocomputers”