TRX-Duo Is A Red Pitaya Clone For Software Defined Radio

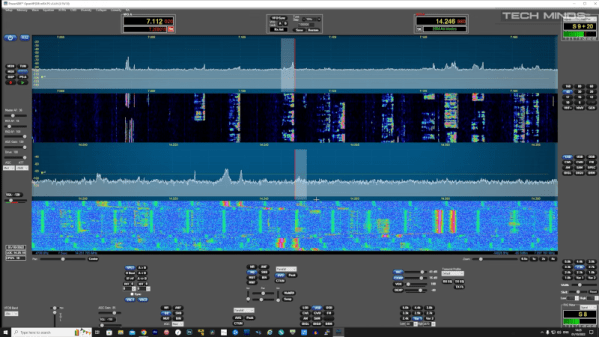
If you’ve noticed the TRX-DUO software-defined radio transceiver, you might have wondered how it stacks up to other choices like Red Pitaya or HackRF.  [Tech Minds] obliges with a review of the Red device in the video below.

While this unit isn’t inexpensive, it also isn’t as expensive as some of its competitors. Sure, you can pick up an RTL-SDR dongle for a fraction of the price, but then you miss out on transmitting. The device is pretty powerful compared to a cheap software defined radio:

  • Frequency: 10 kHz to 60 MHz
  • CPU: Zynq SoC with a dual-core ARM Cortex A9
  • RAM: 512 MB
  • OS: Linux
  • Connectivity: Ethernet and USB connectivity (WiFi with a dongle)
  • ADC: 16-bit at 125 MS/s (2 channels)
  • DAC: 14-bit at 125 MS/s (2 channels)

The board boots off an SD card and there are several to choose from. The video shows two different images. One has a number of applications that run on the device and will also run on a Red Pitaya. The device shows a browser menu with various options and the result is quite impressive. Using the box as a WSPR beacon, it was heard fairly well given the low output power. It was, however, able to hear the world easily.

You can get a less capable Red Pitaya model for about $100 less than the going price. However, for something comparable, you will pay more for the Red Pitaya and — depending on capabilities — perhaps a lot more, although you do get more capability for the increased price.

You can do a lot more with a transmitting SDR — having both transmit and receive opens up many new projects. Of course, canned applications are great, but if you get one of these, you are going to want to try GNU Radio.

Continue reading “TRX-Duo Is A Red Pitaya Clone For Software Defined Radio”

3D printed tea cup and saucer with the edges made out of 3d printed human teeth. Cup is sitting on a wooden table.

Relax And Have A Nice Cup Of Teeth

Halloween is just around the corner and what better way to add a little spooky decor than to 3D print [DaveMakesStuff]’s Teeth Cup.

It looks like [DaveMakesStuff] has done the equivalent of “kit bashing” by taking 3D models of a full teeth set and merging them with a tea cup. Details are pretty light but a Twitter thread (Nitter)has some clues about the process. The cup looks like it can be done in one print, support free. The smooth finish comes from bead blasting it which, as an added bonus in this case, provides the “dirty” look as the bead blaster is only normally used on nylon SLS prints.

Halloween is always a good source of inspiration for hacker projects and we’ve had many good entries from Halloween Hackfests of the past.

Continue reading “Relax And Have A Nice Cup Of Teeth”

RotBot Adds An Extra Dimension To 3D Printing, With A Twist

It always seemed to us that the Z-axis on a 3D printer, or pretty much any CNC machine for that matter, is criminally underused. To have the X- and Y-axes working together to make smooth planar motions while the Z-axis just sits there waiting for its big moment, which ends up just moving the print head and the bed another fraction of a millimeter from each other just doesn’t seem fair. Can’t the Z-axis have a little more fun?

Of course it can, and while non-planar 3D printing is nothing new, [Stefan] over at CNC Kitchen shows us a literal twist on the concept with this four-axis non-planar printer. For obvious reasons, it’s called the “RotBot,” and it comes via the Zurich University of Applied Sciences, where [Michael Wüthrich] and colleagues have been experimenting with different slicing strategies to make overhang printing more manageable. The hardware side of things is actually pretty intuitive, especially if you’ve ever seen an industrial waterjet cutter in action. They modified a Prusa printer by adding a rotating extension to the print head, putting the nozzle at a 45° angle to the print bed. A slip ring connects the heater and fan and allows the head to rotate 360°, with the extruder living above the swiveling head.

On the software side, the Zurich team came up with some clever workarounds to make conical slicing work using off-the-shelf slicers. As [Stefan] explains, the team used a “pre-deformation” step to warp the model and trick the slicer into generating the conical G-code. The G-code is then back-transformed in exactly the opposite process as pre-deformation before being fed to the printer. The transformation steps are done with a bit of Python code, and the results are pretty neat. Watching the four axes all work together simultaneously is quite satisfying, as are the huge overhangs with no visible means of support.

The academic paper on this is probably worth a read, and thankfully, the code for everything is all open-sourced. We’re interested to see if this catches on with the community.

Continue reading “RotBot Adds An Extra Dimension To 3D Printing, With A Twist”

A tiny CRT showing an eye, inside a plexiglass enclosure

This Eye Is Watching You From Its Tiny CRT

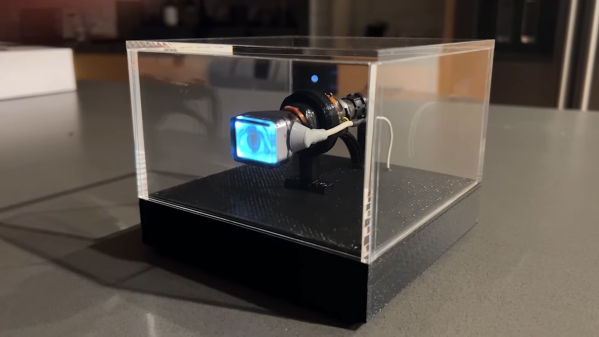
The days of cathode ray tubes, or CRTs, are firmly behind us, and that’s generally a good thing. Display tubes were heavy, bulky and fragile, and needed complicated high-voltage electronics in order to work. But not all of them were actually large: miniature display tubes were also produced, for things like camcorder viewfinders, and [Tavis] from Sideburn Studios decided to turn one of those into a slightly creepy art project.

The heart of this build is a one-inch CRT that was salvaged from an RCA video camera. [Tavis] mounted the tiny tube inside an acrylic box on a 3D printed base. Inside that base sits a Raspberry Pi along with a high-voltage driver and a power management board. The Pi continuously plays a video that shows a human eye blinking and looking in various directions. Just an eye, floating in space, looking at the world around it.

The magic is briefly lost when the Pi starts up, because it then shows a microscopic version of the Pi’s standard bootup sequence, but once the thing is running it adds a weird vibe to a room. It actually looks like something you’d find in an avant-garde art exhibition — in the video (embedded below) it’s accompanied by eerie music that gives it an even more unsettling feel. Electronic eyes are always a bit scary, especially when they’re actually looking at you.

Continue reading “This Eye Is Watching You From Its Tiny CRT”

Flip-Segment Digital Clock Is A Miniature Mechanical Marvel

Clocks are such mundane objects that it’s sometimes hard for them to grab your attention. They’re there when you need them, but they don’t exactly invite you to watch them work. Unless, of course, you build something like this mechanical flip-segment clock with a captivating exposed mechanism

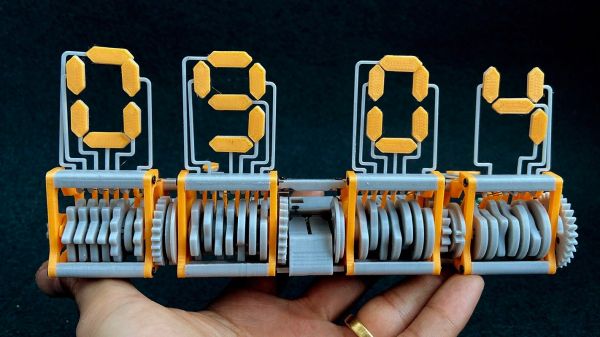
“Eptaora” is the name of this clock, according to its inventor [ekaggrat singh kalsi]. The goal here was to make a mechanical flip-segment display as small as possible, which meant starting with the smallest possible printable screw hole and scaling the design up from there. Each segment is controlled by a multi-lobed cam which bears on a spring-loaded cam follower. When the cam rotates against the follower, a segment is flipped up from the horizontal rest position to the vertical display position. A carryover mechanism connects two adjacent displays so that each pair of digits can be powered by a single stepper, and the finished clock is quite small — a little bit larger than the palm of a hand. The operation seems quite smooth, too, which is always a bonus with clocks such as these. Check out the mesmerizing mechanism in the video below.

We’d have sworn we covered a similar clock before — indeed [ekaggrat] says the inspiration for this clock came from one with a similar mechanism — but we couldn’t find it in the back catalog. Oh sure, there are flip-up digital clocks and all manner of mechanical seven-segment displays, but this one seems to be quite unique, and very pleasing.

Continue reading “Flip-Segment Digital Clock Is A Miniature Mechanical Marvel”

DIy Arduino FM radio enclosure with the lid off, showing the electronics inside

DIY Arduino Due TEA5767 FM Radio

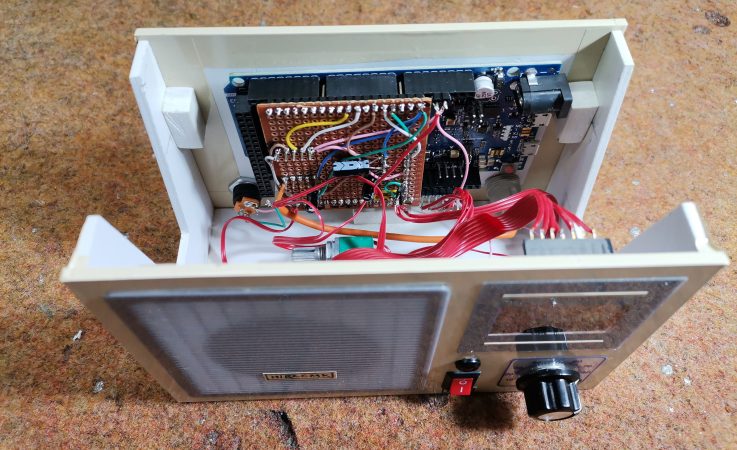
Older hackers will remember that a crystal set radio receiver was often one of the first projects attempted.  Times have changed, but there’s still something magical about gathering invisible signals from the air and listening to the radio on a homemade receiver. [mircemk] has brought the idea right up to date by building an FM radio with an OLED display, controlled with a rotary encoder.

The design is fairly straightforward, based as it is on another project that [mircemk] found on another site, but the build looks very slick and would take pride of place on any hacker’s workbench. An Arduino Due forms the heart of the project, controlling a TEA5767 module, an SH1106 128×64 pixel OLED display and a rotary encoder. The sound signal is passed through an LM4811 headphone amplifier for private listening, and a PAM8403 Class D audio amplifier for the built-in loudspeaker. The enclosure is made from PVC panels, and accented with colored adhesive tape for style.

It’s easier than ever before to quickly put together projects like this by connecting pre-built modules and downloading code from the Internet, but that doesn’t mean it’s not a worthwhile way to improve your skills and make some useful devices like this one. There are so many resources available to us these days and standing on the shoulders of giants has always been a great way to see farther.

We’ve shown some other radio projects using Arduinos and the TEA5767 IC in the past, such as this one on a tidy custom PCB, and this one built into an old radio case.

Continue reading “DIY Arduino Due TEA5767 FM Radio”

A hot glue gun with a revolving stick holder on the back

Quick Reload For Your Glue Sticks: The Glue Gun Six Shooter

They say that the two essential items in any toolbox are WD-40 and duct tape: one thing to make stuff move and another thing to stop stuff from moving. Many hackers would argue that the third essential tool should be hot glue — it stops stuff from moving, but still allows you to move it later if you decide that’s better after all. It also works on loads of stuff ranging from macaroni to microcontrollers. And let’s be honest: who hasn’t done the “pew pew” thing with their glue gun?

[Vije Miller] decided to give his hot glue dispenser a bit of a western vibe and built himself a Glue Gun Six Shooter. Like an Old West revolver, it has a rotating cylinder with six rounds of ammunition that lets you continue gluing right away even if your glue stick runs out in the middle of a job. A tiny switch on the side of the barrel starts the reloading sequence: one servo rotates the cylinder, then another one chambers a round. Both are controlled by an Arduino Nano, which is powered by a 5 V USB power supply hidden in the grip.

A red laser below the barrel gives the user a better aim, as well as a bit more “pew pew” ability. The rest of the gun is pretty standard, similar to what we’ve seen before in a teardown. If you’re looking for something more high-tech, check out [Ben Heck]’s ultimate glue gun.

Continue reading “Quick Reload For Your Glue Sticks: The Glue Gun Six Shooter”