Build Your Own 16 MB 30-Pin SIMMs For Vintage PCs

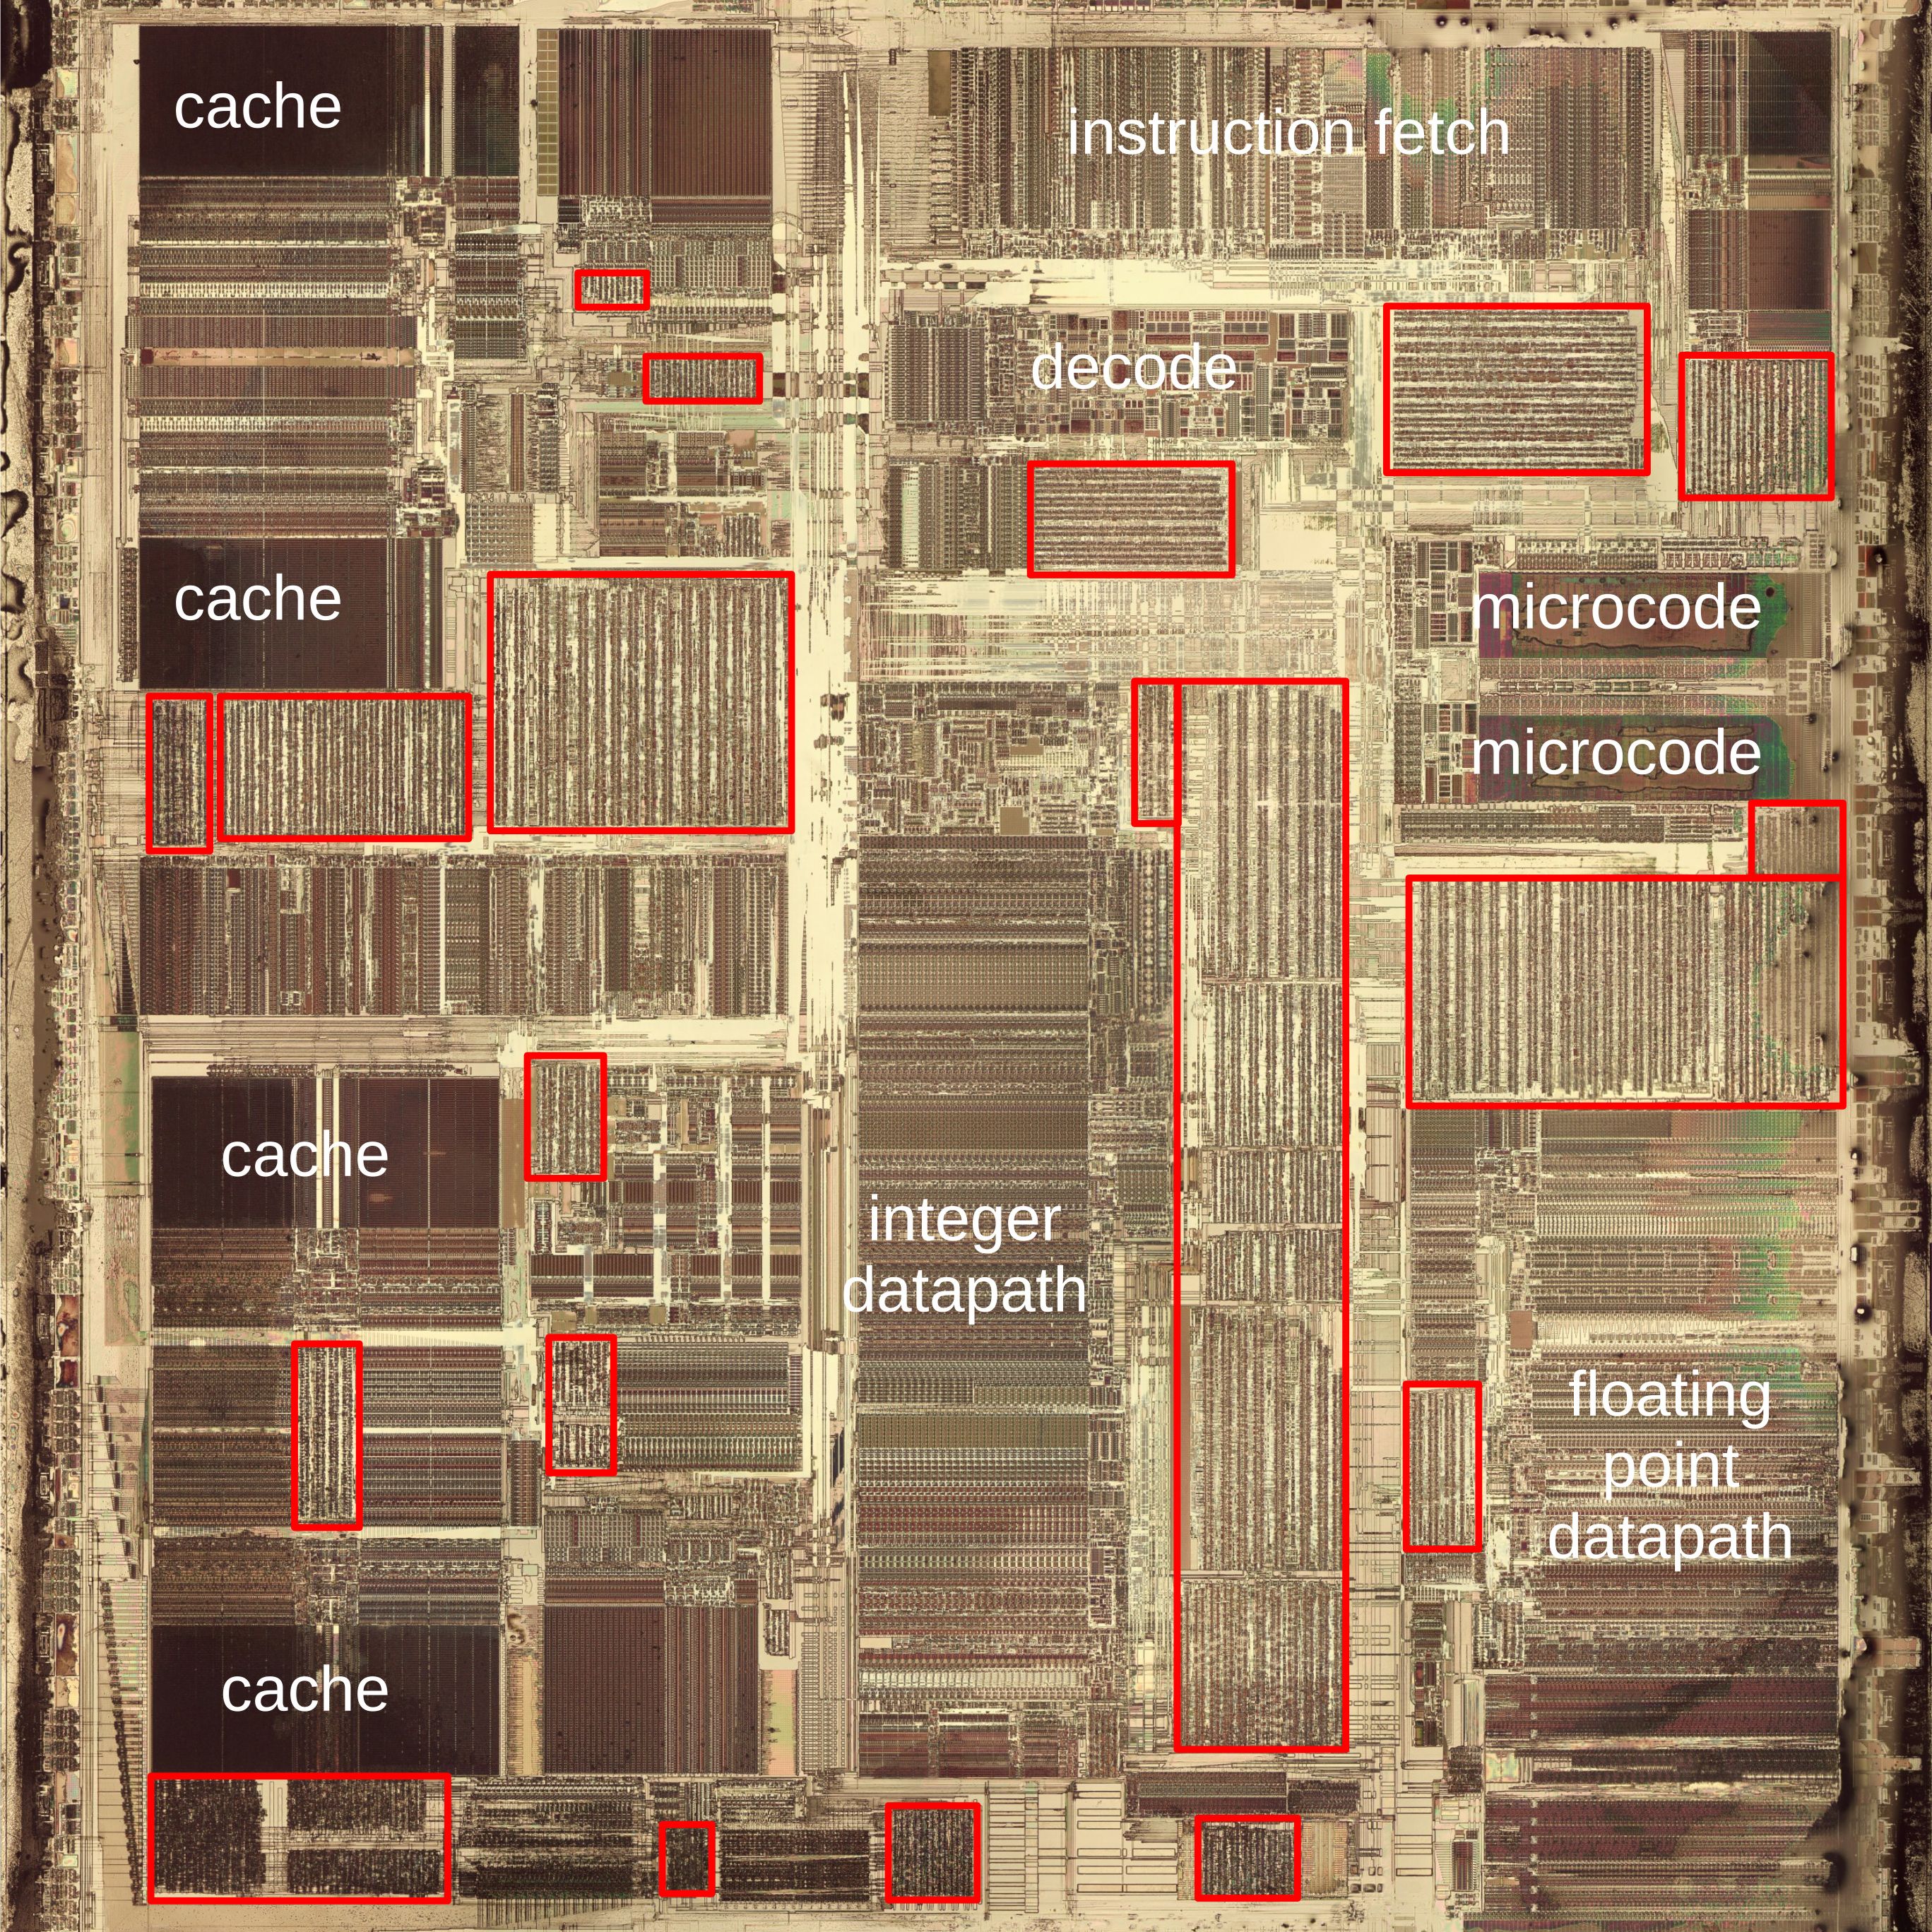
Today’s memory sticks have hundreds of pins and many gigabytes of RAM on board. Decades ago, though, the humble 30-pin SIMM was the state of the art where memory was concerned. If you’ve got vintage gear, you can try and hunt down old RAM, or you can copy [Bits und Bolts] and make your own.

Previously, [Bits und Bolts] built a 4 MB SIMM, but he’s now ramped up to building 16 MB RAM sticks — the largest size supported by the 30-pin standard. That’s a ton compared to most 30-pin sticks from the 1980s, which topped out at a feeble 1 MB.

We get to see four of his 16 MB sticks installed in a 386 motherboard, set up to operate in the appropriate Fast Page Mode. He was able to get the system operating with 64 MB of RAM, an amount still considered acceptable in the early Pentium 3 era. Hilariously, memtest took a full ten hours to complete a single pass with this configuration. [Bits and Bolts] also tried to push the motherboard further, but wasn’t able to get it to POST with over 64 MB of RAM.

As [Bits und Bolts] demonstrates, if you can read a schematic and design a PCB, it’s not that hard to design RAM sticks for many vintage computers. We’ve seen some other RAM hacks in this vein before, too.

Continue reading “Build Your Own 16 MB 30-Pin SIMMs For Vintage PCs”

Misconceptions About Loops, Or: Static Code Analysis Is Hard

When thinking about loops in programming languages, they often get simplified down to a conditions section and a body, but this belies the dizzying complexity that emerges when considering loop edge cases within the context of static analysis. A paper titled Misconceptions about Loops in C by [Martin Brain] and colleagues as presented to SOAP 2024 conference goes through a whole list of false assumptions when it comes to loops, including for languages other than C. Perhaps most interesting is the conclusion that these ‘edge cases’ are in fact a lot more common than generally assumed, courtesy of how creative languages and their users can be when writing their code, with or without dragging in the meta-language of C’s preprocessor.

Assumptions like loop equivalence can fall apart when considering the CFG ( control flow graph) interpretation versus a parse tree one where the former may e.g. merge loops. There are also doozies like assuming that the loop body will always exist, that the first instruction(s) in a loop are always the entry point, and the horrors of estimating loop exits in the context of labels, inlined functions and more. Some languages have specific loop control flow features that differ from C (e.g. Python’s for/else and Ada’s loop), all of which affect a static analysis.

Ultimately, writing a good static analysis tool is hard, and there are plenty of cases where it’s likely to trip up and give an invalid result. A language which avoids ambiguity (e.g. Ada) helps immensely here, but for other languages it helps to write your code as straightforward as possible to give the static analysis tool a fighting chance, or just get really good at recognizing confused static analysis tool noises.

(Heading image: Control flow merges can create multiple loop entry
edges (Credit: Martin Brand, et al., SOAP 2024) )

Looking At Standard-Cell Design In The Pentium Processor

Die photo of the Intel Pentium processor with standard cells highlighted in red. The edges of the chip suffered some damage when I removed the metal layers. (Credit: Ken Shirriff)

Whereas the CPUs and similar ASICs of the 1970s had their transistors laid out manually, with the move from LSI to VLSI, it became necessary to optimize the process of laying out the transistors and the metal interconnects between them. This resulted in the development of standard-cells: effectively batches of transistors with each a specific function that could be chained together. First simple and then more advanced auto-routing algorithms handled the placement and routing of these standard elements, leading to dies with easily recognizable structures under an optical microscope. Case in point an original (P54C) Intel Pentium, which [Ken Shirriff] took an in-depth look at.

Using a by now almost unimaginably large 600 nm process, the individual elements of these standard cells including their PMOS and NMOS components within the BiCMOS process can be readily identified and their structure reverse-engineered. What’s interesting about BiCMOS compared to CMOS is that the former allows for the use of bipolar junction transistors, which offer a range of speed, gain and output impedance advantages that are beneficial for some part of a CPU compared to CMOS. Over time BiCMOS’ advantages became less pronounced and was eventually abandoned.

All in all, this glimpse at the internals of a Pentium processor provides a fascinating snapshot of high-end Intel semiconductor prowess in the early 1990s.

(Top image: A D flip-flop in the Pentium. Credit: [Ken Shirriff] )

Building A Cassette Deck Controller To Save A Locked Out Car Stereo

Cars have had DRM-like measures for longer than you might think. Go back to the 1990s, and coded cassette decks were a common way to stop thieves being able to use stolen stereos. Sadly, they became useless if you ever lost the code. [Simon] had found a deck in great condition that was locked out, so he set about building his own controller for it. 

The build relies on the cassette transport of a car stereo and a VFD display, but everything else was laced together by Simon. It’s a play-only setup, with no record, seeing as its based on an automotive unit. [Simon]’s write up explains how he reverse engineered the transport, figuring out how the motors and position sensors worked to control the playback of a cassette.

[Simon] used an Atmega microcontroller as the brains of the operation, which reads the buttons of the original deck via an ADC pin to save I/O for other tasks. The chip also drives the VFD display for user feedback, and handles auto reverse too. The latter is thanks to the transport’s inbuilt light barriers, which detect the tape’s current status. On the audio side, [Simon] whipped up his own head amplifier to process the signal from the tape head itself.

Fundamentally, it’s a basic build, but it does work. We’ve seen other DIY tape decks before, too. There’s something about this format that simply refuses to die. The fans just won’t let Compact Cassette go down without a fight. Video after the break.

Continue reading “Building A Cassette Deck Controller To Save A Locked Out Car Stereo”

Hackable Ham Radio Gives Up Its Mechanical Secrets

Reverse-engineered schematics are de rigeur around these parts, largely because they’re often the key to very cool hardware hacks. We don’t get to see many mechanical reverse-engineering efforts, though, which is a pity because electronic hacks often literally don’t stand on their own. That’s why these reverse-engineered mechanical diagrams of the Quansheng UV-K5 portable amateur radio transceiver really caught our eye.

Part of the reason for the dearth of mechanical diagrams for devices, even one as electrically and computationally hackable as the UV-K5, is that mechanical diagrams are a lot less abstract than a schematic or even firmware. Luckily, this fact didn’t daunt [mdlougheed] from putting a stripped-down UV-K5 under a camera for a series of images to gather the raw data needed by photogrammetry package RealityCapture. The point cloud was thoughtfully scaled to match the dimensions of the radio’s reverse-engineered PC board, so the two models can work together.

The results are pretty impressive, especially for a first effort, and should make electromechanical modifications to the radio all the easier to accomplish. Hats off to [mdlougheed] for the good work, and let the mechanical hacks begin.

Supercon Call For Proposals Extended: July 16th

Ever since the first Supercon, people have submitted talk proposals at the very last minute, and some even in the minutes after the last minute. We know how it is – we are fully licensed procrastineers ourselves. So with an eye toward tradition, we’re extending the Call for Speakers and the Call for Workshops one more week, until July 16th.

The Hackaday Superconference is really and truly our favorite event of the year. It’s small, but not too small. The ideas everyone brings with them, however, are big. It’s like the absolute best of Hackaday live and in person. If you’re looking for a place to give a technical talk, or just to regale us all with the trials and triumphs of hacking, you won’t find a more receptive audience anywhere. Plus, presenters get in free.

In other news, [Voja] has an alpha version of the badge finished, so all that’s left is 90% of the work disguised as 10%. Some people have asked for clues, and what we’ll say at this point is that “Simple Add Ons have underutilized I2C pins”.

Expect tickets to go on sale in the next weeks – early bird tickets sell out fast. Keep your eyes on Hackaday for the announcement post when it goes live. Or, you can skip straight to the front of the line by giving a talk. But you can’t give a talk if you don’t submit your proposal first. Get on it now, because we’re not going to extend the CFP twice!

Keep Your Lungs Clean And Happy With A DIY Supplied-Air Respirator

The smell of resin SLA printing is like the weather — everybody complains about it, but nobody does anything about it. At least until now, as [Aris Alder] tackles the problem with an affordable DIY supplied-air respirator.

Now, we know what you’re thinking, anything as critical as breathing is probably best left to the professionals. While we agree in principle, most solutions from reputable companies would cost multiple thousands of dollars to accomplish, making it hard to justify for a home gamer who just doesn’t want to breathe in nasty volatile organic compounds. [Aris] starts the video below with a careful examination of the different available respirator options, concluding that a supplied air respirator (SAR) is the way to go.

His homebrew version consists of an affordable, commercially available plastic hood with a built-in visor. Rather than an expensive oil-free compressor to supply the needed airflow, he sourced a low-cost inline duct fan and placed it outside the work zone to pull in fresh air. Connecting the two is low-cost polyethylene tubing and a couple of 3D printed adapters. This has the advantage of being very lightweight and less likely to yank the hood off your head, and can be replaced in a few seconds when it inevitably punctures.

Another vital part of the kit is a pulse oximeter, which [Aris] uses to make sure he’s getting enough oxygen. His O2 saturation actually goes up from his baseline when the hood is on and powered up, which bodes well for the system. Every time we pick up the welding torch or angle grinder we wish for something like this, so it might just be time to build one.

Continue reading “Keep Your Lungs Clean And Happy With A DIY Supplied-Air Respirator”