Get Your Lisp On With The Dune Shell

Lisp is one of those programming languages that seems to keep taunting us for not learning it properly. It is still used for teaching functional languages today. [Adam McDaniel] has an obvious fondness for this fifty-year-old language and has used it in several projects, including their own shell, Dune.

Dune is a shell designed for powerful scripting. Think of it as an unholy combination of bash and Lisp.

Dune is designed to be highly customisable, allowing you to create a super-optimised workstation for your admin and programming tasks. [Adam] describes the front end for Dune as having turned up the cosiness dial to eleven, and we can see that. A cosy home is personalised, and Dune lets you customise everything.

Dune is a useable functional programming environment with a reasonably complete standard library to back it up, which should simplify some of the more complicated sysadmin tasks. [Adam] says the language also supports a few metaprogramming concepts, such as a quote operator, operator overloading, and macro programming. It’s difficult to describe much more about what you can do with Dune, as it’s a general-purpose programming language wrapped in a shell. The possibilities are endless, and [Adam] is looking forward to seeing what you lot out there do with his project!

The shell can be personalised by editing the prelude file, which allows you to overload functions for the prompt text, the incomplete prompt text (so you can implement intelligent completion options), and a function that deals with the formatting of the command response text. [Adam] gives us his personal prelude file, which defines many helper functions displaying useful things such as the current weather, a calendar, and an ASCII art cat. You never know when that might come in handy. This file is written in Lisp, so we reckon that’s where many people will start as they come up the Lisp (re)learning curve before embarking on more involved automation. Dune was written in Rust, so you need that infrastructure to install it with Cargo.

As we said earlier, Lisp is not a new language. We found a hack for porting a Lisp interpreter to any old language and also running Lisp bare metal on a Lisp machine. Finally, [Al] takes a look at some alternative shells.

Amateur Astronomer Images Spy Satellite

As anyone who’s looked at the sky just before dawn or right after dusk can confirm, for the last seventy years or so there have been all kinds of artificial satellites floating around in low-Earth orbit that are visible to the naked eye. Perhaps the most famous in the last few decades is the International Space Station, but there are all kinds of others up there from amateur radio satellites, the Starlink constellation, satellite TV, and, of course, various spy satellites from a few of the world’s governments. [Felix] seems to have found one and his images of it can be found here.

[Felix] has been taking pictures of the night sky for a while now, including many different satellites. While plenty of satellites publish their paths to enable use, spy satellites aren’t generally public record but are still able to be located nonetheless. He uses a large Dobsonian telescope to resolve the images of several different satellites speculated to be spy satellites, with at least one hosting a synthetic aperture radar (SAR) system. His images are good enough to deduce the size and shape of the antennas used, as well as the size of the solar panels on board.

As far as being concerned about the ramifications of imaging top-secret technology, [Felix] is not too concerned. He states that it’s likely that most rival governments would be able to observe these satellites with much more powerful telescopes that he has, so nothing he has published so far is likely to be a surprise to anyone. Besides, these aren’t exactly hidden away, either; they’re up in the sky for anyone to see. If you want to take a shot at that yourself you can get a Dobsonian-like telescope mostly from parts at Ikea, and use a bit of off-the-shelf electronics to point them at just the right position too.

Mechanical Logic Gates With Amplification

One of the hardest things about studying electricity, and by extension electronics, is that you generally can’t touch or see anything directly, and if you can you’re generally having a pretty bad day. For teaching something that’s almost always invisible, educators have come up with a number of analogies for helping students understand the inner workings of this mysterious phenomenon like the water analogy or mechanical analogs to electronic circuits. One of [Thomas]’s problems with most of these devices, though, is that they don’t have any amplification or “fan-out” capability like a real electronic circuit would. He’s solved that with a unique mechanical amplifier.

Digital logic circuits generally have input power and ground connections in addition to their logic connection points, so [Thomas]’s main breakthrough here is that the mechanical equivalent should as well. His uses a motor driving a shaft with a set of pulleys, each of which has a fixed string wrapped around the pulley. That string is attached to a second string which is controlled by an input. When the input is moved the string on the pulley moves as well but the pulley adds a considerable amount of power to to the output which can eventually be used to drive a much larger number of inputs. In electronics, the ability to drive a certain number of inputs from a single output is called “fan-out” and this device has an equivalent fan-out of around 10, meaning each output can drive ten inputs.

[Thomas] calls his invention capstan lever logic, presumably named after a type of winch used on sailing vessels. In this case, the capstan is the driven pulley system. The linked video shows him creating a number of equivalent circuits starting with an inverter and working his way up to a half adder and an RS flip-flop. While the amplifier pulley does take a minute to wrap one’s mind around, it really helps make the equivalent electronic circuit more intuitive. We’ve seen similar builds before as well which use pulleys to demonstrate electronic circuits, but in a slightly different manner than this build does.

Continue reading “Mechanical Logic Gates With Amplification”

Raspberry Pi RP2350-E9 Erratum Redefined As Input Mode Leakage Current

Although initially defined as an issue with GPIO inputs when configured with the internal pull-downs enabled, erratum RP2350-E9 has recently been redefined in the datasheet (page 1341) as a case of increased leakage current. As it is now understood since we previously reported, the issue occurs when a GPIO (0 – 47) is configured as input, the input buffer is enabled, and the pad voltage is somewhere between logic LOW and HIGH. In that case leakage current can be as high as 120 µA with IOVDD = 3.3 V. This leakage current is too much for the internal pull-up to overcome, ergo the need for an external pull-down: 8.2 kΩ or less, per the erratum. Disabling the input buffer will stop the leakage current, but reading the input requires re-enabling the buffer.

GPIO Pad leakage for IOVDD=3.3 V (Credit: Raspberry Pi)

The upshot of this issue is that for input applications, the internal pull-downs are useless, and since PIO applications cannot toggle pad controls, the input buffer toggling workaround is not an option. ADC usage requires one to clear the GPIO input enable. In general any circuit that relies on floating pins or an internal pull-down resistor will be affected.

Although this should mean that the affected A2 stepping of the RP2350 MCU can still be used for applications where this is not an issue, and external pull-downs can be used as a ‘fix’ at the cost of extra power usage, it makes what should have been a drop-in replacement a troubled chip at best. At this point there have still been no definite statements from Raspberry Pi regarding a new (B0) stepping, leaving RP MCU users with the choice between the less flashy RP2040 and the buggy RP2350 for the foreseeable future.

Header: Thomas Amberg, CC BY-SA 2.0.

Fixing An Elgato HD60 S HDMI Capture Device

There’s a special kind of satisfaction found in the act of repairing a previously broken device, which is why YouTube is full of repair channels and guides on how to do it yourself. Inspired by this, [Doug Brown] decided to give it a shot himself, with an Elgato HD60 S HDMI capture device as the patient. As per the eBay listing, the device did not show up as a USB device when connected to a computer — a quick probing of the innards revealed that not only were the board voltages being dragged down, but some of the components on the PCB were getting suspiciously hot.

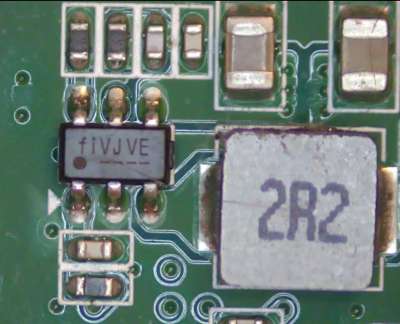
One of the broken switching regulators on the Elgato HD60 S capture device PCB. (Credit: Doug Brown)

On a thermal camera the hot components in question turned out to part of the voltage regulator circuits, one a switching regulator (marked fiVJVE, for Fitipower FP6373A) and another a voltage inverter marked PFNI (Ti TPS60403DBV).

Since both took 5 V, the suspicion was an over-voltage event on the USB side. After replacing the FP6373A and TPS60403 with newly purchased ones, the voltage rails were indeed healthy, and the Elgato sprung to life and could be used for HDMI capture and pass-through. However, the device’s onboard LEDs stubbornly refused to follow the boot-up pattern or show any other color patterns. Was this just a busted Innotech IT1504 LED driver IC?

Swapping it with a pin-compatible Macroblock MB15040 didn’t improve the situation, and the LEDs worked fine when externally controlling the MB15040 on its SPI bus, as well as with the original IT1504. Asking Elgato whether there was a known issue with these status LEDs didn’t lead to anything, so [Doug] decided to tackle the presumed source of the problem: the Nuvoton M031LD2AE MCU that’s supposed to drive the LED driver IC. The PCB helpfully provides a 4-pin JST connector on the board for the MCU’s SWD interface, but Elgato did protect the flash contents, so a straight dump wasn’t going to work.

The binary firmware is however helpfully available from Elgato, with the MCU already running the latest version. This is the point where [Doug] loaded the firmware into Ghidra to begin to understand what exactly this firmware was supposed to be doing. Putting on a fresh MCU with the correct firmware definitely worked, but debugging was hard as the new MCU also enabled protections, so in Ghidra the offending code for this was identified and neutralized, finally allowing for on-chip debugging and leading down another rabbit hole only to find an SPI flash chip at the end.

Ultimately it turned out that all the hardware was working fine. The problem ended up being that the LED patterns stored on the SPI EEPROM had become corrupted, which caused the Nuvoton MCU to skip over them. The same issue was confirmed on a second HD60 S, which makes it seem that this is a common issue with these Elgato capture devices. As a next step [Doug] hopes to figure out a way to more easily fix this issue, as even the streamlined process is still quite convoluted. Whether it is an issue with Elgato’s software or firmware (updater) is unknown at this point, but at least there seems to be a fix for now, even if Elgato support seems to just tell owners to ‘ignore it if capturing works’.

There’s nothing quite as inspirational as reading about a successful repair. If you need another shot of endorphins, check out the work [BuyItFixIt] put into a video baby monitor to bring it back online.

Hackaday Podcast Episode 289: Tiny Games, Two Modern Modems, And The Next Big Thing

This week on the Podcast, Hackaday’s Elliot Williams and Kristina Panos joined forces to bring you the latest news, mystery sound, and of course, a big bunch of hacks from the previous week.

First up in the news: we’ve announced the 2024 Tiny Games Contest winners! We asked you to show us your best tiny game, whether that means tiny hardware, tiny code, or a tiny BOM, and you did so in spades. Congratulations to all the winners and Honorable Mentions, and thanks to DigiKey, Supplyframe, and all who entered!

We also announced the first round of Supercon speakers, so if you haven’t gotten your ticket yet, now’s the second best time.

A square image with the Supercon 8 Add-On Contest art featuring six SAOs hanging from lanyards.But wait, there’s more! We’re already a few weeks into the next contest, where we want you to show us your best Simple Supercon Add-On. We love to see the add-ons people make for the badge every year, so this time around we’re really embracing the standard. The best SAOs will get a production run and they’ll be in the swag bag at Hackaday Europe 2025.

Then it’s on to What’s That Sound, which completely stumped Kristina once again. Can you get it? Can you figure it out? Can you guess what’s making that sound? If you can, and your number comes up, you get a special Hackaday Podcast t-shirt.

Now it’s on to the hacks, beginning with non-planar ironing for smooth prints, and a really neat business card that also plays tiny games. Then we’ll discuss USB modems, cool casts for broken wrists, and archiving data on paper. Finally, we ask two big questions — where do you connect the shield, and what’s the Next Big Thing gonna be? Inquiring minds want to know.

Check out the links below if you want to follow along, and as always, tell us what you think about this episode in the comments!

Download in DRM-free MP3 and savor at your leisure.

Continue reading “Hackaday Podcast Episode 289: Tiny Games, Two Modern Modems, And The Next Big Thing”

Inviting The Public To Take Stereo Photos For Science

[Lynnadeng]’s team wanted to monitor the Los Angeles River over time and wanted citizen scientists — or anyone, for that matter — to help. They built a dual phone holder to allow random passersby to use their phones to take photos. A QR code lets them easily send the pictures to the team. The 3D printed holder is fixed in place and has a known gap that allows stereo reconstruction from pairs of photos.

Of course, people aren’t going to know what to do, so you need a sign with instructions along with the QR code. One advantage to this scheme is that it’s cheap. All the camera hardware is in the public’s phone. Of course, you still have to make the holder robust to the elements, but that’s not nearly as difficult as supplying power and weatherproofing cameras and radios.

The real interesting part is the software. At first, we were disappointed that the post had a dead link to GitHub, but it was easy enough to find the correct one. In some cases, people will use a single camera, so 3D reconstruction isn’t always possible.

We love citizen science around here. No matter where you live, there are many opportunities to contribute.