Restoring An Abandoned Game Boy Kiosk

Back in the olden days, there existed physical game stores, which in addition to physical games would also have kiosks where you could try out the current game consoles and handhelds. Generally these kiosks held the console, a display and any controllers if needed. After a while these kiosks would get scrapped, with only a very few ending up being rescued and restored. One of the lucky ones is a Game Boy kiosk, which [The Retro Future] managed to snag after it was found in a construction site. Sadly the thing was in a very rough condition, with the particle board especially being mostly destroyed.

Display model Game Boy, safely secured into the demo kiosk. (Credit: The Retro Future, YouTube)

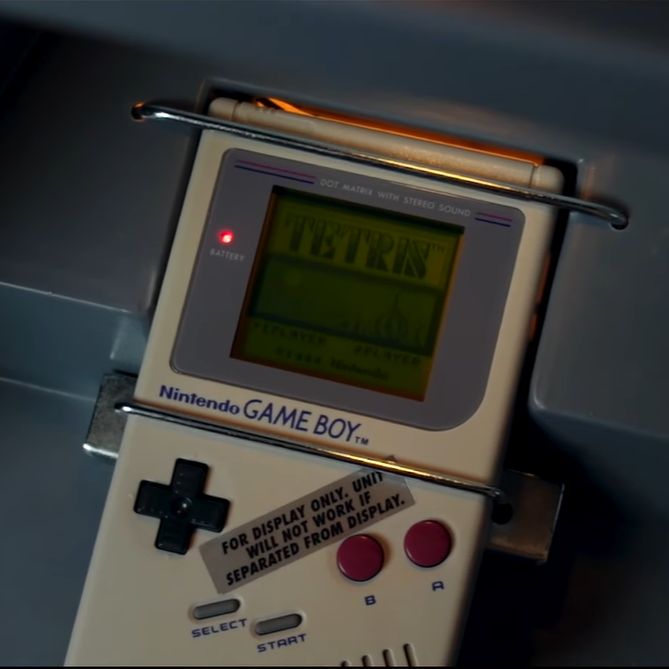
These Game Boy kiosks also featured a special Game Boy, which – despite being super rare – also was hunted down. This led to the restoration, which included recovering as much of the original particle board as possible, with a professional furniture restore ([Don]) lending his expertise. This provides a master class in how to patch up damaged particle board, as maligned as this wood-dust-and-glue material is.

The boards were then reassembled more securely than the wood screws used by the person who had found the destroyed kiosk, in a way that allows for easy disassembly if needed. Fortunately most of the plastic pieces were still intact, and the Game Boy grey paint was easily matched. Next was reproducing a missing piece of art work, with fortunately existing versions available as reference. For a few missing metal bits that held the special Game Boy in place another kiosk was used to provide measurements.

After all this, the kiosk was powered back on, and it was like 1990 was back once again, just in time for playing Tetris on a dim, green-and-black screen while hunched half into the kiosk at the game store.

Continue reading “Restoring An Abandoned Game Boy Kiosk”

Haircuts In Space: How To Keep Your Astronauts Looking Fresh

NASA astronaut Catherine Coleman gives ESA astronaut Paolo Nespoli a haircut in the Kibo laboratory on the ISS in 2011. (Credit: NASA)

Although we tend to see mostly the glorious and fun parts of hanging out in a space station, the human body will not cease to do its usual things, whether it involves the digestive system, or even something as mundane as the hair that sprouts from our heads. After all, we do not want our astronauts to return to Earth after a half-year stay in the ISS looking as if they got marooned on an uninhabited island. Introducing the onboard barbershop on the ISS, and the engineering behind making sure that after a decade the ISS doesn’t positively look like it got the 1970s shaggy wall carpet treatment.

The basic solution is rather straightforward: an electric hair clipper attached to a vacuum that will whisk the clippings safely into a container rather than being allowed to drift around. In a way this is similar to the vacuums you find on routers and saws in a woodworking shop, just with more keratin rather than cellulose and lignin.

On the Chinese Tiangong space station they use a similar approach, with the video showing how simple the system is, little more than a small handheld vacuum cleaner attached to the clippers. Naturally, you cannot just tape the vacuum cleaner to some clippers and expect it to get most of the clippings, which is where both the ISS and Tiangong solutions seems to have a carefully designed construction to maximize the hair removal. You can see the ISS system in action in this 2019 video from the Canadian Space Agency.

Of course, this system is not perfect, but amidst the kilograms of shed skin particles from the crew, a few small hair clippings can likely be handled by the ISS’ air treatment systems just fine. The goal after all is to not have a massive expanding cloud of hair clippings filling up the space station.

The GRIP-tape robot picking a lemon

Robot Picks Fruit And Changes Light Bulbs With Measuring Tape

How far can you stretch a measuring tape before it buckles? The answer probably depends more on the tape than the user, but it does show how sturdy the coiled spring steel rulers can be. [Gengzhi He et. al.] may have been playing that game in the lab at UC San Diego when they hit upon the idea for a new kind of low-cost robotic gripper.

An image of the GRIP-tape robot described in the article, showing the tape-loop fingers.
Four motors, four strips of measuring tape (doubled up)– one robot hand.

With the lovely backronym “GRIP-tape” — standing for Grasping and Rolling in Plane — you get a sense for what this effector can do. Its two “fingers” are each made of loops of doubled-up measuring tape bound together with what looks suspiciously like duck tape. With four motors total, the fingers can be lengthened or shortened by spooling the tape, allowing  a reaching motion, pivot closer or further apart for grasping, and move-in-place like conveyor belts, rotating the object in their grasp.

The combination means it can reach out, grab a light bulb, and screw it into a socket. Or open and decant a jar of spices. Another video shows the gripper reaching out to pick a lemon, and gently twist it off the tree. It’s quite a performance for a device with such modest components.

At the moment, the gripper is controlled via remote; the researchers plan on adding sensors and AI autonomous control. Read all the details in the preprint, or check below the fold to watch the robot in action.

This is hardly the first time we’ve highlighted a grabby robot. We’ve seen belts, we’ve seen origami — but this is the first time we’ve seen a measuring tape. Have you seen a cool robot? Toss us a tip. We’d love to hear from you. Continue reading “Robot Picks Fruit And Changes Light Bulbs With Measuring Tape”

A Pi-Based LiDAR Scanner

Although there are plenty of methods for effectively imaging a 3D space, LIDAR is widely regarded as one of the most effective methods. These systems use a rapid succession of laser pulses over a wide area to create an accurate 3D map. Early LIDAR systems were cumbersome and expensive but as the march of time continues on, these systems have become much more accessible to the average person. So much so that you can quickly attach one to a Raspberry Pi and perform LiDAR imaging for a very reasonable cost.

This software suite is a custom serial driver and scanning system for the Raspberry Pi, designed to work with LDRobot LIDAR modules like the LD06, LD19, and STL27L. Although still in active development, it offers an impressive set of features: real-time 2D visualizations, vertex color extraction, generation of 360-degree panoramic maps using fisheye camera images, and export capabilities for integration with other tools. The hardware setup includes a stepper motor for quick full-area scanning, and power options that include either a USB battery bank or a pair of 18650 lithium cells—making the system portable and self-contained during scans.

LIDAR systems are quickly becoming a dominant player for anything needing to map out or navigate a complex 3D space, from self-driving cars to small Arduino-powered robots. The capabilities a system like this brings are substantial for a reasonable cost, and we expect to see more LiDAR modules in other hardware as the technology matures further.

Thanks to [Dirk] for the tip!

Vintage Game Rides Again Thanks To Modern Tech

You have to admire the lengths designers went to back in the day to create engaging games and toys. One particularly clever game of this type was called GEE-WIZ, a horse racing game from the 1920s that seems like it might have been right at home at a bar or pub, and that caught [Michael Gardi]’s imagination enough that he built a modern version of the game.

GEE-WIZ imitates a horse race with an extremely clever mechanism powered by a flywheel on a square shaft. Play is started by pulling a ripcord, which spins up the flywheel to shoot steel balls up six tracks in a gently sloped playing field. The balls hit tin horses riding in each track, pushing them ever further up the track until they trip a flag to indicate the winner. We can practically hear the cheers.

As with many of his other retro-reimaginings, [Mike]’s 21st-century version of GEE-WIZ focuses on capturing the look and feel of the original as accurately as possible. To that end, he put a lot of work into the 3D prints that form the playing field, as well as labels that adorned the original. But the game wouldn’t be much good without the drive mechanism, so [Mike] had to put some work into reverse-engineering the flywheel. He had that machined out of stainless steel and mounted it to the base with some chunky printed bearing blocks. You can see the final product in the brief video below.

[Mike] says that vintage toy recreations aren’t exactly his usual fare, but some might argue that the Sol-20 and Minivac 601 very much count as toys. Either way, we really like the simplicity of GEE-WIZ and the quality of [Mike]’s reproduction.

Continue reading “Vintage Game Rides Again Thanks To Modern Tech”

Hackaday Podcast Episode 317: Quantum Diamonds, Citizen Science, And Cobol To AI

When Hackaday editors Elliot Williams and Al Williams need a break from writing posts, they hop on the podcast and talk about their favorite stories of the past week. Want to know what they were talking about? Listen in below and find out!

In an unusual twist, a listener sent in the sound for this week’s What’s This Sound competition, so it turns out Elliot and Al were both stumped for a change. See if you can do better, and you might just score a Hackaday Podcast T-shirt.

On the hacking front, the guys talked about what they hope to see as entries in the pet hacking contest, quantum diamonds (no kidding), spectrometers, and several science projects.

There was talk of a tiny robot, a space mouse—the computer kind, not a flying rodent—and even an old-fashioned photophone that let Alexander Graham Bell use the sun like a string on a paper cup telephone.

Things really heat up at the end, when there is talk about computer programming ranging from COBOL to Vibe programming. In case you’ve missed it, vibe coding is basically delegating your work to the AI, but do you really want to? Maybe, if your job is to convert all that old COBOL code.

Want to read along? The links are below. Be sure to leave your robot plans, COBOL war stories, and AI-generated Vibe limerics in the comments!

As always, the human-generated Hackaday Podcast is available as a DRM-free MP3 download.

Continue reading “Hackaday Podcast Episode 317: Quantum Diamonds, Citizen Science, And Cobol To AI”

Presence Detection Augments 1930s Home

It can be jarring to see various sensors, smart switches, cameras, and other technology in a house built in the 1930s, like [Chris]’s was. But he still wanted presence detection so as to not stub any toes in the dark. The result is a sensor that blends in with the home’s aesthetics a bit better than anything you’re likely to find at the Big Box electronics store.

For the presence detection sensors, [Chris] chose to go with 24 GHz mmwave radar modules that, unlike infrared sensors, can detect if a human is in an area even if they are incredibly still. Paired with the diminutive ESP32-S2 Mini, each pair takes up very little real estate on a wall.

Although he doesn’t have a 3D printer to really pare down the size of the enclosure to the maximum, he found pre-made enclosures instead that are fairly inconspicuous on the wall. Another design goal here was to make sure that everything was powered so he wouldn’t have to perpetually change batteries, so a small wire leads from the prototype unit as well.

The radar module and ESP pair are set up with some code to get them running in Home Assistant, which [Chris] has provided on the project’s page. With everything up and running he has a module that can control lights without completely changing the aesthetic or behavior of his home. If you’re still using other presence sensors and are new to millimeter wave radar, take a look at this project for a good guide on getting started with this fairly new technology.