Testing Refrigerants And Capillary Tubes To Find Peak Performance

Heat lift graphs. (Credit: Hyperspace Pirate, YouTube)

Although vapor-compression refrigeration is a simple concept, there are still a lot of details in the implementation of such a system that determines exactly how efficient it is. After making a few of such systems, [Hyperspace Pirate] decided to sit down and create a testing system that allows for testing of many of these parameters.

Some of the major components that determine the coefficient of performance (COP) of a heat pump or similar system include the used refrigerant, as well as the capillary tube diameter or expansion valve design. For the testing in the video three refrigerants are used: R600 (N-Butane), R134a (tetrafluoroethene, AKA Freon) and R290 (propane), with R134a being decidedly illegal in places like the EU. The use of R600 instead of R600A is due to the former allowing for a lower pressure system, which is nice for low-power portable systems.

The test rig has the typical fresh-from-the-scrap-heap look that we’re used to and love from [Hyperspace Pirate], but does exactly what it says on the tin, and is easy for any DIY enthusiast to replicate. Which compressor to pick for a specific refrigerant is also covered in the video, along with oil type and more.

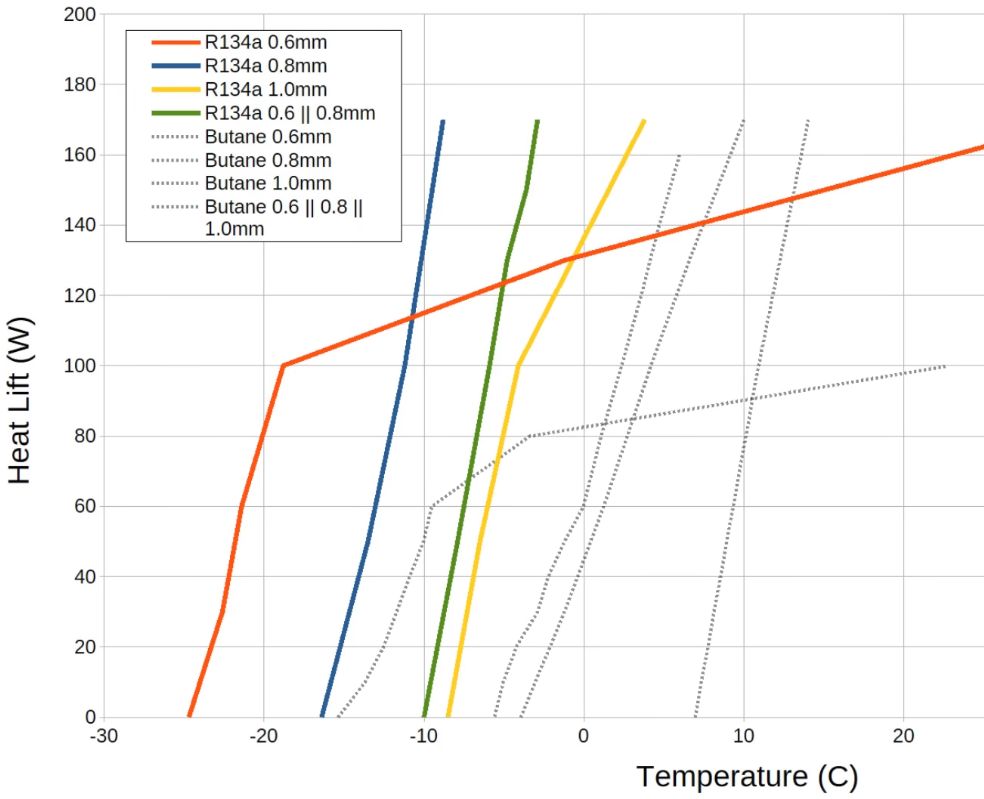
For basic systems you’d use a simple capillary tube, whereas an airconditioner or similarly more complex system would use an adjustable valve design. With the rig you can test the efficiency of different tube diameters, with three sizes available in this version. Unfortunately the electronic expansion valve (EEV) that was going to be used didn’t get a chance to shine due to unforeseen events.

With the R134a and butane a COP of 2.0 – 2.5 was achieved when taking power factor into account, which was reasonable considering a compressor was used that targets R134a. Regardless, if you have ever felt like repurposing that old compressor from a fridge or AC unit, this might be a fun afternoon project.

Continue reading “Testing Refrigerants And Capillary Tubes To Find Peak Performance”

Kiki Is The Unknown Array Language

Kiki bills itself as the “array programming system of unknown origin.” We thought it reminded us of APL which, all by itself, isn’t a bad thing.

The announcement post is decidedly imaginative. However, it is a bit sparse on details. So once you’ve read through it, you’ll want to check out the playground, which is also very artistically styled.

If you explore the top bar, you’ll find the learn button is especially helpful, although the ref and idiom buttons are also useful. Then you’ll find some examples along with a few other interesting tidbits.

Continue reading “Kiki Is The Unknown Array Language”

An orange silicone sheet is shown in front, with depressions in the shape of a 7-segment character "4". A man's hand is holding a pipe leading to a series of needles, which enter the block behind the silicone sheet.

A Suction-Driven Seven-Segment Display

There’s a long history of devices originally used for communication being made into computers, with relay switching circuits, vacuum tubes, and transistors being some well-known examples. In a smaller way, pneumatic tubes likewise deserve a place on the list; [soiboi soft], for example, has used pneumatic systems to build actuators, logic systems, and displays, including this latching seven-segment display.

Each segment in the display is made of a cavity behind a silicone sheet; when a vacuum is applied, the front sheet is pulled into the cavity. A vacuum-controlled switch (much like a transistor, as we’ve covered before) connects to the cavity, so that each segment can be latched open or closed. Each segment has two control lines: one to pressurize or depressurize the cavity, and one to control the switch. The overall display has four seven-segment digits, with seven common data lines and four control lines, one for each digit.

The display is built in five layers: the front display membrane, a frame to clamp this in place, the chamber bodies, the membrane which forms the switches, and the control channels. The membranes were cast in silicone using 3D-printed molds, and the other parts were 3D-printed on a glass build plate to get a sufficiently smooth, leak-free surface. As it was, the display used a truly intimidating number of fasteners to ensure airtight connections between the different layers. [soiboi soft] used the display for a clock, so it sits at the front of a 3D-printed enclosure containing an Arduino, a small vacuum pump, and solenoid valves.

This capacity for latching and switching, combined with pneumatic actuators, raises the interesting possibility of purely air-powered robots. It’s even possible to 3D-print pneumatic channels by using a custom nozzle.

Thanks to [Norbert Mezei] for the tip!

Implementing PCIe Over Fiber Using SFP Modules

Although we can already buy commercial transceiver solutions that allow us to use PCIe devices like GPUs outside of a PC, these use an encapsulating protocol like Thunderbolt rather than straight PCIe. The appeal of  [Sylvain Munaut]’s project is thus that it dodges all that and tries to use plain PCIe with off-the-shelf QSFP transceivers.

As explained in the intro, this doesn’t come without a host of compatibility issues, least of all PCIe device detection, side-channel clocking and for PCIe Gen 3 its equalization training feature that falls flat if you try to send it over an SFP link. Fortunately [Eli Billauer] had done much of the leg work already back in 2016, making Gen 2 PCIe work over SFP+.

The test setup involves a Raspberry Pi 5 on a PCIe breakout board and a PCIe card connected to the whole QSFP intermediate link with custom SFP module PCBs for muxing between PCIe edge connector or USB 3.0 connectors to use those cheap crypto miner adapter boards. The fiber is just simple single-mode fiber. Using this a Gen 2 x1 link can be created without too much fuss, demonstrating the basic principle.

Moving this up to Gen 3 will be challenging and will be featured in future videos, involving more custom PCBs. With Gen 5 now becoming standard on mainboards, it would be great to see this project work for Gen 3 – 5 at link sizes of x4 and even x16 so that it might be able to run external GPUs at full bandwidth unlike Thunderbolt.

Thanks to [zoobab] for the tip.

Continue reading “Implementing PCIe Over Fiber Using SFP Modules”

Authenticate SSH With Your TPM

You probably don’t think about it much, but your PC probably has a TPM or Trusted Platform Module. Windows 11 requires one, and most often, it stores keys to validate your boot process. Most people use it for that, and nothing else. However, it is, in reality, a perfectly good hardware token. It can store secret data in a way that is very difficult to hack. Even you can’t export your own secrets from the TPM. [Remy] shows us how to store your SSH keys right on your TPM device.

Continue reading “Authenticate SSH With Your TPM”

What’s Your Favorite Kind Of Hack?

Talking with [Tom Nardi] on the podcast this week, he mentioned his favorite kind of hack: the community-developed open-source firmware that can be flashed into a commercial product that has crappy firmware, thus saving it. The example, just for the record, is the CrossPoint open e-book reader firmware that turns a mediocre cheap e-book into something that you can do anything you want with. Very nice!

And that got me thinking about “kinds of hacks” in general. Do we have a classification scheme for the hacks that we see here on Hackaday? For instance, the obvious precursor to many of Tom’s favorite hacks is the breaking-into-the-locked-firmware hack, where a device that didn’t want you loading your own firmware on it is convinced to let you do so. Junk-hacking is probably also a category of its own, where instead of finding your prey on AliExpress, you find it on eBay, or in the alleyway. And the save-it-from-the-landfill repair and renovation hacks are close relatives.

The doing-too-much-with-too-little hacks are maybe my personal favorite. I just love to see when someone manages to get DOOM running in Linux on a computer made with only 8-pin microcontrollers. Because of the nature of the game, these often also include a handful of abusing-a-component-to-do-something-it’s-not-meant-to-do hacks. Heck, we even had a challenge for just exactly those kind of hacks.

Then there are fine-art-hacks, where the aesthetic outcome is as important as the technical, or games-hacks where fun is the end result.

What other broad categories of hacks are we missing? And which are your favorite?

Rust-y Firmware For Waveshare Smartwatch

Waveshare makes a nifty little ESP32-S3 based smartwatch product, but its firmware is apparently not to everyone’s liking. Specifically, it’s not to [infiniton] a.k.a [Bright_Warning_8406]’s liking, as they rewrote the entire code base in Rust. No_std Rust, to be specific, but perhaps that doesn’t need to be specified when dealing with ESP32.

On the Reddit thread about the project, he lists some of the advantages. For one thing, the size of the binary has dropped from 1.2 MB to 579 kB while maintaining the same functionality. More interesting is that he’s been able to eliminate polling entirely: the firmware is purely event-driven. The CPU is not just idle but parked until a timer or GPIO event wakes it up. For this form factor, that’s a big deal — you can’t fit a very large battery in a watch, after all.

Getting drivers for the AMOLED display, touch sensor, audio, and RTC modules written from scratch is an impressive accomplishment. Apparently the screen driver in particular was “a nightmare” and we believe it. There’s a reason most people go for existing libraries for this stuff. [Bright_Warning] did not post screenshots or video, but claims his version of the watch watch can make HTTP calls to Smart Home, play MP3s, play the old phone games– Snake, 2048, Tetris, Flappy Bird, Maze– and even comes with a T9 keyboard for text input.

If you’re looking to get closer to bare metal, and don’t mind it being Rust-y, take a look at the code on GitHub in the first link above. This author isn’t enough of a rustacean to say if the code is as good as it sounds at a glance, but nothing egregious jumps out. The documentation describing exactly what’s going on under the hood isn’t half-bad, either. If you aren’t into Waveshare products, you could easily adapt this code into a more DIY ESP32 watch, too.

If you’re not into Rust, uh… washing soda and electric current can get it off of steel, and probably microcontrollers too. We can’t say that the chip will work after that, but hey — no rust.