
LED technology has improved by leaps and bounds in recent years, with what was once considered unachievable being common place now. Two of the main parameters of interest, total input power and conversion efficiency have been steadily increasing over the years. An efficacy of 120 lumens/watt is fairly common nowadays, and it may not be improbable to expect double this figure in the near future. Input power ratings have also steadily increased, with single LED units capable of 100 W or more becoming common.
But the Chinese manufacturer Yuji seems to have hit the ball out of the park by introducing their BC-Series, 500 W, high CRI, high Power, COB LED. Single, 500 W COB LED’s are not new and have been available since a couple of years, but their emitting surface areas are quite large. For example, a typical eBay search throws up parts such as this one – 500 W, high Power LED, 60,000 lm, 6000-6500K. It has a large, square emitting area of 47.6 x 47.6 mm. By comparison, the Yuji BC-Series are 27 mm square, with an active emitting area only 19 mm in diameter. This small emitting area makes it easier to design efficient reflector and/or lens units for the LED.
Luminous Flux is between 18,000 to 21,000 for a color temperature of 3200 K, and between 20,000 to 24,000 for the 5600 K type. Further, this high power rating is accompanied with a pretty high color rendering index (CRI) above 95. This allows the LED to faithfully reveal the natural colors of objects due to its wide spectrum. Electrically, it is rated for 12 Amps with input voltage between 35 V to 39 V. This translates to between 420 W ~ 468 W of input electrical power. Some quick math tells us that the efficacy efficiency works out to just a little over 50 lm/W, which isn’t all that great. But with light sources, you can have high-efficacy high-efficiency or high CRI, but not both – that’s just how the physics of it works.
At US $ 500 a pop, these eye blinders do not come cheap and may not find much use for individual hackers. But for some applications, such as studio and theatre lighting or photography, they may be just what the Doctor prescribed. In the video after the break, you can see [Matt] from DIY Perks give a rundown of the LED’s features and take it for a test ride.

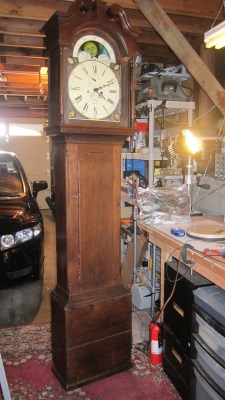 He starts off by building a custom electro-mechanical clock movement, and since he’s planning as he progresses, meccano, breadboard and jumper wires were the way to go. Hot glue helps preserve sanity by keeping all the jumper wires in place. To interface with all of the peripherals in the clock, he decided to use a bank of shift registers driven from a regular Arduino Uno. The more expensive DS3231 RTC module ensures better accuracy compared to the cheaper DS1307 or similar clones. A bank of RGB LEDs acts as an annunciator panel inside the clock to help provide various status indications. The mechanical movement itself went through several iterations to get the time display working with a smooth movement of the hands. Besides displaying time, [David] also added a moon phase indicator dial. A five-rod chime is struck using a stepper motor driven cam and a separate solenoid is used to pull and release three chime hammers simultaneously to generate the loud gong sounds.