After The Prize: SatNOGS Builds Satellites

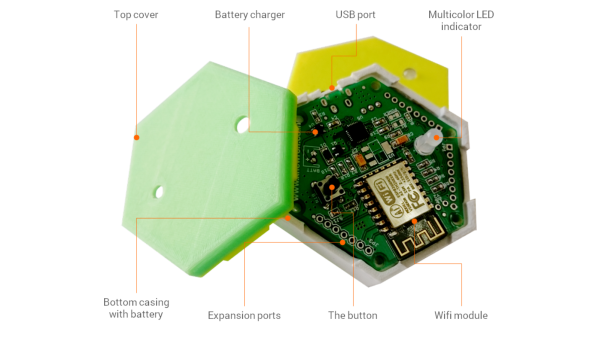
When Hackaday announced winners of the 2014 Hackaday Prize, a bunch of hackers from Greece picked up the grand prize of $196,418 for their SatNOGS project – a global network of satellite ground stations for amateur Cubesats.

upsat-integration-test-1The design demonstrated an affordable ground station which can be built at low-cost and linked into a public network to leverage the benefits of satellites, even amateur ones. The social implications of this project were far-reaching. Beyond the SatNOGS network itself, this initiative was a template for building other connected device networks that make shared (and open) data a benefit for all. To further the cause, the SatNOGS team set up the Libre Space Foundation, a not-for-profit foundation with a mission to promote, advance and develop Libre (free and open source) technologies and knowledge for space.

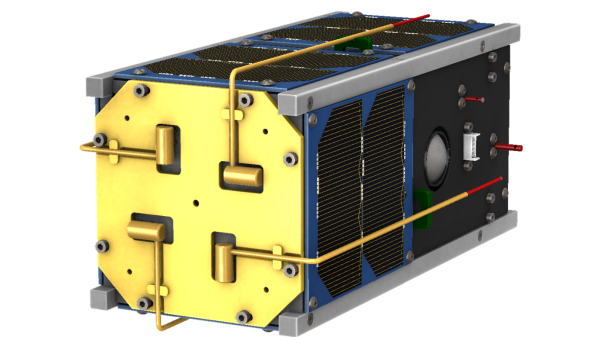
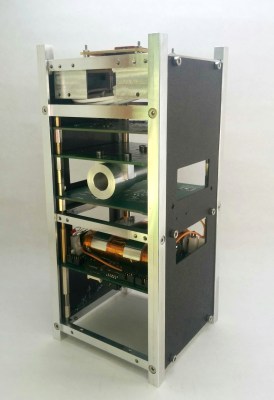
Now, the foundation, in collaboration with the University of Patras, is ready to launch UPSat – a 2U, Open Source Greek Cubesat format satellite as part of the QB50 international thermosphere research mission. The design aims to be maximally DIY, designing most subsystems from scratch. While expensive for the first prototype, they hope that documenting the open source hardware and software will help kickstart an ecosystem for space engineering and technologies. As of now, the satellite is fully built and undergoing testing and integration. In the middle of July, it will be delivered to Nanoracks to be carried on a SpaceX Dragon capsule and then launched from the International Space Station.

Continue reading “After The Prize: SatNOGS Builds Satellites”

Reading An IR Thermometer The Hard Way

[Derryn Harvie] from the MakeHackVoid maker space hacked a $10 IR Thermometer and made it talk USB. Sounds easy? Read on.

He opened it up in the hope of finding, and tapping into, a serial bus. But he couldn’t find one, and the main controller was a COB blob – hidden under unmarked black epoxy. Normally this is a dead-end.  (We’ve seen some interesting approaches to decapping epoxy blobs, and even ICs with lasers.)

But [Derryn] went his own way – intercepting the data going from the micro-controller to the LCD display, and reverse engineering it using another microcontroller. He scraped off the solder mask over the tracks leading to the LCD display, and used an oscilloscope to identify the common drive lines. He then used a function generator to excite each of the LCD common lines and the segments lines to build a complete matrix identifying all the combinations that drove the segments. With all the information decoded, wires were soldered so he could hook up an Arduino, and the cut tracks repaired.

Since the LCD was a multiplexed display, the bias voltages were at four levels. Luckily, he could extract most of the LCD information by reading just eight of the segment drive lines, using up all of the analog inputs on the Arduino. Perhaps a different microcontroller with more ADC inputs would have allowed him to display more LCD functions. Well, he can always upgrade his upgrade later. If you have a similar hack to implement, then [Derryn]’s code could be useful to get started.

Thanks, [csirac2] for sending us this tip from MakeHackVoid.

Super Massive Musical Instrument

Performing music in open spaces can be a real challenge. The acoustics of the space can play spoil-sport. Now imagine trying to play an instrument spread out over tens of kilometres. The folks at [LimbicMedia] wrote in to tell us about the project they worked on to build the The World’s Largest Musical Instrument.

The system consists of wirelessly controlled air horns deployed at remote locations. Each air horn is self contained, driven by a supply of compressed air from a scuba diving tank and battery powered electronics. The wireless link allows the air horns to be placed up to 10kms away from the base station. Each air horn is tuned to a specific note of the piano keyboard which, in turn, is configured to transmit its note data to the air horns.

HornsBeaconHill_02Currently, they have built 12 air horns, enough to let them play the Canadian and British anthems. The horns are built out of PVC piping and other off-the-shelf plastics with the dimensions of the horn determining its note. The setup was installed and performed at the Music by the Sea festival recently, by mounting the air horns on 12 boats which were stationed out at Sea in the Bamfield Inlet in Eastern Western Canada. But that was just a small trial. The eventual plan is to set up air horns all around Canada, and possibly other places around the world, and synchronise them to play music simultaneously, to commemorate the 150th Canada Day celebrations in 2017.

There aren’t many details shared about the hardware, but it’s not too difficult to make some guesses. A micro-controller to operate the air solenoid, long range radio link to connect all the air horns to the base station, and another controller to detect the key strokes on the Piano. The limiting issue to consider with this arrangement is the spatial separation between the individual air horns. Sound needs about 2.9 seconds to travel over a kilometer. As long as all the air horns are at approximately the same distance from the audience, this shouldn’t be a problem. See how they did in the video after the break. We do know of another project which handled that problem brilliantly, but we’ll leave the details for a future blog post.

This isn’t the first time [LimbicMedia] was commissioned to create audio-visual public installations. A couple of years back they built this Sound Reactive Christmas Tree in Victoria, British Columbia.

Continue reading “Super Massive Musical Instrument”

Hackaday Prize Entry: Optical Experiments Using Low Cost Lasercut Parts

Experimenting with optics can be great fun and educational. Trouble is, a lot of optical components are expensive. And other support paraphernalia such as optical benches, breadboards, and rails add to the cost. [Peter Walsh] and his team are working on designing a range of low-cost, easy to build, laser cut optics bench components. These are designed to be built using commonly available materials and tools and can be used as low-cost teaching tools for high-schools, home experimenters and hacker spaces.

They have designed several types of holders for mounting parts such as lasers, lenses, slits, glass slides, cuvettes and mirrors. The holder parts are cut from ¼ inch acrylic and designed to snap fit together, making assembly easy. The holders consist of two parts. One is a circular disk with three embedded neodymium magnets, which holds the optical part. The other is the base which has three adjustment screws which let you align the optical part. The magnets allow the circular disk to snap on to the screws on the base.

A scope for improvement here would be to use ball plunger screws instead of the regular ones. The point contact between the spherical ball at the end of the screw and the magnet can offer improved alignment. A heavy, solid table with a ferrous surface such as a thick sheet of steel can be used as a bench / breadboard. Laser cut alignment rods, with embedded magnets let you set up the various parts for your experiment. There’s a Wiki where they will be documenting the various experiments that can be performed with this set. And the source files for building the parts are available from the GitHub repository.

Check out the two videos below to see how the system works.

Continue reading “Hackaday Prize Entry: Optical Experiments Using Low Cost Lasercut Parts”

Soldering Iron Cauterization

Medical hacks are not for the weak of stomach, so read further at your own risk. [Todd Harrison] shows you how to remove a stubborn skin wart using a good ol’ soldering iron, and a fair endurance for pain. After all, cauterization is a well known and documented medical procedure. If you have the stomach for this, read on, or better, check out his 9 minute video after the break. If there are kids around, turn down the volume between 1:40 to 2:20.

Continue reading “Soldering Iron Cauterization”

Megaprocessor Is A Macro Microprocessor

If we have to make a list of Projects that are insane and awesome at the same time, this would probably be among the top three right up there. For the past few years, [James Newman] has been busy building Megaprocessor – a huge micro-processor made out of transistors and LED’s, thousands of ’em. “I started by wanting to learn about transistors. Things got out of hand.” And quite appropriately, he’s based out of Cambridge – the “City of perspiring dreams“. The Why part is pretty simple – because he can. We posted about his build as recently as 10 months back, but he’s made a ton of progress since then and an update seemed in order.

megaprocessor_04How big is it ? For starters, the 8-bit adder module is about 300mm (a foot) long – and he’s using five of them. When fully complete, it will stretch 14m wide and stand 2m tall, filling a 30 sq.m room, consisting of seven individual frames that form the parts of the Megaprocessor.

The original plan was for nine frames but he’s managed to squeeze all parts in to seven, building three last year and adding the other four since then. Assembling the individual boards (gates), putting them together to form modules, then fitting it all on to the frames and putting in almost 10kms of cabling is a slow, painstaking job, but he’s been on fire last few months. He has managed to test and integrate the racks shown here and even run some code.

The Megaprocessor has a 16-bit architecture, seven registers, 256bytes of RAM and a questionable amount of PROM (depending on his soldering endurance, he says). It sips 500W, most of it going to light up all the LED’s. He guesses it weighs about half a ton. The processor uses up 15,300 transistors and 8,500 LED’s, while the RAM has 27,000 transistors and 2,048 LED’s. That puts it somewhere between the 8086 and the 68000 microprocessors in terms of number of transistors. He recently got around to calculating the money he’s spent on this to date, and it is notching up over 40,000 Quid (almost $60,000 USD)!  You can read a lot of other interesting statistics on the Cost and Materials page.

Continue reading “Megaprocessor Is A Macro Microprocessor”

1btn – An Open Source Dash

The availability of cheap radios, omni-present WiFi and powerful web services means the IoT wave is here to stay. Amazon got into the act with its “do only one thing” Dash button. But a more interesting solution would be an IoT “do it all” button.

[Anand] has been working on his 1btn Open Source WiFi connected IoT button for a while. It connects to the Internet over WiFi to trigger whatever action you have assigned to it using a simple, online interface. It’s reconfigurable and open source. Which means it can be used in pretty imaginative ways, and if needed, can be re-flashed with your own custom firmware should you decide to really get under its hood.

The 1btn’s ESP8266 module is usually in sleep mode, waking up when the button is pressed, making the connection, performing the task and then going back to sleep once confirmation is received. A Red/Green LED indicates if the action was successful or not. You can set it up to send e-mails, messages, tweets or perform actions via a custom script, API or the IFTTT – maker channel. To make it hacker friendly, all of the ESP8266 GPIO pins are accessible via headers. This makes it convenient to add external sensors, for example. There’s also a (unpopulated) QFN footprint to allow adding an ATmega device (168P/328P) whose GPIO pins are also accessible via headers. This opens up a large number of additional applications for the device such as home automation.

On the software side, the 1btn connects to a web console, where you can set up an account, configure the device, register its MAC ID, assign it an alias and set up its actions. All of the source files for the 1btn – firmware, enclosure, schematic, BOM, PCB layout and example use cases – are posted on his Github repository.

The HackadayPrize2016 is Sponsored by: