3D Printering: Induction Heating

Every filament-based 3D printer you’ll find today heats plastic with resistive heaters – either heater cartridges or big ‘ol power resistors. It’s efficient, but that will only get you so far. Given these heaters can suck down only so many Watts, they can only heat up so fast. That’s a problem, and if you’re trying to make a fast printer, it’s also a limitation.

Instead of dumping 12 or 24 VDC into a resistive heater, induction heaters passes high-frequency AC through a wire that’s inductively coupled to a core. It’s also very efficient, but it’s also very fast. No high-temperature insulation is required, and if it’s designed right, there’s less thermal mass. All great properties for fast heating of plastic.

A few years ago, [SB] over on the RepRap blog designed an induction heater for a Master’s project. The hot end was a normal brass nozzle attached to a mild steel sleeve. A laminated core was attached to the hot end, and an induction coil wrapped around the core. It worked, but there wasn’t any real progress for turning this into a proper nozzle and hot end. It was, after all, just a project.

Finally, after several years, people are squirting plastic out of an induction heated nozzle. [Z], or [Bulent Unalmis], posted a project to the RepRap forums where he is extruding plastic that has been heated with an induction heater. It’s a direct drive system, and mechanically, it’s a simpler system than the fancy hot ends we’re using now.

Electronically, it’s much more complex. While the electronics for a resistive heater are just a beefy power supply and a MOSFET, [Z] is using 160 kHz AC at 30 V. That’s a much more difficult circuit to stuff on a printer controller board.

This could be viewed as just a way of getting around the common 24V limitation of common controller boards; shove more power into a resistor, and it’s going to heat faster. This may not be the answer to hot ends that heat up quicker, but at the very least it’s a very neat project, and something we’d like to see more of.

You can see [Z]’s video demo of his inductive hot end below. Thanks [Matt] for the tip.
Continue reading “3D Printering: Induction Heating”

Calibrating The MSP430 Digitally Controlled Oscillator

The MSP430 is a popular microcontroller, and on board is a neat little clock source, a digitally controlled oscillator, or DCO. This oscillator can be used for everything from setting baud rates for a UART or for setting the clock for a VGA output.

While the DCO is precise – once you set it, it’ll keep ticking off at the correct rate – it’s not accurate. Without a bit of code, it’s difficult to set the DCO to the rate you want, and the code to set that rate will be different between different chips.

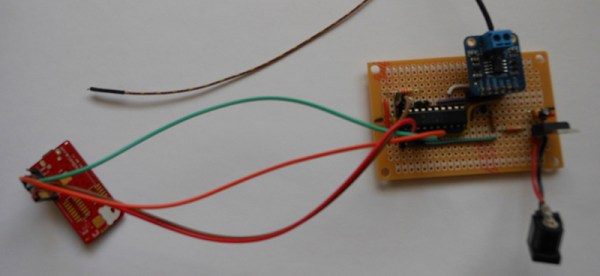
When [Mike] tried to set up a UART between an MSP430 and a Bluetooth module, he ran into a problem. Setting the MSP to the correct baud rate was difficult. Luckily, there’s a way around that.

There’s an easy way to set the DCO on the MSP programatically; just set two timers – one that interrupts every 512 cycles, with its clock source set to the DCO, and another that interrupts every 32768 cycles that gets its clock from a 32.768kHz crystal. The first timer clicks off every second, and by multiplying the first timer by 512, the real speed of the DCO can be deduced.

After playing around with this technique and testing the same code on two different chips, [Mike] found there can be a difference of almost 1MHz between the DCOs from chip to chip. That’s something that would have been helpful to know when he was playing around with VGA on the ‘430. Back then he just used a crystal.

Measuring Filters And VSWR With RTL-SDR

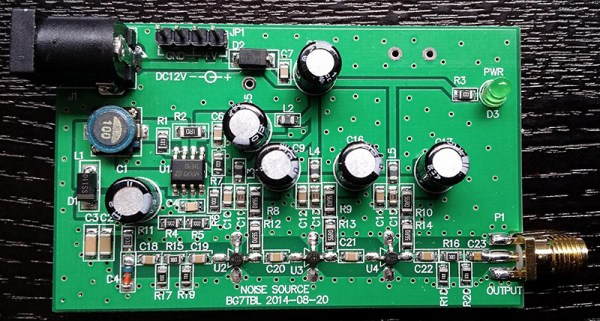
Once again the ubiquitous USB TV tuner dongle has proved itself more than capable of doing far more than just receiving broadcast TV. Over on the RTL-SDR blog, there’s a tutorial covering the measurement of filter characteristics using a cheap eBay noise source and an RTL-SDR dongle.

For this tutorial, the key piece of equipment is a BG7TBL noise source, acquired from the usual online retailers. With a few connectors, a filter can be plugged in between this noise source and the RTL-SDR dongle. With the hardware out of the way, the only thing remaining is the software. That’s just rtl_power and this wonderful GUI. The tutorial is using a cheap FM filter, and the resulting plot shows a clear dip between 50 and 150 MHz. Of course this isn’t very accurate; there’s no comparison to the noise source and dongle without any attenuation. That’s just a simple matter of saving some scans as .csv files and plugging some numbers in Excel.

The same hardware can be used to determine the VSWR of an antenna, replacing the filter with a directional coupler; just put the coupler between the noise source and the dongle measure the attenuation through the range of the dongle. Repeat with the antenna connected, and jump back into Excel.

Hacklet 38 – 6502 Projects

The 6502 CPU is probably the most famous of all the 8-bit processors out there, whether in the form of bare chips for homebrew computers, or as slightly modified derivative chips found in everything from the C64, the NES, and the BBC Micro. For this edition of the Hacklet, we’re taking a look at all the 6502-based builds on hackaday.io.


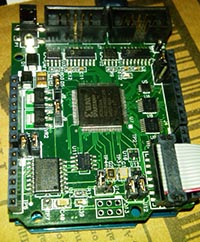
6917521396192751941There aren’t many transistors on a 6502, making it perfect for implementing on an FPGA. [Michael A. Morris] has an Arduino FPGA shield, and his soft-6502 project is called Cameleon. There’s a bunch of SPI Flash and FRAM on board, and the 128kB of (parallel) SRAM on the board is more than enough to handle any computational task you can throw at it.
Since the Cameleon is built on programmable logic, [Michael] thought it would be a good idea to put some of those unused opcodes to use. There are instructions for coprocessor support, and a bunch of instructions specifically designed to make the Forth implementation easier.


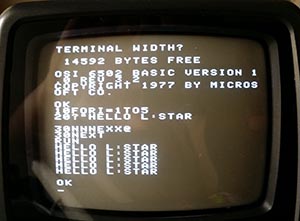
4244551421640813832Maybe programmable logic isn’t your thing, and you’d just like a simple computer like the Ohio Scientific or the Apple I. The L-Star is for you. That’s [Jac Goudsmit]’s build featuring a 6502, a Parallax Propeller, and little else.
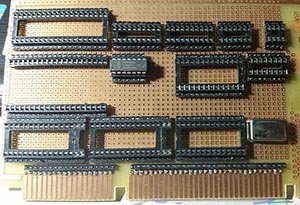
The Parallax Propeller is a powerful (multi-core!) chip that’s easily capable of handling video out, keyboard in, and serving up the ROM and RAM of a computer. [Jac]’s build does it all beautifully, and if you’re looking for the easiest way to run code on a 6502, this is how you do it.


6502s were found in just about everything, and while poking around at the local e-waste recycler, he stumbled upon something rather interesting. The case badges screamed, “BS medical device”, but after poking around a bit, he figured out this was an MTU-130 system, a machine that was apparently the top of the line in its day.

There’s some weird stuff going on in this machine – 18-bit addressing and 80kB of RAM. So far [Eric] has managed to dump the ROM, and he’s taking a look at the floppy controller board to see if he can figure out how it’s mapped. It’s one thing to figure out what’s broken on an Apple II or C64; those are well documented machines. It’s another thing entirely to figure out a machine very few people have heard of, and we tip our hat to [Eric] and his efforts.


4000511410347834190Here’s a build that both does and doesn’t have a 6502 in it. [BladeRunner]’s SheMachine is a single board computer that has a 65c816 in it. The ‘816 is an interesting beast that operates as a standard 6502 until a bit is flipped in one of its registers. After that, it has a 24-bit address space for addressing 16 Megabytes of memory, 16-bit registers, but is still completely backwards compatible with the 6502. Yes, it does have weird interleaved address pins, but we can only imagine what the world would be like if this chip came out a few years earlier…

[BladeRunner] is designing the SheMachine with 1MB of SRAM – more than enough, really – and is mapping all the memory through a CPLD. That’s how you should do it, anyway.

Hackaday Retro Edition: A New Commodore 64 Case

Some time in the 80s, the plastic injection molds for the Commodore 64C, the Commodore 128, and the Plus/4 were shipped from somewhere in Asia to the great Commodore Mother Brain in West Chester, Pennsylvania. These molds had already produced a million or two cases, but there were some issues with production – too much waste, or something like that. A mechanical engineer took a look at the molds, sent out some recommendations, and moved the 2500 pound molds to a corner of the building.

For some time after a gray day in April, 1994 these molds sat in a West Chester, Pennsylvania warehouse until they were sold off. They made their way to a plastics manufacturer around Dallas, Texas where they sat for twenty years. All things must pass, sometimes several times, and this plastics manufacturer closed down, contacted an auctioneer, and began to sell off some of their equipment.

The hero of our story, [Dallas Moore], owns a small business, buying and selling everything from Barbie dolls to antiques. He found an ad for an auction at a plastics manufacturing plant in the newspaper, and figuring he could find something interesting, headed out to the auction preview.

The auctioneer at this liquidation sale asked [Dallas] what he did, and mentioned there was something pretty cool tucked away in a warehouse full of hardened steel molds. Something about molds for old computers. These were the molds for the Commodore 64C, Commodore 128, and the Commodore Plus/4. A literal crucible of computing history, stacked on a pallet and up for sale.

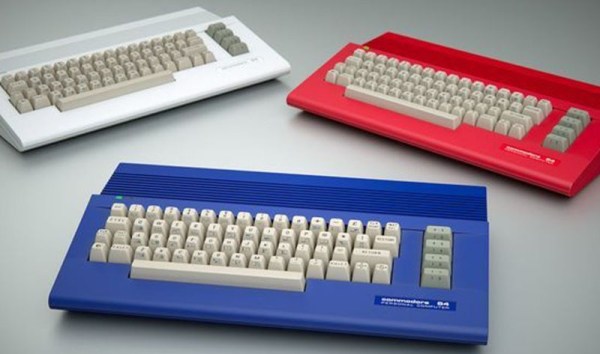
The auctioneer said one of his friends was interested in the molds, and thought they would make a neat coffee table. Something about this struck [Dallas] the wrong way and for the entire drive home he thought about someone taking history and turning it in to a piece of furniture. He decided to buy these molds and lugged the three 2500 pound pieces of hardened steel to his shop. Not wanting to let a good piece of history go to waste, he contacted another plastics manufacturer, planned a run of a thousand or so Commodore 64C cases in red, white, and blue. [Dallas] is funding the whole production run through Kickstarter.

To me, this is one of the greatest retrocomputing successes in recent memory. There will always be someone putting SD cards in old computers, getting them on the Internet (and especially pointed towards our retro edition), and cloning complete systems in FPGAs. This, though, is a clear example of someone recognizing the historical importance of several thousand pounds of steel, realizing there’s a market out there, and doing the leg work to remanufacture these pieces of history.

I put in my $45 for a red one, and I tipped off [Bil Herd], designer of the C128 and Plus/4, to this Kickstarter. He’s been talking with [Dallas], there I’m sure he’ll chime in on the comments with some retellings of Commodore battle stories.

If it arrives in time, I’ll be bringing my limited-edition red 64C case to the Vintage Computer Festival in Wall, NJ April 17-19. That’s a plug for the event. If you’re in the area, you should come.

EDIT: [Dallas] has a different story of where the molds came from.

2015 THP Inspiration: Renewable Energy

Most of our energy comes from dead algae or dead ferns right now, and we all know that can’t continue forever. The future is by definition sustainable, and if you’re looking for a project to change the world for this year’s Hackaday Prize, you can’t do better than something to get the world off carbon-based fuels.

mhqyqz7The simplest solar builds can be as fun as a redneck hot tub – a solar thermal water heater repurposed into a heated swimming pool with the help of a pump and JB Weld. You can even build a hose-based version for $100. They can be as useful as a Maximum Power Point Tracking charger for a solar setup – a few bits of electronics that ensure you’re getting the most out of your solar cells. You can, of course, access solar power in a roundabout way with a wind generator built from a washing machine and a 555 timer.

carben-mainGetting energy from the sun is one thing, and putting it to use is another thing entirely. We spend a lot of energy on transportation, and for that there’s a solar power bike, an electric scooter, or a completely open source electric car.

Building the machines that make sustainable energy possible or even just the tools that will let us use all that energy are just a few ideas that would make great entries for The Hackaday Prize. You could go another direction and build the tools that will build and maintain these devices, like figuring out a way to keep these batteries and generators out of the landfill. Any way you look at it, anything that actually matters  would make a great entry to The Hackaday Prize.

2015 THP Inspiration: The Environment

It’s not as flashy as Tesla coils or electric vehicles going 200 mph, but the environment is more important than a bunch of cool baubles and sparks flying everywhere. When it comes to this year’s Hackaday Prize, you’re going to need a project that matters, and what’s a better way to do it than with something to help the environment?

While not traditionally a domain that rocks people’s socks, there are a lot of cool builds that can help the environment like this hyperspectral imager that’s a mashup of a spectrometer and a camera, or something that takes an image of an object, complete with the spectral data of each pixel. It’s useful for everything from farming, to forestry, to medicine.

aquaponicsPerhaps you want to get your hands messy by mucking about in the dirt. You’ll probably find something interesting to build for this year’s Hackaday Prize, like the modular farmer’s market we saw in Detroit last year. How about an urban farming and aquaponics setup? Tilapia do well in giant buckets, you know.

If robots are more your speed, then how about an RC tractor or an entire robotic farm? You could always eradicate invasive plants with a quadcopter if flying around is more suited to your expertise. There are plenty of ways to do something that matters for this year’s Hackaday prize, but we’d be lying if we had all the answers. That’s where you come in with your entry for The Hackaday Prize.