The Making Of The Hackaday Prize Video

As you’re probably aware, there’s a video announcing the launch of The Hackaday Prize blocking the front page of Hackaday right now. This is by design, and surprisingly we haven’t gotten any complaints saying, ‘not a hack’ yet. I’m proud of you. Yes, all of you.

Making this video wasn’t easy. The initial plans for it were something along the lines of the new Star Wars trailer. Then we realized we could do something cooler. The idea still had Star Wars in it, but we were going for the classics, and not the prequels. As much as we love spending two hours watching a movie about trade disputes, we needed to go to Tatooine.
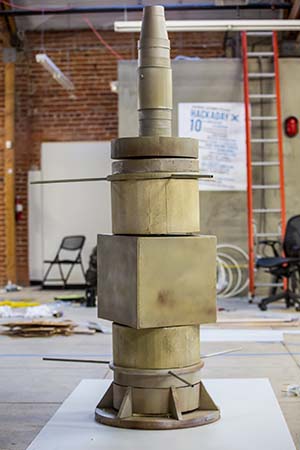
QV4A4035I just wanted to go to Toshi station

This meant building a prop. We decided on the moisture vaporators from Uncle Owen’s farm. It’s a simple enough structure to build at the Hackaspace in a weekend, and could be broken down relatively easily for transport to the shooting site. I’ve created a hackaday.io project for the actual build, but the basic idea is a few pieces of plywood, an iron pipe for the structural support, and some Coroplast and spray paint to make everything look like it’s been sitting underneath two suns for several decades.

Oh, I was the only person at the hackaspace that knew what greebles were. That’s not pertinent in any way, I’d just like to point that out.

The Suit

The vaporator is the star of the show, but we also rented a space suit. No one expected teflon-covered beta cloth when we were calling up costume rental places, but the suit can really only be described as a space-suit shaped piece of clothing. The inlet and outlet ports are resin, and the backpack is a block of foam. If anyone knows where we can get an Orlan spacesuit, or even a NASA IVA or Air Force high altitude suit, let us know.

Credits

[Matt Berggren] led the prop build and starred in the assembly footage. [Aleksandar Braic] and [Rich Hogben] rented a ridiculous amount of camera equipment. On set for the hijinks was [Aleksandar “Bilke” Bilanovic], [Brian Benchoff] (me), [Jasmine Bracket], [Sophi Kravitz], and [Mike Szczys].
2015 THP Inspiration: Medical Hacks

Last year’s Hackaday Prize focused on building something cool, useful, and open. This led to builds as impressive as quadcopters nicknamed the Decapitron, to devices as useful as an Everything Radio. It’s a big field, and if you want to build something that will win, you first need an idea.

This year we’re making that part of the process a little easier for you. We’re looking for builds that matter, be they devices that monitor pollution, feed entire populations, lay the groundwork for powering an entire city, or reduce the cost and increase access to medical care.

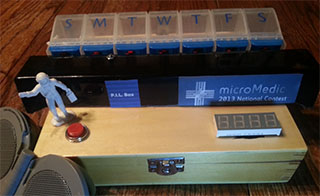
pillminderMedical builds are a tricky subject, but over the years we’ve seen a few that stand out. Some can be as simple as a pill dispenser that tells the Internet when you don’t take your meds. This type of build is actually pretty popular with several iterations, one that works with pill bottles.

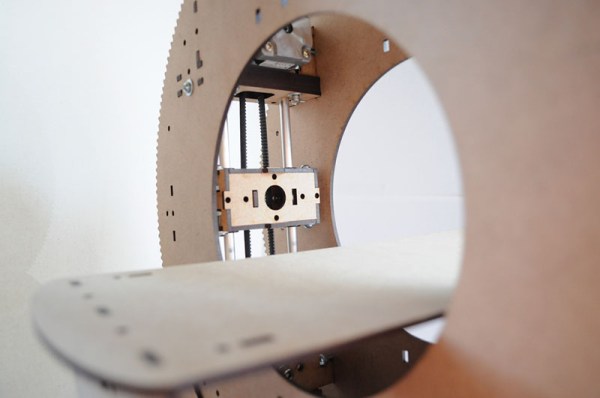
Maybe a gadget you could find in a drug store isn’t your thing. That’s okay, instead you can turn your attention to advanced medical imaging, like 3D printing a brain tumor and preventing a misdiagnosis. We’ve seen 3D printed MRI and CT scans for a while now, and coming up with a system that automates the process would be a great entry for the Hackaday prize.

prosOf course with 3D printers, you have a bunch of prosthesis applications; from a nine-year-old who designed his own prosthetic arm, a printed prosthetic arm for a stranger, or something simpler like our own [Bil Herd]’s quest to rebuild a finger.
These are all simple builds, but ones that clearly meet the criteria of doing something meaningful. The sky is the limit, and if you want to improve the desktop CT scanner, learn CPR (correctly) from an automated assistant, or be brought back to life with your own design, that’s all well within the goals of this year’s Hackaday Prize.

Open Source, 3D Printed Rocket Engines

A liquid-fuel rocket engine is just about the hardest thing anyone could ever build. There are considerations for thermodynamics, machining, electronics, material science, and software just to have something that won’t blow up on the test rig. The data to build a liquid engine isn’t easy to find, either: a lot of helpful info is classified or locked up in one of [Elon]’s file cabinets.

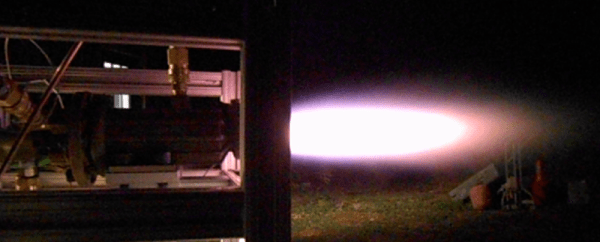
[Graham] over at Fubar Labs in New Jersey is working to change this. He’s developing an open source, 3D printed, liquid fuel rocket engine. Right now, it’s not going to fly, but that’s not the point: the first step towards developing a successful rocket is to develop a successful engine, and [Graham] is hard at work making this a reality.

This engine, powered by gaseous oxygen and ethanol, is designed for 3D printing. It’s actually a great use of the technology; SpaceX and NASA have produced 3D printed engine parts using DMLS printers, but [Graham] is using the much cheaper (and available at Shapeways) metal SLS printers to produce his engine. Rocket engines are extremely hard to manufacture with traditional methods, making 3D printing the perfect process for building a rocket engine.

So far, [Graham] has printed the engine, injector, and igniter, all for the purpose of shoving oxygen and ethanol into the combustion chamber, lighting it, and marveling at the Mach cones. You can see a video of that below, but there’s also a few incredible resources on GitHub, the Fubar Labs wiki, and a bunch of pictures and test results here.

Continue reading “Open Source, 3D Printed Rocket Engines”

Execution Tracing On Cortex-M3 Microcontrollers

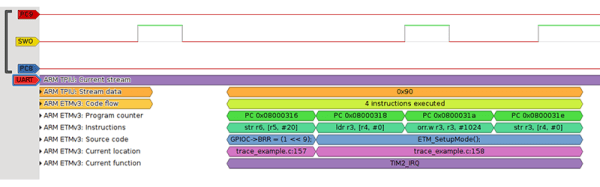
The higher-power ARM micros have a bunch of debugging tools for program and data tracing, as you would expect. This feature – CoreSight Trace Macrocells – is also found in the lowly ARM Cortex M3 microcontroller. The Cortex M3 is finding its way into a lot of projects, and [Petteri] wondered why these debugging tools weren’t seen often enough. Was it a question of a lack of tools, or a lack of documentation? It doesn’t really matter now, as he figured out how to do it with a cheap logic analyzer and some decoders for the trace signals.

There are two trace blocks in most of the Cortex M3 chips: the ITM and ETM. The Instrumentation Trace Macrocell is the higher level of the two, tracing watchpoints, and interrupts. The Embedded Trace Macrocell shows every single instruction executed in the CPU.  Both of these can be read with a cheap FX2-based logic analyzer that can be found through the usual outlets for about $10. The problem then becomes software, for which [Petteri] wrote a few decoders.

To demonstrate the debugging capability, [Petteri] tracked down a bug in his CNC controller of choice, the Smoothieboard. Every once in a great while, the machine would miss a step. With the help of the trace tool and by underclocking the micro, [Petteri] found the bug in the form of a rounding error of the extruder. Now that he knows what the bug is, he can figure out a way to fix it. He hasn’t figured that out yet. Still, knowing what to fix is invaluable and something that couldn’t be found with the normal set of tools.

Hackaday Links Column Banner

Hackaday Links: March 8, 2015

Nintendo is well known for… odd… hardware integration, but this video takes it to a new level. It’s a Gamecube playing Zelda: Four Swords Adventure, a game that can use a Game Boy Advance as a controller. [fibbef] is taking it further by using the Gamecube Game Boy Advance player to play the game, and using another GBA to control the second Gamecube. There’s also a GBA TV tuner, making this entire setup a Gamecube game played across two Gamecubes, controlled with a Game Boy Advance and displayed on a GBA with a TV tuner. The mind reels.

TI just released a great resource for analog design. It’s the Analog Engineer’s Pocket Reference, free for download, if you can navigate TI’s site. There are print copies of this book – I picked one up at Electronica – and it’s a great benchtop reference.

A few months ago, a life-size elephant (baby elephants are pretty small…) was 3D printed at the Amsterdam airport. A model of the elephant was broken up into columns about two meters tall. How did they print something two meters tall? With this add-on for a Ultimaker. It flips an Ultimaker upside down, giving the printer unlimited build height. The guy behind this – [Joris van Tubergen] – is crazy creative.

And you thought TV was bad now. Here’s the pitch: take a show like Storage Wars or American Pickers – you know, the shows that have people go around, lowball collectors, and sell stuff on the Internet – and put a “Tech” spin on it. This is happening. That’s a post from a casting producer on the classic cmp message boards. Here’s the vintage computer forums reaction. To refresh your memory, this is what happens when you get ‘tech’ on Storage Wars. Other examples from Storage Wars that include vastly overpriced video terminals cannot be found on YouTube. Here’s a reminder: just because it’s listed on eBay for $1000 doesn’t mean it’ll sell on eBay for $1000.

Optimized Molds With 3D Printing

[Florian] has a few arcade games and MAME machines, and recently he’s been trying to embed objects in those hard plastic spheres on the end of joysticks. A common suggestion is to 3D print some molds, but even though that’s a great idea in theory the reality is much different: you’re going to get layer lines on the casting, and a mirror finish is impossible.

No, a silicone mold is the way to do this, but here 3D printing can be used to create the mold for the silicone. Instead of a few pieces of hot glued cardboard or a styrofoam cup, [Florian] is 3D printing a a container to hold the liquid silicone around the master part.

After printing a two-piece part to hold both halves of a silicon mold, [Florian] put the master part in, filled it up with silicone, and took everything apart. There were minimal seam lines, but the end result looks great.

In addition to making a 3D printed mold container, [Florian] is also experimenting with putting 3D printed parts inside these joystick balls. The first experiment was a small 3D printed barrel emblazoned with the Donkey Kong logo. This turned out great, but there’s a fair bit of refraction that blows out all the proportions. Further experiments will include a Pac-Man, a skull, and a rose, to be completed whenever [Florian] gets a vacuum chamber.

New Part Day: Really, Really Wide Screens

Once again my inbox runneth over with press releases, Kickstarter announcements, unsolicited emails, and a bunch of product announcements. Most of these, of course, are never to be seen again. Once in a great while – statistically insignificant, really – there’s a product announcement that’s just interesting enough to take a closer look at. This time, it’s a really, really wide screen.

LCDs are curious beasts when it comes to display interfaces. Back in the bad old days of gigantic tube TVs, the aspect ratio of these displays was fairly limited. You could get a 4:3 display, and with the rare exception of o-scopes, vector displays, and other weird devices, that was it. Since then we’ve moved to LCDs, a promising technology if you want a display in the shape of a car dashboard, or as a thin strip to put on some rackmount modules. It took this long for a sliver of an LCD to appear.

This display produced by EarthLCD is a 10.4 inch display, about ten inches wide and one inch tall. The resolution is 1024 by 100. It is, by far, the skinniest LCD ever produced. The closest you’re going to get to a display with this kind of aspect ratio are old character LCDs, and even then you’re not going to address individual pixels.

If you’re struggling to figure out what this would be used for, this product makes it somewhat obvious. It’s a 1U rack with a beautiful 1024×100 display embedded in the front. You’ve never seen a server that cool.

Interestingly, the 1U display is driven by a single Raspberry Pi, and looking at the datasheet for the display (PDF) tells you pretty much everything. The display is driven by a regular old parallel interface, with six bits of color for R, G, and B. That means it can be driven with a Raspberry Pi without an adapter board, a BeagleBone, or even smaller ARM micros with the obvious reduction in color depth.

While the display isn’t a game changer or something that will knock your socks off, it is, interesting and something that could find its way into some interesting projects. If you have any idea what those projects would be, drop a note in the comments.

Continue reading “New Part Day: Really, Really Wide Screens”