Balancing A Ball With A Solar Cell

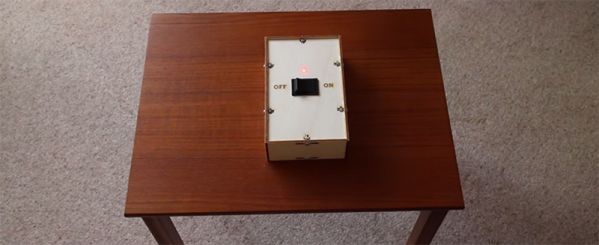
Go to any control systems class, and you’ll see a final project that demonstrates loops, integration, and everything else that can be learned in a semester or two of control theory. This project is not from one of those classes. It is, however, very cool: it balances a 40mm steel ball on the rim of a lasercut wood wheel using nothing more than a solar cell as a sensor.

[Manuel] was inspired to build this ball-balancing device after seeing a similar project at CCC about six years ago. He doesn’t remember who made it, and eschewed the PC/Matlab architecture of the original, but this build retains one interesting feature of its muse. The input to the control system is just a high intensity light bulb and a solar cell. The 40mm steel ball blocks the light reaching the solar cell most of the time. Slight variations in voltage go through the control system to keep this ball balanced on top of the wheel.

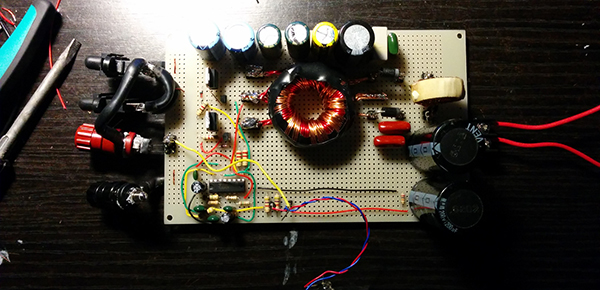
The only hardware for this build is a motor, a motor driver, and an ATMega644P. The first revision of the hardware was just a few breakout boards stuffed into a rat’s nest of wiring in the base of the build, but this has been fixed in version two with a new PCB. Video below.

Continue reading “Balancing A Ball With A Solar Cell”

A Class D Amp Made From Scrap

[Boolean90] needed an amplifier for a subwoofer, and had a lot of parts sitting around in a scrap bin. His project, a Class D sub amp made out of scrap, is a great example of what you can build with the right know-how and a very large pile of junk.

With digital logic and PWM chips, a Class D amp is one of the simpler ways to get a lot of amplification easily in an efficient package. It’s really not that complicated; an audio signal is turned into a PWM’d square wave, this is sent out to a Mosfet bridge, and finally out to the speaker.

Most Class D amps have a switching frequency of hundreds of kilohertz to the Megahertz range, but since this is an amplifier for a subwoofer that has a cutoff frequency of about 1kHz, the switching frequency doesn’t need to be quite as fast. [Boolean] is using a 50kHz carrier frequency; it’s more than high enough to recreate low frequencies.

With the completed project, [Boolean] has an extremely loud amplifier that has around 75-150W of output power. The subwoofer is only rated for 200W, but with the volume [Boolean] is getting, this isn’t an amp he’ll be rebuilding anytime soon.

New Part Day: Time Of Flight Sensors

Every robotics project out there, it seems, needs a way to detect if it’s smashing into a wall repeatedly, acting like the brainless automaton it actually is. The Roomba has wall sensors, just about every robot kit has some way of detecting obstacles its running into, and for ‘wall-following robots’, detecting objects is all they do.

While the earliest of these robots used a piece of wire and a metal contact to act like a switch for these object detectors, ultrasonic sensors – the kind you can buy on eBay for a few bucks – have replaced this clever wire spring switch. Now there’s a new sensor for the same job – the VL6180 – and it measures the speed of light.

The sensors that are used for object and collision detection now use either ultrasonic or infrared light. They’re susceptible to noise, and if you’re doing anything automated, you really don’t want rogue measurements. A time of flight sensor clocks out photons and records how long it takes them to return at 299,792,458 meters per second. It’s less sensitive to noise, and if you can believe this SparkFun demo of this sensor, extremely accurate

This is not the first Time of Flight distance sensor on the market; earlier this week we saw a project use a sensor called the TeraRanger One. This sensor costs €150.00. The VL6180 sensor costs about $6 in quantity one from the usual suspects, and breakout boards with the proper level converters and regulators can be found for about $25. More expensive sensors have a greater range, naturally; the VL6180 is limited to somewhere between 10cm (on paper) and 25cm (in practice). But this is cheap, and it measures the time of flight of pulses of light. That’s just cool.

Turning A 3D Printer Into An Injection Molding Machine

Injection molding machines are able to form very detailed plastic parts, simply by squirting plastic into a mold. 3D printers squirt plastic. Why no one thought of using a 3D printer extruder to push plastic into a mold until now is something we’ll never know.

[bfk] has been working on a way to produce very small, very detailed parts for a while now, and realized the extruder of a 3D printer serves most of the functions of an injection molding machine. It takes plastic, melts it, and forces it through an orifice. Whether that plastic goes to a build platform or into a mold is beside the point; but with a simple silicone mold, anyone can replicate extremely small parts with a tool every hackerspace already has.

The tools required are RTV rubber, which is the most popular mold material around. Aside from that, it’s just silicone lubricant, dowels and LEGO to make sprues, and of course something to make a mold from. Once the mold is made, it’s a simple matter of holding the mold up to the nozzle of a printer and extruding a bit of plastic.

The resulting ‘print’ is as detailed as the best prints that will ever come off a resin printer. It’s great for making parts for very small models like [bfk]’s current project, but this technique could be expanded to anything that needs a lot of small plastic parts with tight tolerances.

Video of the process below.

Continue reading “Turning A 3D Printer Into An Injection Molding Machine”

The Annoying Machine

The Useless Machine – a machine with a toggle switch, a mechanical arm, and something that only exists to turn itself off – is a staple of Instructables and builds from random workbenches the world over. It’s cliché, and now hackaday.io has a better project: The Annoying Machine, a machine that exists purely to annoy.

According to [unigamer], the Annoying Machine is the evil cousin of the Useless Machine. On the outside, it’s extremely simple: a switch labeled ‘on’ and ‘off’, and a hole for an LED. Turn the switch on, and the Annoying Machine will emit an annoying buzzing sound. Switch the Machine off, and the buzzing will go away. Then the switch will flick itself back to on. Insidious.

A switch and buzzer is easy enough, but the key component of this build is an actuated rocker switch. It’s basically a normal toggle switch with two additional terminals for a coil that can move the switch back and forth electronically. Throw in an Arduino, buzzer, battery, and a boost converter for the switch, and that’s just about all there is to it.

How to deactivate the Annoying Machine? There’s an accelerometer attached to the Arduino, and by throwing the box up in the air after flicking the switch off, it will reset. There are already plans for a Version 2 of the Annoying Machine that will be even louder and made out of aluminum. Anything to protect it from the inevitable hammers of frustration.

Video below.

Continue reading “The Annoying Machine”

Hackaday Links Column Banner

Hackaday Links: February 15, 2015

[Matthias Wandel], also known as the genius/demigod that can make anything out of wood, put together a mount for a Raspberry Pi and a camera. Yes, it’s just a holder for a Raspi, but some of our readers who aren’t up to speed with [Matthias] might want to check out his Youtube channel. There are hundreds of awesome videos. Report back in a month.

[Evan], the guy working his butt off for the MidAtlantic Retro Computing Hobbyists, and the organizer for the Vintage Computer Festival East (we’re going, April 17-19, Wall, NJ) has been working on a book. It’s about mobile computing, and he’s crowdfunding it.

Your keyboard has buttons, and so does and Akai MPC. Daft PunKonsole! Press the space bar for  instrumental part. There is, as yet, no video of someone doing this correctly.

Valentine’s Day was yesterday, and that means Valentine’s Day builds started rolling in on the tip line. Here’s something that’s actually a very simple circuit that’s inspired from an old ‘Electronic Games and Toys’ book by [Len Buckwalter]. Here’s a video of it in action.

A few years ago the name of the game was tiny, credit card-sized ARM boards. It had to come to this: a 64-bit board. ARM Cortex A53 running at 1.2GHz. It also costs $120 and only has a gig of RAM, but there you go.

Hackaday Retro Edition: The Second Most Valuable Home Computer

This will come to no surprise to anyone who has ever talked to me for more than a few minutes, but one of my guilty Internet pleasures is heading over to eBay’s ‘vintage computing’ category, sorting by highest price, and grabbing a cup of coffee. It’s really just window shopping and after a while you start seeing the same things over and over again; Mac 512s with a starting bid far more than what they’re worth, a bunch of old PC-compatible laptops, and a shocking amount of old software. For the last week I’ve been watching this auction. It’s a Commodore 65 prototype – one of between 50 and 200 that still exist – that has over 60 bids, the highest for over $20,000 USD. It’s the most successful vintage computer auction in recent memory, beating out the usual high-profile auctions like Mac 128s and Altair 8800s. The most valuable home computer is the Apple I, but if you’re wondering what the second most valuable one is, here you go.

C65 serial
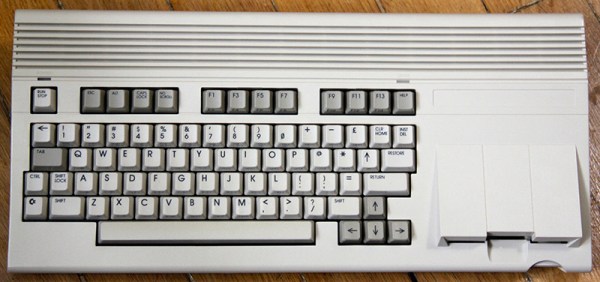
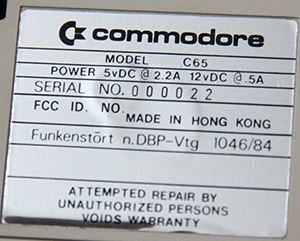
The C65 is not a contemporary of the C64, or even our own [Bil Herd]’s C128. This was the Amiga era, and the C65 was intended to be the last great 8-bit machine. From a page dedicated to the C65, it’s pretty much what you would expect: the CPU is based on a 6502, with the on-die addition of two 6526 CIA I/O controllers. The standard RAM is 128kB, expandable to 8MB by an Amiga 500-like belly port. Sound would be provided by two SIDs, and the video is based on the VIC-III, giving the C65 a pallette of up to 4096 colors and a resolution of up to 1280×400.

There’s still a little over five hours to go in the auction, but the current $21000 price should go even higher in the final hour; a C65 auction from a few years ago fetched $20100 for ‘a computer with missing parts’. This auction is for a complete, working system that has remained intact since it was discovered during the Commodore closing.

Update: Auction finished for $22,862.01 USD. For historical purposes, here’s a flickr album, a video, and another video.


vt100normal The Hackaday Retro Edition is our celebration of old computers doing something modern, in most cases loading the old, no CSS or Javascript version of our site.

If old and rare computers are your sort of thing, Hackaday will be at the VCF East this year.

If you have an old computer you’d like featured, just load up the retro site, snap some pictures, have them developed, and send them in.