Film Negative Viewer Has Many Positives

Not so long ago, taking pictures was a much more sacred thing. Film and processing were expensive compared to the digital way, and since you couldn’t just delete a picture off the camera and get your film back, people tended to be much more selective about the pictures they took. Even so, for every roll of film, there was usually at least one stinker. If you’ve made it your quest to digitize the past, you’ll quickly realize that they’re not all gems, and that some can be left to languish.

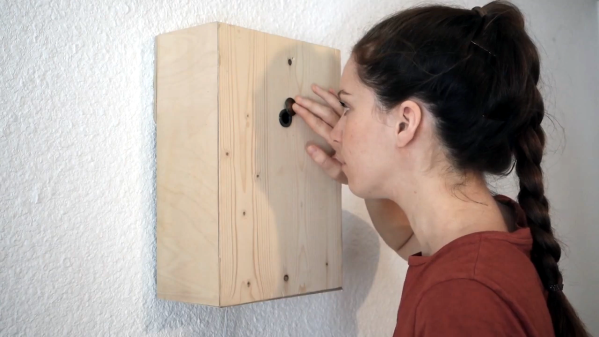
[Random_Canadian] recently found himself knee-deep in negatives, but wanted an easy way to weed out the mediocre memories. With this film negative viewer and converter, he can step through the pictures one by one on a big screen and decide which ones to keep.

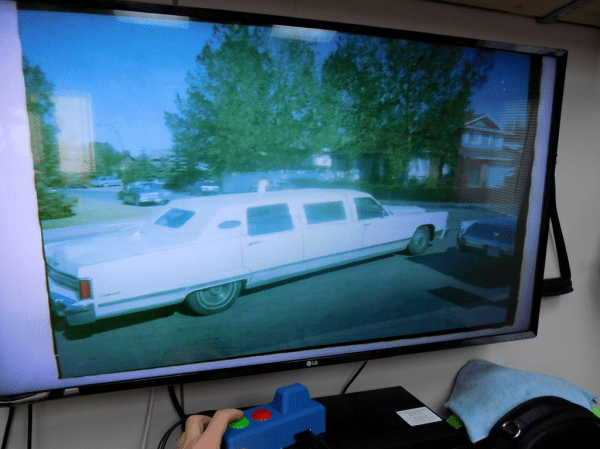
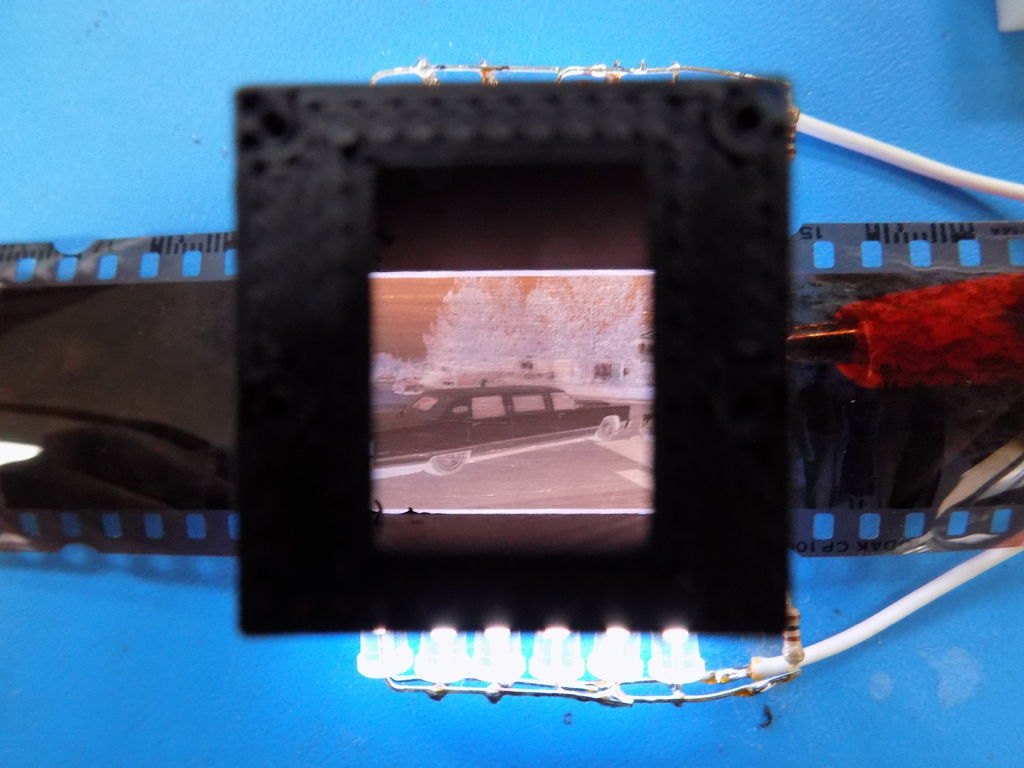
The Pi uses the negative image effect to turn the negatives positive, and then outputs them to the TV. If [Random_Canadian] finds one worth bringing into the 21st century, he pushes the green button to take a picture with the Pi camera and save it to that awesome cryptex USB drive. When he’s tired of walking down memory lane, he pushes the red button to exit the program.

We especially like that [Random_Canadian] made his own light panel by edge-lighting a piece of 6 mm Lexan. Fresh out of flat-topped LEDs, he made his own by grinding down some regular ones on a belt sander.

Got some old 8mm film you want to digitize? Check out this beautiful automated film scanner.

Insecure Surveillance Cameras Provide Dystopian Peep Show

It probably doesn’t surprise you to hear there are tens of thousands of web-connected cameras all over the world that are set to take the default credentials. Actually, there are probably more than that out there, but we can assure you that at least 70,000 or so are only a click away. With this project, [carolinebuttet] proves that it’s quite possible to make art from our rickety, ridiculous surveillance state — and it begins with a peephole perspective.

The peephole in your own front door grants you the inalienable right to police your porch, stoop, or patch of carpet in the apartment building’s hallway while going mostly undetected. In Virtual Peephole, the peephole becomes a voyeuristic virtual view of various corners of the world.

Slide aside the cover, and an LDR connected to an Arduino Micro detects the change in light level. This change makes the Micro send a key press to a Raspberry Pi, which fetches a new camera at random and displays it on a screen inside the box. You can peep a brief demo after the break, followed by a couple of short build/walk-through videos.

If you’re a peephole people watcher, put a camera in there and watch from anywhere.

Continue reading “Insecure Surveillance Cameras Provide Dystopian Peep Show”

Sherbet Custom Game Pad Is Smooth And Sweet

When [Billiam]’s beloved Logitech G13 game pad went to that great spectate room in the sky, he decided to pay homage by designing a custom, more ergonomic replacement from the desk up. Grab a spoon and dig into the story of [Billiam]’s journey toward Sherbet, because it’s a sweet ride.

Here’s the scoop: like a lot of DIY game pads and keyboards, Sherbet is based on the Teensy. We often see the micro USB coming straight off the Teensy, especially in clear acrylic builds, but [Billiam] added a USB breakout board so there’s no direct stress on the Teensy itself.

One of [Billiam]’s design challenges comes from the game pad placement — he has a tall desk and uses a keyboard tray, so it has to fit the space and leave enough room for his hand. Fortunately, there are low-profile mechanical switches out there, although the keycap options are strongly limited. We love that [Billiam] embedded a tiny ceramic bearing into one of them to use as a homing bump, because that’s a great idea.

If you want to take a crack at this project, [Billiam] has all the goodies laid out. [Billiam] wanted to use QMK firmware, but they didn’t have joystick support yet, so he’s got an Arduino sketch running in the meantime.

We love a good custom game pad around here, especially if they can reprogram themselves.

Sky Is New Limit For Dot Com Domain Prices

Earlier this week, domain name registrar Namecheap sent out an email to all customers advising them of a secret deal that went down between ICANN and Verisign sometime late last year. It has the potential to change the prices of domain names drastically over time, and thus change the makeup of the Internet as we know it.

Domain names aren’t really owned, they’re rented with an option to renew, and the annual rate that you pay depends both on your provider’s markup, but also on a wholesale rate that’s the same for all names in that particular domain. This base price is set by ICANN, a non-profit.

Officially, this deal is a proposed Amendment 3 to the contract in place between Verisign and ICANN that governs the “.com” domain. The proposed amendment would let Verisign increase the wholesale rental price of “.com” domain names by 7% per year for the next four years. Then there will be a two-year breather, followed by another four years of 7% annual hikes. And there is no foreseeable end to this cycle. We think it seems reasonable to assume that the domain name registrars might pass the price gouging on to the consumer, but that really remains to be seen.

The annual wholesale domain name price has been sitting at $7.85 since 2012, and as of this writing, Namecheap is charging $8.88 for a standard “.com” address. If our math is correct, ten years from now, a “.com” domain will cost around $13.50 wholesale and $17.50 retail. This almost-doubling in price will affect both small sites and companies that hold many domain names. And the increase will only get more dramatic with time.

So let’s take a quick look at the business of domain names.
Continue reading “Sky Is New Limit For Dot Com Domain Prices”

Laser Tachometer Knows How Fast You Were Spinning Back There

Does your drill go as fast as the manufacturer says it will? Well, you’d need a tachometer to figure that out. They’re not that expensive to buy, but as [Elite Worm] shows, they’re not that expensive to make, either — about $10 total if you get your parts from the right places. Lucky for you, he has links to everything.

Really, the links are just the tip of the iceberg here as far as the gifts that [Elite Worm] bestows upon those who choose to undertake this project. The build video (after the break, as usual; our favor to you) is fantastic, and would be perfect for a beginner because of the entrancing speed at which he builds it. The video is straight up relaxing to watch, whether you want to build one or not.

It’s a fairly simple circuit — just push the momentary switch, and the laser diode and sensor pair count the revolutions over one second. The Arduino Nano multiplies this number by 60 and displays the RPM on the OLED screen. What we absolutely love about this build is the care that taken in designing the case. There’s a designated spot for each component, and the ones without their own special holder are kept in place with printed crossbar pieces. [Elite Worm] says this has a higher refresh rate than his store-bought tacho, and we say it looks way cooler, too.

Still don’t want to make one yourself? Well, okay. Before you buy one, try using your phone to calculate RPM.

Continue reading “Laser Tachometer Knows How Fast You Were Spinning Back There”

3D Printed Flip Clock Is Worth A Second Look

Flip clocks: they were cool long before Bill Murray was slapping one repeatedly in Groundhog Day, they were cool in 1993, and they’re still cool now. If you can’t find one on the secondhand market, you’re in luck, because [iz2k] has laid out an extensive blueprint for building a gorgeous retro-looking clock with some modern touches.

There’s a Raspberry Pi to fetch the time, the weather, and the Spotify. Old flip clocks invariably tuned in FM radio, so [iz2k] used an RTL-SDR dongle and a software decoder for the deed. This clock even has a big snooze bar, which functions like a night light when there is no alarm actively going off. The three groups of painstakingly-printed flaps are controlled with stepper motors and an IR transmitter/receiver pair to do the counting.

For the interface, [iz2k] kept things nice and simple. The big-knobbed rotary encoder handles volume up/down/mute, and the little one on the front switches between FM radio, Spotify, and silence. Moving either knob generates feedback by flashing LEDs that sit underneath the display. Take a few seconds to flip past the break and check out the short demo.

If you do find a nice flip clock out in the wild, maybe you can retrofit it.

Continue reading “3D Printed Flip Clock Is Worth A Second Look”

Concrete Solder Squid Is A Solid Solution

Although it’s possible to buy a soldering setup out of the box, the one that works for you will likely develop over time. Honestly, it may never stop evolving. Sure, you can start with el-cheapo helping hands or a nice hobby vise, but it probably won’t end there. Why? Because no one of these tools will be right for all applications, unless you plan to solder the same thing over and over again. Sometimes it’s just easier to alligator clip a board in place than to slowly manipulate the jaws of a vise, but those helping hands have such a limited range of motion.

Have you been meaning to build a soldering squid out of coolant hose because that stuff just looks so dang cool and bendy? Well, then let Hackaday alum [JeremySCook] show you how it can be done. A few years ago he built a similar squid with a wooden base, but it just isn’t heavy enough, so he redesigned it with a concrete base. He took the opportunity to make some nice tweaks, like zip-tying a small PC fan and 9 V to make an endlessly repositionable ventilation system, and adding a big clip in the back for extra stability while soldering. And of course, threading the solder spool on to one of the hoses is genius.

If you follow [Jeremy] at all, you know he’s been playing around with concrete for a while now, and it’s neat to see him cement his devotion to the stuff by using it in the pursuit of better tools. He’s got the files for the printed mold up on GitHub, and the build video after the break should be all set up by now.

Not custom enough for you? Fire up that printer and make your own ball and socket arms.
Continue reading “Concrete Solder Squid Is A Solid Solution”