Homebrew Optical Sensor Helps Your Diesel Pass The Smoke Test

We’ve all heard of the smoke test, and we know that it’s the lowest possible bar for performance of an electronic device. If it doesn’t burst into flames when power is applied, you’re good to go for more functional testing. But the smoke test means something else for cars, especially those powered by diesel fuel. And passing diesel exhaust tests can become something of a chore.

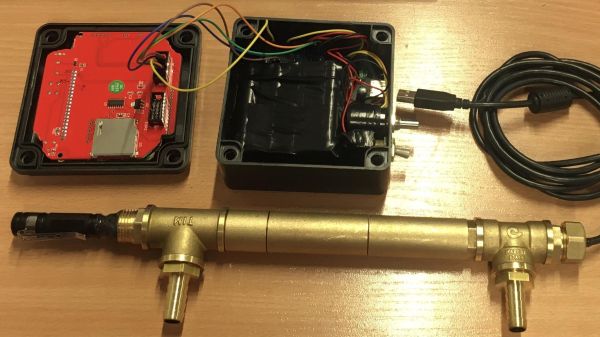
To make passing these tests a little easier, [Janis Alnis] came up with this diesel exhaust monitor that measures the opacity of his car’s emissions. The sensor itself is quite simple, and mimics what commercial exhaust analyzers use: a LED and a photodiode at opposite ends of a tube of a specified length. Soot particles in exhaust passing through the tube will scatter light in a predictable way, and the numbers work out that a passing grade is anything greater than 53% transmission.

The sensor body is cobbled together from brass pipe fittings with glass windows epoxied into each end. Exhaust enters via a tee fitting attached to a hose and sampling tube, and exits through another tee. One window of the sensor has a cheap battery-powered flashlight as a light source, while the other end has a Texas Instruments OPT101 photodiode sensor. The sensor is connected to one of the analog inputs of an Arduino, which also runs a 128×64 pixel LCD display — inspired by this air quality meter — to show the current smokiness both graphically and as a percentage. The video below shows the sensor at work.

While there were some issues with soot buildup and water vapor condensation, using the sensor [Janis] discovered that a little bit of a warm-up drive got things hot enough to clear up his ride’s tendency to smoke a bit, allowing him to pass his inspection. Continue reading “Homebrew Optical Sensor Helps Your Diesel Pass The Smoke Test”

Odd Inputs And Peculiar Peripherals: RoenDi Smart Knob Thinks Outside The Box

When it comes to design decisions, we’re often advised to “think outside the box.” It’s generally good advice, if a bit abstract — it could really mean anything. But it appears that someone took it quite literally with this nifty little smart knob display and input device.

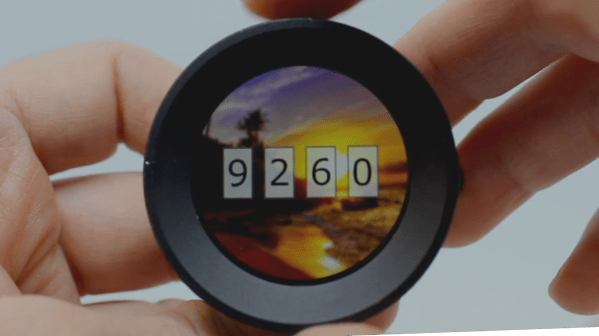
[Dimitar]’s inspiration for RoenDi — for “rotary encoder and display” — came from an unusual source: a car dashboard, and specifically, the multipurpose knobs that often crop up in a car’s climate control cluster. Designed for ease of use while driving while causing as little distraction as possible, such knobs often combine a rotary encoder with one or more indicators or buttons. RoenDi builds on that theme by putting a 1.7″ round LCD display in the middle of a ring attached to an Alps rotary encoder, allowing the knob to be customized for whatever you want it to represent. The backplane sports a powerful STM32 microcontroller with a lot of the GPIO pins broken out, so customization and interfacing are limited only by your imagination. The design is open source, so you can either build your own or support the project via Crowd Supply.

Unlike the haptic smart knob we’ve been seeing a bit about lately, which also features a round LCD at its center, RoenDi’s feedback is via the physical detents on the encoder. We think both devices are great, and they fill different niches in the novel input ecosystem.

Continue reading “Odd Inputs And Peculiar Peripherals: RoenDi Smart Knob Thinks Outside The Box”

Hackaday Links Column Banner

Hackaday Links: June 26, 2022

Head for the hills!! We’re all doomed! At least that’s the impression you might get from the headlines about the monster Earth-facing sunspot this week. While any sunspot that doubles in size within a matter of days as AR3038 has done is worth looking at, chances are pretty low that it will cause problems here on Earth. About the best this class of sunspot can manage is an M-class solar flare, which generally cause radio blackouts only at the poles, and may present a radiation problem for the crew of the ISS. So no, this sunspot is probably not going to kill us all. But then again, this is the 2020s, and pretty much everything bad seems like it’s possible.

Speaking of bad outcomes, pity the poor Sonos customers and their ongoing battle with the company’s odd “glitches.” For whatever reason, customers have been getting shipments of Sonos products they never ordered, with at least one customer getting over $15,000 worth of products shipped. The customer reports ordering five Sonos items, but the company saw fit to fill the order six times, stuffing their apartment with goods. Sonos doesn’t appear to be doing much to make it right; while offering the customer free shipping labels to return the goods, they were expected to schlep the packages to a UPS store. And then there’s the money — Sonos charged the customer for all the unordered goods, and won’t issue a refund till it’s all returned.

If you’ve ever wondered exactly what the signals going up and down your cable line look like, you’ll want to check out this video from Double A Labs. Using an RTL-SDR dongle and some spectrum analyzer software they probed the RF signals on the cable, with some fascinating results. The first 11 minutes or so of the video are devoted to setting up the hardware and software, although there is some interesting stuff about broadband network architecture right up at the start. The scans are interesting — you can clearly see the 6-MHz quadrature amplitude modulation (QAM) digital channels. We were surprised to learn that these start at just about the FM broadcast band — about 108 MHz. There were a couple of little surprises hiding in the spectrum, like two unmodulated analog TV carriers in one spot, and the fact that there are over 400 virtual channels jammed into 41 6-MHz QAM channels. Broadband indeed.

Continue reading “Hackaday Links: June 26, 2022”

An In-Depth Look At The Haptic Smart Knob

At Hackaday, we love those times when we get a chance to follow up on a project that we’ve already featured. Generally, it’s because the project has advanced in some significant way, which is always great to see. Sometimes, though, new details on the original project are available, and that’s where we find ourselves with [Scott Bez] and his haptic smart knob project.

Alert readers may recall [Scott]’s announcement of this project back in March. It made quite a splash, with favorable comments and a general “Why didn’t I think of that?” vibe. And with good reason; the build quality is excellent, and the idea is simple yet powerful. By attaching a knob to the shaft of a brushless DC motor and mounting a small circular LCD screen in the middle, [Scott] came up with an input device that could be reprogrammed on the fly. The BLDC can provide virtual detents at any interval while generating haptic feedback for button pushes, and the LCD screen can provide user feedback.

But how is such a thing built? That’s the subject of the current video, which has a ton of neat design details and build insights. The big challenge for [Scott] was supporting the LCD screen in the middle of the knob while still allowing the knob — and the motor — to rotate. Part of the solution was, sadly, a hollow-shaft motor that was out of stock soon after he released this project; hopefully a suitable replacement will be available soon. Another neat feature is the way [Scott] built tiny strain gauges into the PCB itself, which pick up the knob presses that act as an input button. We also found the way button press haptics are provided by a quick jerk of the motor shaft very clever.

This is one of those projects that seems like a solution waiting for a problem, and something that you’d build just for the coolness factor. Hats off to [Scott] for following up a sweet build with equally juicy details.

Continue reading “An In-Depth Look At The Haptic Smart Knob”

Scratch-Built Industrial Camera’s Modular Design Really Stacks Up

The news here isn’t so much that [Guarav Singh] built this high-quality industrial digital camera from scratch, but it’s in the way it was accomplished. That plus the amount of information that’s packed into the write-up, of course. And the excellent photography.

Modularity was one of [Guarav]’s design goals, with the intention of being able to swap out the sensor as the technology changes. To that end, [Guarav] came up with a stack of three PCBs. The middle board of the stack contains a Lattice FPGA chip along with two 16-MB RAMs and the FPGA config flash. The sensor board lies on one side of the FBGA board, while the USB 3.0 board is on the other. Each six-layer board is a masterpiece of high-density design, and the engineering that went into interfacing them and getting everything squeezed into a 3D-printed case with an integrated aluminum C-mount ring is pretty impressive.

[Guarav]’s write-up goes into a great deal of detail on processing the sensor data on the FPGA. Also, there’s quite a bit of practical information on implementing MIPI (Mobile Industry Processor Interface) and the CSI (Camera Serial Interface) specification. We’ve delved into this world before, but this project is a great hands-on explanation that might really help move your MIPI project along.

Thanks for the tip, [STR-alorman].

Machine Learning Does Its Civic Duty By Spotting Roadside Litter

If there’s one thing that never seems to suffer from supply chain problems, it’s litter. It’s everywhere, easy to spot and — you’d think — pick up. Sadly, most of us seem to treat litter as somebody else’s problem, but with something like this machine vision litter mapper, you can at least be part of the solution.

For the civic-minded [Nathaniel Felleke], the litter problem in his native San Diego was getting to be too much. He reasoned that a map of where the trash is located could help municipal crews with cleanup, so he set about building a system to search for trash automatically. Using Edge Impulse and a collection of roadside images captured from a variety of sources, he built a model for recognizing trash. To find the garbage, a webcam with a car window mount captures images while driving, and a Raspberry Pi 4 runs the model and looks for garbage. When roadside litter is found, the Pi uses a Blues Wireless Notecard to send the GPS location of the rubbish to a cloud database via its cellular modem.

Cruising around the streets of San Diego, [Nathaniel]’s system builds up a database of garbage hotspots. From there, it’s pretty straightforward to pull the data and overlay it on Google Maps to create a heatmap of where the garbage lies. The video below shows his system in action.

Yes, driving around a personal vehicle specifically to spot litter is just adding more waste to the mix, but you’d imagine putting something like this on municipal vehicles that are already driving around cities anyway. Either way, we picked up some neat tips, especially those wireless IoT cards. We’ve seen them used before, but [Nathaniel]’s project gives us a path forward on some ideas we’ve had kicking around for a while.

Continue reading “Machine Learning Does Its Civic Duty By Spotting Roadside Litter”

No Tool Left Behind With The Help Of Homemade Shadow Boards

Shadowed tool storage — where a tool outline shows at a glance what’s missing from storage — is a really smart way to keep your shop neat. They’re also super important for cases where a tool left behind could be a tragedy. Think, where’s-that-10-mm-socket-while-working-on-a-jet-engine? important. (It’s always the 10-mm socket.)

But just because shadow boards are smart, doesn’t mean they’re easy to make. That’s why [Scott Prince] came up with this semi-automated method for making toolbox shadow boards. The job of tracing around each tool on some sort of suitable material and cutting out the shapes seems straightforward, but the trick comes in organizing the outlines given the space available and the particular collection of tools.

[Scott]’s method starts with capturing images of each individual tool. He used a PiCam and a lightbox housed, strangely enough, in a storage bench; we’d love to hear the full story behind that, but pretty much any digital camera would do for the job. After compensating for distortion with OpenCV, cropping the images, and turning the image into a vector outline of the tool, [Scott] was left with the task of putting the tools into logical groups and laying them out sensibly. After tweaking the tool outlines and adding finger cutouts for easy pickup, [Scott] put his CNC router to work. He chose to use a high-density polyethylene product made by his employer, which looks fantastic, but MDF would work fine too.

We have to admit to a fair degree of toolbox envy now that we’ve seen what shadow boards can do. We’re a bit torn, though — [Zach Friedman]’s Gridfinity storage system has a lot going for it, too.