Make Your Own Microdot

If you spent your youth watching James Bond or similar movies on rainy Saturday afternoons, then you may be familiar with a microdot as a top-secret piece of spy equipment, usually revealed as having been found attached to a seemingly innocuous possession of one of the bad guy’s henchmen, which when blown up on the screen delivers the cryptic yet vital clue to the location of the Evil Lair. Not something you give much thought in 2020 you might think, but that’s reckoning without [Sister HxA], who has worked out how to make them herself and detailed the process in a Twitter thread.

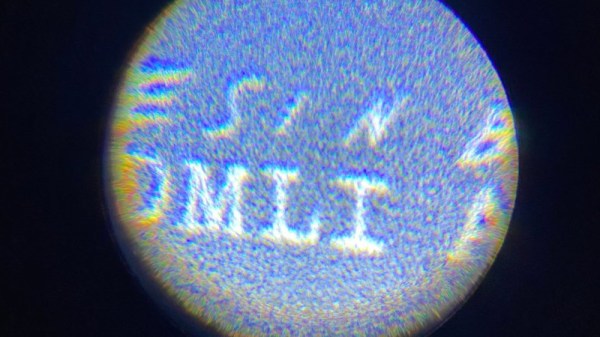
A microdot is a tiny scrap of photographic film, containing the image of some secret document or other, the idea being that it is small enough to conceal on something else. The example she gives is hiding it underneath a postage stamp. Because of their origins in clandestine work there is frustratingly little info on how to produce them, but she found a set of British instructions. Photographing a sheet such that its image occupies a small portion of her negative she makes a postage-stamp-sized one, and with care photographing that she manages to produce another of only a few millimetres in size. The smaller one isn’t very legible, but it’s still a fascinating process.

While we’re shopping at Q branch, how about an air-gun pen worthy of James Bond?

Why Are Digital Cameras Still Boring?

In the matter of technological advancement, we are as a species, mostly insatiable. The latest toy, the fastest silicon, the largest storage, the list goes on. Take digital cameras as an example, what was your first one? Mine was a Casio QV200 in about 1997, I still have it somewhere though I can’t immediately lay my hands on it, and it could hold a what was for its time a whopping 64 VGA-resolution pictures in its 4Mb of onboard memory.

The QV200 showing off its VGA capabilities. It's March 1998, and this is a brand-new PlayStation that I'm about to install a mod chip inside.
The QV200 showing off its VGA photography capabilities. It’s March 1998, and this is a brand-new PlayStation that I’m about to install a mod chip inside.

It’s a shock to realise that nearly a quarter century has passed since then, and its fixed-focus 640×480 camera module with a UV-sensitive CMOS sensor that gave everything a slight blue tint would not even grace the cheapest of feature phones in 2020. Every aspect of a digital camera has improved beyond measure since the first models in the 1980s and early 1990s that started to resemble what we’d know today as a standalone digital camera, they have near-limitless storage, excellent lenses, huge and faithfully-reproducing sensors, and broadcast-quality video capability.

But how playful have camera manufacturers been with the form factor? We see reporters in sci-fi movies toting cameras that look nothing like their film-based ancestors. What do our real-life digital cameras have on offer as far as creative body design goes?

Continue reading “Why Are Digital Cameras Still Boring?”

Fail Of The Week: This SD Card Won’t Slot

If you’ve got a few self-designed PCBs under your belt, you probably know the pain of missing some little detail and having to break out the bodge wires to fix it. So we feel for [Arsenio Dev], who placed an SD card slot next to an SoC, only to find that it was the wrong way round. Rather than tossing it in the bin, he decided to employ a particularly crafty set of bodge wires that curve over the board and connect to an SD card adapter on the other side.

Our attention was taken by the board itself, he’s posted little information about it and taken pains to conceal one of the pieces of text on it. Since it has an Octavo Systems BeagleBone-on-chip, a slot for a cellular modem, and a connector marked “CONNECT AERONET HERE” which we are guessing refers to the Aeronet sun photometry network, we’re guessing it might be a controller for remotely-sited nodes for that system. Either way it’s enough to have us intrigued, and we wish him every success with the next spin.

Meanwhile, this certainly isn’t the first PCB CAD fail we’ve brought you.

An Affordable Home Made Vacuum Chamber

The term “vacuum” means many different things depending whether you are working on space equipment, scientific instruments, or even internal combustion engines. In our sphere it is so often used as a means to draw bubbles out of resin castings, for which it is a relatively easily achievable partial vacuum. It’s something [Fab] is using, in a vacuum chamber made from Plexiglass.

A simple Plexiglass box would collapse under the air pressure on its own, so to mitigate that it’s made from a piece of tube, and with an internal frame of aluminium extrusion with 3D printed joints to strengthen it from the inside. A pressure sensor allows regulation of the pump that drives the vacuum, and connections are made to the chamber using pneumatic hose connectors. It’s not immediately clear how it is sealed, whether there are nay gaskets or other sealant, or whether air pressure pushing the parts together provides enough of a seal.

We’ve featured a lot of vacuum chambers made for this purpose over the years, and we’d be interested to know what vacuum pump is being used here. IfĀ  you’re curious too and want to build your own, perhaps you could try a fridge compressor.

A Dead Macbook GPU Shouldn’t Stop You, With This BGA Soldering Hack

On some 2011 Macbook Pro models, there is a tendency for the Radeon GPU to fail. This should mean game over for the computer, but surprisingly salvation is offered by its having not one but two GPUs on board. The Intel processor also has a GPU, and Apple use a pile of logic in an FPGA to switch at will between them. The community have produced fresh FPGA code to revive a dead Mac on its Intel GPU, but at the expense of losing brightness control. [Ayilm1] has brought back the brightness with a clever BGA reworking hack that gains access to a brightness control line present on the Intel BD82HM65 Platform Controller Hub chip but not used in the Macbook.

We’re used to impressive soldering work here at Hackaday, and we’ve seen our share of wiring direct to the balls on an upturned BGA chip. This is a similar idea but at another level, as a section of the top insulation on an in-place BGA is removed to expose the microvia above the ball carrying the required signal. A tiny wire is soldered to the exposed pad and taken to a piece of copper tape stuck down to provide mechanical strength, and a piece of enameled copper wire is run from that to the other side of the PCB where lies its destination. It comes with FPGA code to take advantage of it, but even for non-Macbook owners, it’s an extremely impressive piece of work. It’s not the first fine-soldering Macbook fix we’ve seen, either.

Thanks [lightpink784] for the tip.

433 On A Stick

Cheap 433 MHz wireless switches are a tempting way to enter the world of home automation, but without dedicated hardware, they can be less easy to control from a PC. That’s the position [TheStaticTurtle] was in, so the solution was obvious. Build a USB 433 MHz transceiver.

At the computer end is a CH340 USB-to-serial chip and the familiar ATmega328 making this a compact copy of the Arduino. At the RF end are a pair of modules for transmit and receive, unexpectedly with separate antennas. This device is a second revision, after initial experiments with a single antenna connector and an RF switch proved not to work. On the software side the Arduino uses the rc-switch library, while on the PC side there’s a Python library to make sense of it all. The code and hardware files are all on GitHub, should you wish to experiment.

The problem of making a single antenna transceiver is not for the faint-hearted RF engineer, as while diode switches seem on paper to deliver the goods, they can be extremely difficult to get right and preserve linearity. We’re curious that a transceiver module wasn’t used instead, but we’re guessing that cost played a significant part in the equation.

Over the years we’ve featured quite a few fascinating 433 MHz projects, like this TP-Link router conversion.

The Trouble With Tamagotchis…

The must-have toy of a couple of decades ago was the Tamagotchi, a virtual pet in an LCD screen on a keyring, that demanded your attention and which would die were you to neglect it. Fortunately it had a reset button on the back through which it could be resuscitated, but even so it lacked a satisfying tactile experience. [Nadine] has done something about this with her Tamagotchi-style Tribble, an anthropomorphic ball of fluff that demands attention and purrs when it receives some.

Inside the ball of fake fur is an Adafruit Circuit Playground with a capacitive touch pad and a haptic motor. After a random time with no attention it “cries”, and its owner strokes it, after which it responds with a purring vibration. It’s quite cute as you canĀ  see in the Twitter video below, and fortunately it won’t multiply and fill up your starship. We wonder whether a small resistive heater to give it a body temperature would complete its appeal as a virtual pet.

Given the popularity of Star Trek TOS among Hackaday readers perhaps it’s surprising that we don’t see more Tribble related projects. They have made a notable appearance as a DEF CON badge though.

Continue reading “The Trouble With Tamagotchis…”