Hackaday Prize Entry: Vendotron

A recurring idea in hackspaces worldwide seems to be that of the vending machine for parts. Need An Arduino, an ESP8266, or a motor controller? No problem, just buy one from the machine!

Most such machines are surplus from the food and drink vending industry, so it’s not unusual to be able to buy an Arduino from a machine emblazoned with the logo of a popular chocolate bar. These machines can, however, be expensive to buy second-hand, and will normally require some work to bring into operation.

A vending machine is not inherently a complex machine nor is it difficult to build when you have the resources of a hackspace behind you. [Mike Machado] is doing just that, building the Vendotron, a carousel vending machine constructed from laser cut plywood and MDF. The whole thing is controlled by an Arduino, with the carousel belt-driven from a stepper motor.

It’s not doing anything commercial vending machines haven’t been doing for years, except maybe having a software interface that allows phone and Bitcoin payments. Where this project scores though is in showing that a vending machine need not be expensive or difficult to build, and broadening access to them for any hackspace that wants one.

We’ve had a few vending machines here before, like this feature on the prototyping process for commercial machines, or even this one that Tweets. Sadly few have a secret button to deliver a free soda though.

Retrotechtacular: Head Start On Tomorrow

In the 1950s and 1960s, the prospects for a future powered by nuclear energy were bright. There had been accidents at nuclear reactors, but they had not penetrated the public consciousness, or had conveniently happened far away. This was the age of “Too cheap to meter“, and The Jetsons, in which a future driven by technologies as yet undreamed of would free mankind from its problems. Names like Three Mile Island, Chernobyl, and Fukushima were unheard of, and it seemed that nuclear reactors would become the miracle power source for the second half of the twentieth century and beyond.

The first generation of nuclear power stations were thus accompanied by extremely optimistic public relations and news coverage. At the opening of the world’s first industrial-scale nuclear power station at Calder Hall, UK in 1956, the [Queen] gave a speech in which she praised it as for the common good of the community, and on the other side of the Atlantic the American nuclear industry commissioned slick public relations films to promote their work. Such a film is the subject of this piece, and though unlike the British they could not muster a monarch, had they but known it at the time they did employ the services of a President.

The Big Rock Point nuclear power plant was completed in 1962 on the shores of Lake Michigan. Its owners, Consumers Power Company, were proud of their new facility, and commissioned a short film about it. The reactor had been supplied by General Electric, and fronting the film was General Electric’s established spokesman and host of their General Electric Theater TV show, the Hollywood actor and future President [Ronald Reagan].

The film below the break starts by explaining nuclear power as a new heat source powering a conventional steam-driven generator, and stresses the safety aspect of reactor control rods. We are then treated to a fascinating view of the assembly of an early-1960s nuclear reactor, starting with the arrival of the pressure vessel and showing the assemblies within it that held the fuel and control rods. Fuel rods are shown at their factory in California, and being loaded onto a truck to be shipped across the continent, seemingly without the massive security that would nowadays accompany such an undertaking. The rods are loaded and the reactor is started, as [Reagan] puts it: “The atom has been put to work, on schedule”.

Continue reading “Retrotechtacular: Head Start On Tomorrow” →

How To Become Part Of An IoT Botnet

We should all be familiar with the so-called Internet Of Things, a proliferation of Internet-connected embedded electronics. The opportunities offered to hardware hackers by these technologies have been immense, but we should also be aware of some of the security issues surrounding them.

Recently, the website of the well-known security researcher [Brian Krebs] suffered a DDoS attack. What made this attack different from previous ones wasn’t its severity, but that it had been directed not from botnets of malware-laced Windows PCs but from compromised IoT devices.

One might ask how it could be possible to take control of such low-end embedded hardware, seeing as it would normally be safely behind a firewall, preloaded with its own firmware, and without a clueless human at its terminal to open malware-laden email attachments. The answer is quite shocking but not entirely surprising, and lies in some astonishingly poor security on the part of the devices themselves. An exposé of one such mechanism comes courtesy of [Brian Butterly], who took an unremarkable IP webcam and documented its security flaws.

The camera he examined exposes two services, a web interface and a Telnet port. While from a security perspective their lack of encryption is a concern this should not pose a significant danger when the device is safely on a private network and behind a suitable firewall. The problem comes from its ability to send its pictures over the Internet, for the owner to be able to check their camera from their phone some kind of outside access is required. Expensive cameras use a cloud-based web service for this task, but the cheap ones like the camera being examined simply open a port to the outside world.

If you are familiar with basic firewall set-up, you’ll be used to the idea that open ports are something that should be under control of the firewall owner; if a port has not been specifically opened then it should remain closed. How then can the camera open a port? The answer lies with UPnP, a protocol enabled by default on most home routers that allows a device to request an open port. In simple terms, the camera has an inherently insecure service which it asks the router to expose to the world, and in many cases the router meekly complies without its owner being any the wiser. We suspect that many of you who have not done so already will now be taking a look at your home router to curtail its UPnP activities.

We covered the [Brian Krebs] DDoS story  as it unfolded last week, but we’re sure this is likely to be only the first of many stories in this vein. As manufacturers of appliances struggle to learn that they are no longer in the dumb appliance business they need to start taking their software security very seriously indeed.

Webcam image: Asim18 (Own work) [CC BY-SA 3.0], via Wikimedia Commons.

Choosing A ‘Scope: Examining Bandwidth

A few weeks ago I asked the Hackaday community for some help and advice in buying a new budget oscilloscope. Thank you very much to those of you who responded both here online and in person among my friends closer to home. I followed the overwhelming trend in the advice I received, and bought myself a Rigol DS1054z, an instrument with which I am very happy. It’s a nominally a 50 MHz scope, but there’s a software hack that can bring it up to 100 MHz. How fast can it go?

My trusty Cossor, its 2 MHz bandwidth as yet unverified.

This question became a mini scope-shootout after a conversation with my Hackaday colleague [Elliot] about measuring oscilloscope bandwidth, and then my fellow Oxford Hackspace members producing more than one scope for comparison. You know who you are, thank you. I found myself with ready access to several roughly equivalent models and one very high-end one in specification terms representing different strata of test equipment manufacture, and with the means to examine their performance.

Continue reading “Choosing A ‘Scope: Examining Bandwidth” →

A Quickly-Hacked-Together Avalanche Pulse Generator

There are times when you make the effort to do a superlative job in the construction of an electronic project. You select the components carefully, design the perfect printed circuit board, and wait for all the pieces to come together as they come in the mail one by one. You then build it with tender care and attention, printing solder paste and placing components by hand with a fastidious attention to detail. There follows an anxious wait by the reflow oven as mysterious clouds of smoke waft towards the smoke detector, before you remove your batch of perfect boards and wait for them to cool.

Alternatively, there are other times when you want the device but you’re too impatient to wait, and anyway you’ve only got half of the components and a pile of junk. So you hack something a bit nasty together on the copper groundplane of a surplus prototype PCB in an evening with ‘scope and soldering iron. It’s not in any way pretty but it works, so you use it and get on with your life.

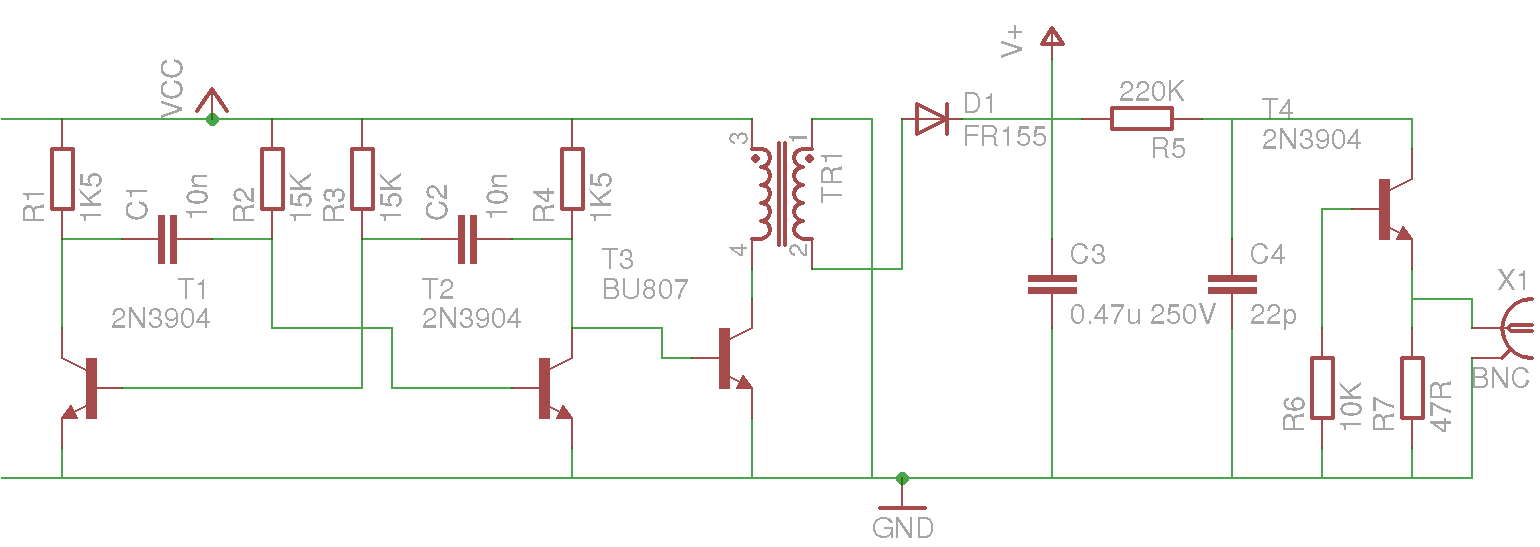
Our avalanche pulse generator schematic. The pulse generator itself is the single 2N3904 on the right.

When you are a Hackaday writer with some oscilloscope bandwidths to measure, you need a picosecond avalanche pulse generator, and you need one fast. Fortunately they’re a very simple circuit with only one 2N3904 transistor, but the snag is they need a high voltage power supply well over 100 V. So the challenge isn’t making the pulse generator, but making its power supply.

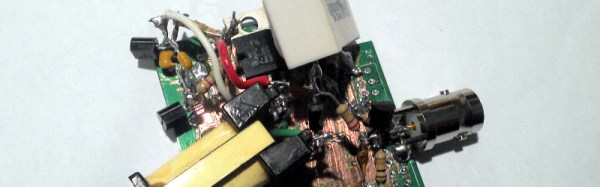
For our pulse generator we lacked the handy Linear Technologies switcher used by the avalanche pulse generator project we were copying. It was time for a bit of back-to-basics flyback supply creation, robbing a surplus ATX PSU for its base drive transformer, high voltage diode and capacitor, and driving it through a CRT line output transistor fed by a two-transistor astable multivibrator. Astoundingly it worked, and with the output voltage adjusted to just over 150V the pulse generator started oscillating as it should.

We’ve looked at avalanche pulse generators once before here at Hackaday, and very recently we featured one used to measure the speed of light. We’ll be using this one tomorrow for a ‘scope comparison.

An Atari 600XL Talks Composite Video

When we write about the 8-bit era of home computers there is a list of manufacturers whose names are frequently mentioned. Apple, Commodore, Texas Instruments, maybe Acorn and Sinclair if you are British, and of course Atari. But when we mention the last of those names it is invariably in reference to their iconic 2600 games console, it almost passes unnoticed that they also produced a line of 8-bit home computers based upon that success.

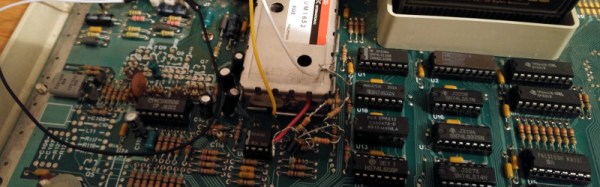
[ModPurist] was lucky enough to secure one of the Atari 8-bit computers through bartering with a local game store, an Atari 600XL from around 1983 or 1984, complete with its original box, manuals, cartridges, and a data cassette recorder. But on powering the system up and connecting to a TV a problem emerged. There was something there, but through a lot of noise and very blurry indeed. The solution after a bit of investigation turned out to be quite simple, to bypass the Astec video modulator and apply a composite video modification. Further investigation revealed that the original problem had in part been caused by the unit’s 5V power supply falling short of its voltage, so a further modification was to make a USB lead to allow it to be powered from a modern 5V charger.

This is a relatively simple piece of work, so you might be asking “Where’s the hack?”. The answer lies not in the mod itself, but in the detailed look [ModPurist] gives us at the inner workings of the 600XL, since it’s not a machine we see very often. Having the benefit of 30 years of hindsight and knowing the Atari’s competition quite well, we’d say that compared to some other machines of the era it’s a surprisingly well-designed computer both aesthetically and mechanically.

If your appetite for old Ataris has been whetted by this mod, can we draw your attention to this Atari 800 laptop? Or how about this 800 whose 6502 has been replaced with a 6809?

Stacking Voltage References To High Voltage Extremes

As children, we all probably had our ideal career paths. As an adult do you still harbor a secret desire to be an astronaut, or to drive a railroad train? Or have holders of other jobs become the people you envy?

As a Hackaday writer it’s probably not too controversial to admit a sneaking envy for the writers of semiconductor application notes. True, often their work consists of dry demonstrations of conventional uses for the products in question, but every once in a while they produce something off the wall and outside the device’s intended use, so out of the ordinary that you envy them their access for experimentation to the resources of a large semiconductor company.

Take Texas Instruments’ Application Report SBAA203, from May 2013. “Stacking the REF50xx for High-Voltage References” (PDF). A laboratory specialising in accurate measurement of high voltages had the problem that the stacks of Zener or avalanche diodes they were using as voltage references lacked both precision and stability, so investigated the properties of the REF5010 10V precision voltage reference.

You'll never be satisfied with a mere Zener diode again.
You’ll never be satisfied with a mere Zener diode again.

They found that by ignoring the device’s data sheet and directly connecting its output pin to its power pin, the REF5010 became equivalent to an ideal Zener diode. In this mode multiple references could be stacked in the same way as a real Zener diode, and very stable and high-precision voltage references could be created with very high voltages. They made a PCB with ten stacked REF5010s for a 100V reference, and then stacked ten of them for a 1000V reference. Leaving it for 24 hours to settle, they achieved a precision of +/- 2.5ppm, and after 3.5 months their average reading for the ten 1000V references they built was 1000.022V.

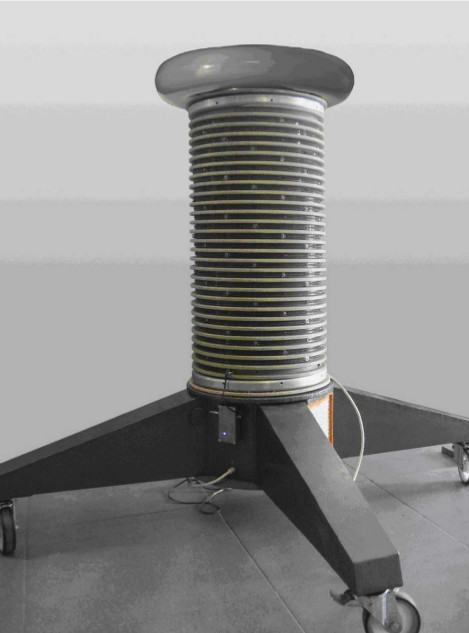
The 1000V reference would be impressive enough, but they weren’t finished. They built a series of boards holding 500 REF5010s for a 5KV reference, and stacked 20 of them to make a 100KV reference. These boards were mounted in a tower looking not unlike the Tesla coils we sometimes feature here. They note that it probably hits the record of simultaneous use of TI parts in a single device.

This may well be the first extremely high voltage precision reference to feature here at Hackaday, but we’ve certainly had our share of HV articles. Earlier this year we had a trio from [Steven Dufresne]: A conucopia of high voltage sources looking at ways to make your EHT, High voltage please, but don’t forget the current looking at selecting the right HV power supply for an application, and Wrangling high voltage looking at construction techniques.

Thanks [Nathan] for the tip.