The Fastest Rise Time In The West: Making A Truly Quick Pulse Edge

When we are taught about oscillators as newbie engineers, we are shown a variety of waveforms on an oscilloscope or in a textbook. This is a sine wave, they say, this is a sawtooth, this is a square wave, and so on. We’re taught to look at the lines on the screen as idealised, a square wave is truly square, and the transition from low to high voltage and back again is instantaneous.

In most cases this assumption is harmless. If we look into the subject a little deeper we learn that what seemed an instantaneous cliff-face is in fact a very steep slope, but when a circuit does its business in milliseconds there is usually no harm in ignoring a transition time measured in nanoseconds. The glue logic for your Arduino project can take its time.

Sometimes though, the rise time of a logic transition is important. The application that prompted this article was the measurement of oscilloscope bandwidth by looking at how quickly the ‘scope catches up with a pulse that exceeds its bandwidth, for example. When the instrument can happily measure the transition times of all your usual  pulse generators, something out of the ordinary is called for. So it’s worth taking a look at the rise times you’d expect from everyday circuitry, examining a few techniques for generating rise times that are much faster.
Continue reading “The Fastest Rise Time In The West: Making A Truly Quick Pulse Edge” →

A Desk Lamp Solder Fume Extractor

Those of us who have spent a lifetime building electronic projects have probably breathed more solder smoke than we should. This is not an ideal situation as we’ve probably increased our risk of asthma and other medical conditions as a result.

It has become more common over the years to see fume extraction systems and filters as part of the professional soldering environment, and this trend has also started to appear in the world of the home solderer. As always, where commercial products go the hardware hacker will never be far behind. We’ve seen people producing their own soldering fume filters using computer fans.

A particularly neat example comes via [Engineer of None], who has posted an Instructable and the YouTube video shown below the break for a filter mounted on a desk lamp. A toaster is used to heat a piece of acrylic. The softened plastic is then shaped to fit the contours of the lamp. The lamp’s articulated arm is perfect for placing light and fume extraction exactly where it is needed. It’s not the most complex of hacks, but we’d have one like it on our bench without a second thought. We would probably add an activated carbon filter to ours though.

Continue reading “A Desk Lamp Solder Fume Extractor” →

Hack An 8085 Like It’s 1985

If you have been building electronic hardware for several decades, do you still have any projects from your distant past? Do they work? An audio amplifier perhaps, or a bench power supply.

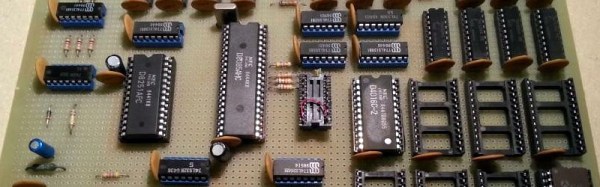
[Just4Fun] made a rather special computer in the 1980s, and it definitely still works. Describing it as “An 8085 single board computer with an EPROM emulator” though, does not convey just how special it is. This is not the modern sense of a single board computer with an SoC and a few support components. Instead it is a full system in the manner of the day in which processor, memory and peripherals are all separate components surrounded by 74 series glue logic. The whole system is wire-wrapped on a piece of perfboard and mounted very neatly in a rack. The EPROM emulator is a separate unit in a console case with hexadecimal keyboard and 7-segment display.

As the video below the break of an LED flashing demo shows, the EPROM emulator allows 8085 machine code to be entered byte by byte instead of having to be burned into a real EPROM.

[Just4Fun] leaves us with plans to replace the period EPROM emulator with a modern alternative, an EEPROM on a PCB designed to fit in the original bank of EPROM sockets. In this he suggests he might fit a bootloader and a BASIC interpreter, something entirely possible back in the day with conventional EPROMs, but probably not as cheaply.

Continue reading “Hack An 8085 Like It’s 1985” →

A Beautiful Turntable With A Heart Of Concrete

On the face of it, playing a vinyl record is a simple process. You simply mount it on a turntable rotating at the right speed, and insert a needle into the groove. A learning exercise for youngsters used to be a passable attempt at a record player on the kitchen table with a pencil, a large cork, a sharpened matchstick, and a piece of paper. It sounded awful, but it demonstrated well how the audio was recorded.

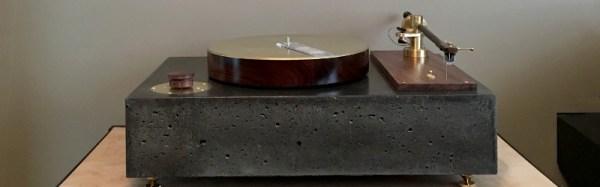
If you have ever looked into the operation of a more conventional turntable though you’ll know that a little more care and attention is needed. There are many factors which affect the quality of the sound, and you quickly become obsessive about tracking, and sources of the tiniest vibration. Someone who has followed this path is [Mjhara], who has made a very high quality turntable. There is an unusual choice in this project: the tonearm is part of the build rather than fitting a commercial item like most turntable projects.

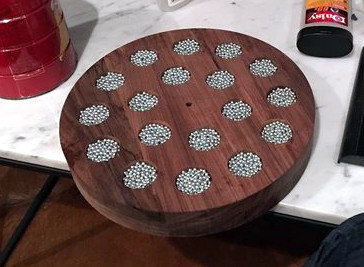
balanced-with-shotThe platter is machined from a piece of rosewood, weighted and balanced with lead shot, and laminated between two sheets of brass. It sits on a bearing aided by a ring of opposing magnets, and is belt driven by a two-phase induction motor. The base of the turntable is cast as a single piece of concrete, the idea being that the extra weight will aid the damping of vibrations. The tonearm is machined from a piece of wood, and its pivot from brass. The tonearm bearing is a ballpoint pen, a surprising yet inspired choice .



Sometimes audiophiles take their quest for better sound to extremes, and justification for their expenditure can be very subjective. But [Mjhara] assures us that this turntable has an exceptionally good sound, and it is certainly a thing of beauty. Full details are in the Imgur gallery embedded below the break.

Continue reading “A Beautiful Turntable With A Heart Of Concrete” →

Hackaday Prize Entry: Explore M3 ARM Cortex M3 Development Board

Even a cursory glance through a site such as this one will show you how many microcontroller boards there are on the market these days. It seems that every possible market segment has been covered, and then some, so why on earth would anyone want to bring another product into this crowded environment?

This is a question you might wish to ask of the team behind Explore M3, a new ARM Cortex M3 development board. It’s based around an LPC1768 ARM Cortex M3 with 64k of RAM and 512k of Flash running at 100MHz, and with the usual huge array of GPIOs and built-in peripherals.

The board’s designers originally aimed for it to be able to be used either as a bare-metal ARM or with the Arduino and Mbed tools. In the event the response to their enquiries with Mbed led them to abandon that support. They point to their comprehensive set of tutorials as what sets their board apart from its competition, and in turn they deny trying to produce merely another Arduino or Mbed. Their chosen physical format is a compact dual-in-line board for easy breadboarding, not unlike the Arduino Micro or the Teensy.

If you read the logs for the project, you’ll find a couple of videos explaining the project and taking you through a tutorial. They are however a little long to embed in a Hackaday piece, so we’ll leave you to head on over if you are interested.

We’ve covered a lot of microcontroller dev boards here in our time. If you want to see how far we’ve come over the years, take a look at our round up, and its second part, from back in 2011.

Hackaday Prize Entry: Bypassing TV Broadcasting Restrictions

It’s a common problem faced by TV viewers, the programming they want to watch is being broadcast, but not to their location. TV content has traditionally been licensed for transmission by geography, and this has sometimes put viewers at odds with broadcasters.

The viewing public have not always taken this restriction of their programming choice lying down, and have adopted a variety of inventive solutions with varying degrees of legality and success. Many years ago you might have seen extreme-length UHF antennas to catch faraway transmitters, more recently these efforts have been in the digital domain. It was said in the 1990s that Sky’s Videocrypt satellite TV smart cards were cracked because German Star Trek Next Generation fans were unable to buy subscriptions for non-UK addresses, for example. You can argue in the comments over whether [Patrick Stewart] et al being indirectly responsible for a decryption coup is an urban legend, but it is undeniable that serial smart card emulators and dodgy DOS software for Sky decryption were sold all over Europe at the time.

Modern-day efforts to break the geographic wall on TV broadcasting have turned to the Internet. Services such as the ill-fated Aereo and the Slingbox set-top streaming products have taken the TV broadcast in a particular area and transported it to other locations for viewing online. But they are not the only Internet self-streaming option, if the idea of paying a subscription or tying yourself to a commercial service does not appeal then you can build an off-air streamer for yourself.

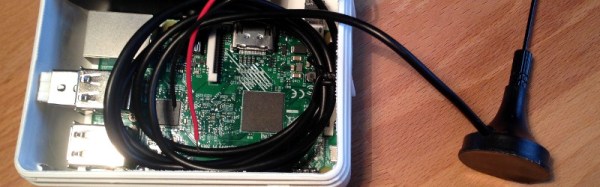
[Solenoid]’s project is an off-air streamer using a Raspberry Pi 3 with a USB DVB-T tuner. It uses Tvheadend to power the streaming, and OpenVPN to provide security. His build logs detail his efforts to ensure that power consumption is not too high and that the Pi is not running too hot, and provides instructions on how to set up and use the software. It’s not an overly complex piece of hardware, but it could provide a useful service for any of you who wish to keep up-to-date with your home TV when you are off on your travels.

Hackaday Prize Entry: Under Cabinet LED Lighting Controller

[Matt Meerian]’s workbench seems to be in perpetual shadow, so he has become adept at mounting LED strips under all his shelves and cabinets. These solve any problems involving finding things in the gloom, but present a new problem in that he risks a lot of LED strips being left on, and going round turning them all off is tedious.

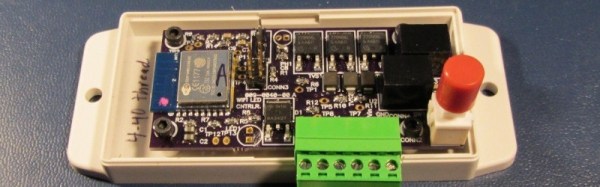
His solution is to make a wireless controller for all his home LED strips, under the command of a web app from his Android tablet. An ESP8266 and a set of MOSFETs provide the inner workings, and the whole is presented on a very compact and well-designed purple OSH Park PCB reflow soldered on a $20 Wal-Mart hotplate and set in a plastic enclosure. The web interface is still in development, but has a fairly simple CSS front end for the ESP8266 code. All software, the schematic, and BoM can be downloaded from the Hackaday.io page linked above.

This project isn’t going to end world hunger or stop wars, but it’s beautifully done and well documented, and it makes [Matt]’s life a lot easier. And that makes it a good entry for the Hackaday Prize.