Raspi Mini Laser Engraver

If you’ve got a lot of spare parts lying around, you may be able to cobble together your own laser engraver without too much trouble. We’ve already seen small engraver builds that use an Arduino, but [Jeremy] tipped us off to [Xiang Zhai’s] version, which provides an in-depth guide to building one with a Raspberry Pi.

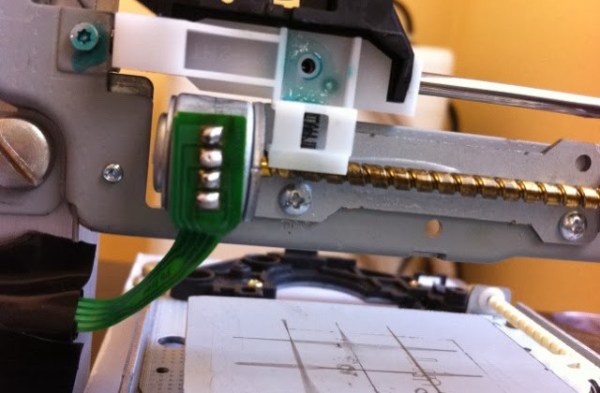
[Xiang] began by opening up two spare DVD writeable drives, salvaging not only their laser diodes but the stepper motors and their accompanying hardware, as well as a handful of small magnets near each diode. To assemble the laser, he sourced an inexpensive laser diode module from eBay and used a vise to push the diode into the head of the housing. With the laser snugly in place and the appropriate connecting wires soldered on, [Xiang] whipped up a laser driver circuit, which the Raspi will later control. [Xiang] worked out the stepper motors’ configuration by following [Groover’s] engraver build-(we featured it a few years back)-attaching the plate that holds the material to be engraved onto one axis and the laser assembly to the other.

Check out [Xiang’s] project blog for details explaining the h-bridge circuits as well as the Python code for the Raspi. As always, if you’re attempting any build involving a laser, please use all necessary precautions! And if you need more information on using DVD burners for their diodes, check out this hack from earlier in the summer

DIY Filament: The Filabot Wee

filabotwee

Now there’s yet another option for making your own 3D printer filament: the Filabot Wee. It looks like their once open source model that they pulled from Thinigiverse earlier this year has received a significant makeover, though we aren’t sure what parts may have changed. (EDIT: Filabot says the Wee is still open source, and that once they’ve updated the files they will be available again.)

As you would expect, the Wee has a PID temperature controller and is capable of extruding both ABS and PLA pellets into either 1.75mm or 3mm-diameter filament. Speed varies depending on materials and thickness, but can reach 5 to 20 inches per minute of filament extrusion. Though the Filabot gang is selling the extruder as a kit, you can probably save a few bucks if you have access to a laser cutter and some other basic materials.

You should expect to spend more for Filabot parts ($649) than you would for the original Lyman extruder, though perhaps a more fair comparison would be the new third version of the Lyman extruder, whose bill of materials approaches $900. Considering Lyman’s recent comments that indicate an extrusion rate of 40-50 inches per minute, the extra bucks may be worth it. You can check out a demonstration video of the Filabot Wee after the break.

Continue reading “DIY Filament: The Filabot Wee”

DIY Coolsculptor Freezes Fat With Cryolipolysis

You’re probably wondering why [Eddy], pictured above, decided to clamp two CPU cooling blocks to his torso. We were a bit concerned ourselves. As it turns out, [Eddy] has managed to construct his own Cryolipolysis device, capable of delivering targeted sub-zero temperatures to different parts of the body using a technique more popularly known as “Coolsculpting.”

Cryolipolysis is a non-surgical method of controlled cooling that exposes fat cells to cold temperatures while also creating a vacuum to limit blood flow to the treated area. [Eddy’s] challenge was to discover exactly how cold to make the treatment surfaces—a secret close-guarded by the original inventors. After digging through the original patent and deciding on a range between -3C and 0C, [Eddy] began cobbling together this medical masterpiece and designing a system capable of controlling it.

His finished build consists of a simple three-button interface and accompanying LCD screen, both wired to an Arduino, allowing the user to adjust temperatures and keep tabs on a session’s time. Unfortunately, results can take several months to appear, so [Eddy] has no idea whether his creation works (despite having suffered a brush with frostbite and some skin discolorations, yikes!) You can pick through a gigantic collection of photos and detailed information over at [Eddy’s] project blog, then stick around for a video from an Australian news program that explains the Coolsculpting process. Need some additional encouragement to experiment on yourself? You can always strap some electrodes to your head and run current through them. You know, for science.

Continue reading “DIY Coolsculptor Freezes Fat With Cryolipolysis”

Hacking A Cheap Toy Quadcopter To Work With Arduino

Building your own quadcopter is an expensive and delicate ordeal. Only after you navigate a slew of different project builds do you feel confident enough to start buying parts, and the investment may not be worth your effort if your goal is to jump right into some hacking. Fortunately, [Dzl] has a shortcut for us; he reverse engineered the communication protocol for a cheap toy quadcopter to work with an Arduino.

The cheap toy in question is this one from Hobbyking, which you can see flying around in their product demonstration video. [Dzl] cracked open the accompanying control handset to discover which transceiver it used, then found the relevant datasheet and worked out all the pin configuration involved in the SPI communication. Flying data is transmitted as 8 byte packets sent every 20 mS, controlling the throttle, yaw, pitch and roll.

[Dzl] took the build a step further, writing an Arduino library (direct Dropbox download link) that should catch you up to speed and allow you to skip straight to the fun part: hacking and experimenting! See his quick video after the break, then convince yourself you need a quadcopter by watching this one save its creator, [Paul], the trouble of walking his son to the bus stop.

Continue reading “Hacking A Cheap Toy Quadcopter To Work With Arduino”

Hacking And Philosophy: Crackdown Part II

hnpHackerCrackdownP2

This week we’re back with Hacker Crackdown: Part II! The caliber of last week’s comments was exceptional, but the level of participation planed off, and I’ll risk a guess: The Mentor’s Manifesto was more likely encountered as part of any given reader’s childhood—or, if not, easily skimmed at just over one page long—and therefore drew more interest. Crackdown, however, is perhaps less familiar. You also needed to read over 50 pages for last week (100 for this week). I list these things not as an apology or a rationalization, but as an attempt to better serve the community by providing accessible content. If you can’t commit to a lengthy reading, that shouldn’t exclude your participation.

This week, I’m adjusting the format to focus on key quotations from the text. Never even heard of Hacker Crackdown? No problem! Stick with us after the break where you’ll find all the relevant issues in a brief outline, then join us in our discussion!

Continue reading “Hacking And Philosophy: Crackdown Part II”

Arduino-Based Power Failure Alert System

arduinoPowerFailBox

When the power went out at his parents’ shop and ruined the contents of their fridge, [Lauters Mehdi] got to work building a custom power failure alert system to prevent future disasters. Although some commercial products address this problem, [Lauters] decided that he could build his own for the same cost while integrating a specific alert feature: one that fires off an SMS to predefined contacts upon mains power failure.

The first step was to enable communication between an Arduino Micro and a Nokia cell phone. His Nokia 3310 uses FBus protocol, but [Lauters] couldn’t find an Arduino library to make the job easier. Instead, he prototyped basic communication by running an Arduino Uno as a simple serial repeater to issue commands from the computer directly to the phone, and eventually worked out how to send an SMS from the ‘duino. [Lauters] then took the phone apart and tapped into the power button to control on/off states. He also disconnected the phone’s battery and plugged it into an attached PCB. The system operates off mains power but swaps to a 1000mAH 9V backup battery during a power outage, logging the time and sending out the SMS alerts. A second message informs the contacts when power has been restored.

Head over to [Lauters’s] project blog for schematics and photos, then see his GitHub for the source code. If you want to see other SMS hacking projects, check out the similar build that keeps a remote-location cabin warm, or the portable power strip activated by SMS.

Battery Backup For RasPi Keeps Your Data Safe

We’ve all raised a clench fist in anger over lost data, and it’s usually the result of unjustified optimism and lack of planning. [George] shared his solution that prepares for the worst: a circuit that provides backup power to a RasPi and its hard drives. [George’s] Pi setup runs as both an Apple Time Machine server and a website backup server, and a power outage could corrupt the data stored on the Pi’s attached hard drives.

Rather than turn to commercial solutions, however, [George] wanted to take advantage of the Pi’s low power consumption and create an inexpensive custom circuit that would safely and automatically power down the devices upon loss of power. To detect a power failure, the build connects one of the Pi’s GPIOs to an opto-isolator, which—through a zener diode—connects to the 12V wall adapter: though [George] welcomes suggestions for alternative methods of safely identifying a mains power loss. The rest of the circuit serves as a trickle charger for the two attached 9V batteries and as a regulator to supply the correct voltage to the RasPi. Power MOSFETs connected to a GPIO handle the delayed power off.

You can view (and edit!) the circuit online here and find the relevant source code on [George’s] website. If you want to build your own RasPi file server, try cramming all the parts into an old optical drive enclosure.