Need A New Programming Language? Try Zig

Maybe you’ve heard of it, maybe you haven’t. Zig is a new programming language that seems to be growing in popularity. Let’s do a quick dive into what it is, why it’s unique, and what sort of things you would use it for. (Ed Note: Other than “for great justice“, naturally.)

What Is It?

You’ve likely heard of Rust as it has made significant inroads in critical low-level infrastructures such as operating systems and embedded microcontrollers. As a gross oversimplification, it offers memory safety and many traditional runtime checks pushed to compile time. It has been the darling of many posts here at Hackaday as it offers some unique advantages. With Rust on the rise, it makes sense that there might be some space for some new players. Languages like Julia, Go, Swift, and even Racket are all relative newcomers vying for the highly coveted mindshare of software engineers everywhere.

So let’s talk Zig. In a broad sense, Zig is really trying to provide some of the safety of Rust with the simplicity and ease of C. It touts a few core features such as:

  • No hidden control flow
  • No hidden memory allocations
  • No preprocessor, no macros
  • First-class support for optional standard library
  • Interoperable by design
  • Adjustable Runtime Safety
  • Compile-time code-execution

Continue reading “Need A New Programming Language? Try Zig”

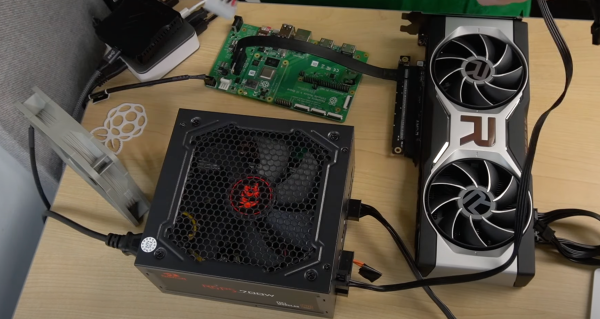
An AMD GPU plugged into an ATX PSU and Raspberry PI CM4

Raspberry Pi With Some Serious Graphical Muscle

[Jeff Geerling] routinely tinkers around with Raspberry Pi compute module, which unlike the regular RPi 4, includes a PCI-e lane. With some luck, he was able to obtain an AMD Radeon RX 6700 XT GPU card and decided to try and plug it into the Raspberry Pi 4 Compute Module.

While you likely wouldn’t be running games with such as setup, there are many kinds of unique and interesting compute-based workloads that can be offloaded onto a GPU. In a situation similar to putting a V8 on a lawnmower, the Raspberry Pi 4 pulls around 5-10 watts and the GPU can pull 230 watts. Unfortunately, the PCI-e slot on the IO board wasn’t designed with a power-hungry chip in mind, so [Jeff] brought in a full-blown ATX power supply to power the GPU. To avoid problems with differing ground planes, an adapter was fashioned for the Raspberry Pi to be powered from the PSU as well. Plugging in the card yielded promising results initially. In particular, Linux detected the card and correctly mapped the BARs (Base Address Register), which had been a problem in the past for him with other devices. A BAR allows a PCI device to map its memory into the CPU’s memory space and keep track of the base address of that mapped memory range.

AMD kindly provides Linux drivers for the kernel. [Jeff] walks through cross-compiling the kernel and has a nice docker container that quickly reproduces the built environment. There was a bug that prevented compilation with AMD drivers included, so he wasn’t able to get a fully built kernel. Since the video, he has been slowly wading through the issue in a fascinating thread on GitHub. Everything from running out of memory space for the Pi to PSP memory training for the GPU itself has been encountered.

The ever-expanding capabilities of the plucky little compute module are a wonderful thing to us here at Hackaday, as we saw it get NVMe boot earlier this year. We’re looking forward to the progress [Jeff] makes with GPUs. Video after the break.

Continue reading “Raspberry Pi With Some Serious Graphical Muscle”

A Rant On Personal Software Projects

Looking across your hard drive and GitHub, you might find hundreds of notes and skeletons of Git repositories. A veritable graveyard of software side projects. The typical flow for many of these projects is: get an idea, ruminate on the idea until it becomes exciting, eventually becoming more exciting than the current side project, notes are captured, a repository is created, and work begins at a blistering pace as the focus and excitement are there. There might be some rewrites or some changes in direction. Questions of whether the project is worthwhile or “what even should this project actually be” start to arise. Eventually, enthusiasm wanes as these questions continue to multiply. Progress slows as the path forward seems less clear-cut as it once did. The project is either sunset with a mournful promise to someday return or quietly put aside as something new and exciting comes to take its place. Sound familiar? Perhaps not, but the principles here could be helpful.

This particular article is largely a piece of opinion from one engineer to another. It’s about engineering the process by which you design a project to have better outcomes. There are many reasons why a project could be shelved or scrapped and not all of them are from a lack of clear project definition. In the case where it isn’t clear what the project is, it can be helpful to think about it in a more holistic/meta sense. There are two types of personal projects in broad strokes: technology demos and products.

Continue reading “A Rant On Personal Software Projects”

Putting Thousands Of Minecraft Players On The Same Server

Multi-threading was the common go-to technique for extracting more performance from a machine for several years. These days it’s all about horizontal scaling or adding more virtual machines to a pool of workers. The Minecraft server is still stuck in the past in some ways as it supports neither multi-threading nor horizontal scaling. [Jackson Roberts] decided to change all that by hacking Minecraft to support thousands of players rather than dozens.

Since the server is single-threaded, having more than 100 players on a single server can slow it to a crawl. Some mods try to optimize and speed up the existing server but [Jackson] wanted more. An early proof of concept was to slice the world into separate servers, each holding 64×64 chunks (chunks are what Minecraft defines as a 16x256x16 volume of the world). When crossing a boundary, entities such as players and zombies were transferred from one server to another. While workable, the demo had issues such as parts of the world being inaccessible if a server went down. The boundaries were also jarring as you had to reconnect and couldn’t see players outside your server.

Instead of splitting the world, [Jackson] took the approach to split the players and have some backing store for persisting and broadcasting changes. A proxy sits in front of several Minecraft servers, which each have a connection to a WorldQL server (a spatial database based on Postgres). Each server reports the player’s location to the WorldQL server and receives updates for their loaded locations. When a server comes online, it catches up with the changes stored in WorldQL and starts syncing, allowing servers to auto-scale. There are still a few core game mechanics that aren’t quite ready for prime-time such as NPCs and Redstone, but the progress so far is remarkable.

The code for the Minecraft plugin is up on GitHub, but more is coming in the future. So if you’re interested in something a little more vanilla, why not marvel at the completely playable Pokemon Red inside vanilla Minecraft?

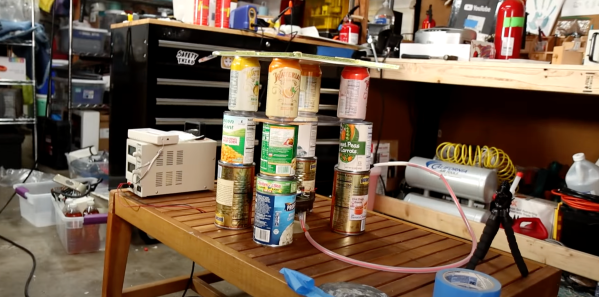
a very slapdash x-ray machine on a table

Building An X-Ray Machine

While we typically encourage hackers to make their own tools or machines when practical, x-ray machines don’t usually make that list. Despite the risk of radiation, [William Osman] has done just that and built a homemade x-ray machine. After receiving an eye-watering medical bill, [William] resolves to make his own x-ray machine in the hopes of avoiding future bills. Thanks to his insurance, the total owed was smaller but still ridiculous to those who live in single-payer health care countries, but it got William thinking. What if he could make an x-ray machine to do cheap x-rays?

Armed with a cheap high voltage DC power supply he acquired from an online auction house, he started to power up his x-ray vacuum tube. A smaller power supply energizes the cathode and forms an electron beam. Then the high voltage (30-150kv) is applied as a tube voltage, accelerating the electrons into x-rays. Safety measures are taken somewhat haphazardly with Geiger counters and lead sheets. With a finger bone cast in ballistic shell [William] made his first x-ray with a long exposure on a DSLR. The next items to go in the x-ray “chamber” were a phone and a hand. The results were actually pretty decent and you can clearly see the bones.

We’ve seen homemade X-Ray machines here at Hackaday before, but not one that is constructed perhaps so haphazardly — his approach makes this obvious: don’t try this at home. Video after the break.

Continue reading “Building An X-Ray Machine”

a man sits on top of a motorcycle simulation rig

Motorcycle Simulation Rig Is Off To The Races

Many arcade machines can be emulated and handily controlled with the standard joystick and button combos. However, a few don’t feel quite right without some extra equipment, motorcycle racing games being one of them. So, no longer content to go to an arcade to get his fix, [The Q] welded his own motorcycle simulation rig for playing racing games at home.

After an initial design was sketched out, rectangular tube steel was cut to size and welded together with a MIG welder. A central shaft linked to some secured bearings made the central pivot point. A few pistons offered the resistance needed for leaning into the curves. To the central shaft, a seat and an old bicycle fork were attached. A clever linkage from the handlebars to the base causes the bike to tilt when turning the handlebars and vice versa.

The bike was ready for prime time after some grinding, orange paint, a license plate, and some lights and grips. [The Q] just needed to get the angle of the bike into the simulation of their choice. While we expected a teensy or other microcontroller emulating a controller, [The Q] went for a somewhat simpler approach, and 3D printed a cradle to hold a PlayStation controller. Little levers pull strings to articulate the joystick, and a cable from the throttle grip pulls back the trigger on the controller. All in all, the experience looks pretty decent, particularly when you’re comparing it to a motocross arcade machine. What it really needs are some fans blowing for the effect of the air stream coming at you.

If you’re thinking about busting out the MIG to make a rig of your own, maybe consider making a homemade car racing rig to complement the bike.

Continue reading “Motorcycle Simulation Rig Is Off To The Races”

a render of the curved bartop arcade machine in fusion 360

Bartop Arcade Machine That Isn’t Afraid Of Change

Arcade machines have a distinct look and feel with large imposing cabinets and smaller bartop machines that try to keep the look and feel of a traditional upright arcade cabinet while taking up less space. An entirely new aesthetic has been given for this engineering marvel of a bartop arcade that [DIY Engineering] has made. Gone is the expansive angular box, and in its place are sleek and slender curves. The key piece that makes this build work is the curved monitor.

He started with a detailed design in Fusion360 that really focused on the tools and techniques that [DIY Engineering] knew would work. The backbone of the device was formed from wooden dowels around which 3d printed parts slid on. To the sides of the dowels, two pieces of acrylic are screwed on to act as an LED diffusor. To that acrylic, two pieces of CNC’d red oak are attached with two arcade buttons for pinball-style actuation. Over the top, cast acrylic was heated and then bent into the desired shape with the help of a two-part mold press. The screen slotted right in perfectly. Part of the display at the top was reserved for a marquee, and the look is extraordinary with the dark acrylic. Ten arcade buttons and an eight-way joystick offer an array of options for input.

Internally, a temperature-controlled fan and a Raspberry Pi are running the show. Controls are wired as GPIO and read by the Pi. So naturally, the games on the SD card tend to look best on a long vertical screen: vertical shooters and the like.

Arguably, the best thing about this project isn’t just the execution (which is fantastic) but the look behind the curtain at the process. So many potential problems were solved in the modeling stage, and fabrication went fairly smoothly as a result (or so we think youtube hides a multitude of sins). The results speak for themselves, and we think this is an enviable arcading machine. [DIY Engineering] has mentioned providing files in the future for you to build your own. If perhaps it seems a little intimidating, why not give a smaller 3D printable bartop a try?

Video after the break.

Continue reading “Bartop Arcade Machine That Isn’t Afraid Of Change”