Building A Satellite-Tracking System With Cold War Tech

The things Hackaday readers come up with and post over on Hackaday.io never cease to amaze us. If you’ve never checked it out, be careful — you can easily spend hours (or weeks) of your life just skimming through the projects that have been logged there. Many of the builds use modern development tools like Arduino and Raspberry Pi, but every so often we come across a project that takes a more difficult road.

That’s the case with [Keplermatik’s] Cold War-era satellite-tracking project, also aptly named Keplermatik. This a build that’s still in progress, which just means you’ve got the privilege of following along as it progresses! What makes this project so special? Aside from the fact that it’s purpose is to track satellites, we think the sole use of vintage tech is a very cool and very ambitious goal.

IV-22 VFD displays will be used for the "Soviet" side of the console
IV-22 VFD displays will be used for the “Soviet” side of the console

[Keplermatik] plans to split the satellite-tracking console into two sides: an American-tech side for tracking the satellite’s position, and a Soviet-tech side for tuning the radio and positioning the antenna. The idea is that he’ll get to use vintage technology from both sides of the Iron Curtain. That should lead to some very interesting lessons about how these kinds of systems were designed by each side during the Cold War.

The build is still in its adolescence, but is definitely worth following along with. But, if you’re craving more Soviet tech and need it right now, be sure to check out this post on Russian Cold War vacuum tubes.


Building A Full-Spectrum Digital Camera On The Cheap

The sensor on your digital camera picks up a lot more than just the light that’s visible to the human eye. Camera manufacturers go out of their way to reduce this to just the visible spectrum in order to produce photos that look right to us. But, what if you want your camera to take photos of the full light spectrum? This is particularly useful for astrophotography, where infrared light dramatically adds to the effect.

Generally, accomplishing this is just a matter of removing the internal IR-blocking filter from your camera. However, most of us are a little squeamish about tearing into our expensive DSLRs. This was the dilemma that [Gavin] faced until a couple of years ago when he discovered the Canon EOS-M.

Now, it’s important to point out that one could do a similar conversion with just about any cheap digital camera and save themselves a lot of money (the practically give those things away now). But, as any photography enthusiast knows, lenses are just as important as the camera itself (maybe even more so).

photo-31
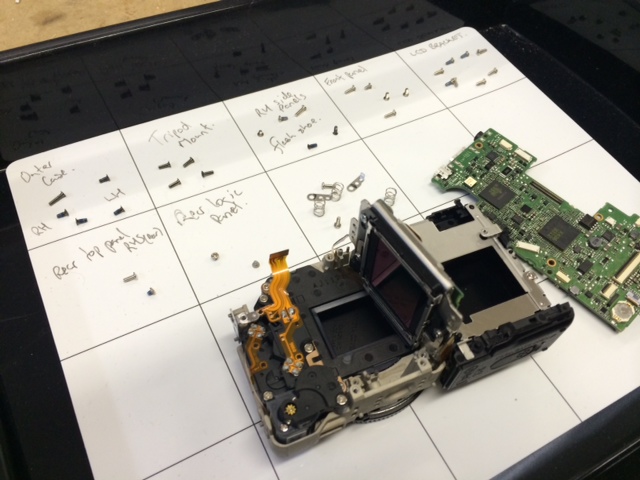
So, if you’re interested in taking nice pictures, you’ve got to have a camera with an interchangeable lens. Of course, if you’re already into photography, you probably already have a DSLR with some lenses. This was the case for [Gavin], and so he needed a cheap digital camera that used Canon interchangeable lenses like the ones he already had. After finding the EOS-M, the teardown and IR-blocking filter removal was straightforward with just a couple of hiccups.

When [Gavin] wrote his post in 2014, the EOS-M was about $350. Now you can buy them for less than $150 used, so a conversion like this is definitely into the “cheap enough to tinker” realm. Have a Nikon camera? The Nikon 1 J3 is roughly equivalent to the original EOS-M, and is about the same price. Want to save even more money, and aren’t concerned with fancy lenses? You can do a full-spectrum camera build with a Raspberry Pi, with the added benefit of being able to adjust what light is let in.

Creo Arm Might Be The SCARA You’re Looking For

A SCARA (Selective Compliance Assembly Robot Arm) is a type of articulated robot arm first developed in the early ’80s for use in industrial assembly and production applications. All robotics designs have their strengths and their weaknesses, and the SCARA layout was designed to be rigid in the Z axis, while allowing for flexibility in the X and Y axes. This design lends itself well to tasks where quick and flexible horizontal movement is needed, but vertical strength and rigidity is also necessary.

This is in contrast to other designs, such as fully articulated arms (which need to rotate to reach into tight spots) and cartesian overhead-gantry types (like in a CNC mill), which require a lot of rigidity in every axis. SCARA robots are particularly useful for pick-and-place tasks, as well as a wide range of fabrication jobs that aren’t subjected to the stress of side-loading, like plasma cutting or welding. Unfortunately, industrial-quality SCARA arms aren’t exactly cheap or readily available to the hobbyist; but, that might just be changing soon with the Creo Arm.
Continue reading “Creo Arm Might Be The SCARA You’re Looking For”

An Apple II Joystick Fix For Enjoyable Gameplay

We all remember the video games of our youth fondly, and many of us want to relive those memories and play those games again. When we get this urge, we usually turn first to emulators and ROMs. But, old console and computer games relied heavily on the system’s hardware to control the actual gameplay. Most retro consoles, like the SNES for example, rely on the hardware clock speed to control gameplay speed. This is why you’ll often experience games played on emulators as if someone is holding down the fast forward button.

The solution, of course, is to play the games on their original systems when you want a 100% accurate experience. This is what led [FozzTexx] back to gameplay on an Apple II. However, he quickly discovered that approach had challenges of its own – specifically when it came to the joystick.

The Apple II joystick used a somewhat odd analog potentiometer design – the idea being that when you pushed the joystick far enough, it’d register as a move (probably with an eye towards smooth position-sensitive gameplay in the future). This joystick was tricky, the potentiometers needed to be adjusted, and sometimes your gameplay would be ruined when you randomly turned and ran into a pit in Lode Runner.

The solution [FozzTexx] came up with was to connect a modern USB gamepad to a Raspberry Pi, and then set it to output the necessary signals to the Apple II. This allowed him to tune the output until the Apple II was responding to gameplay inputs consistently. With erratic nature of the original joystick eliminated, he could play games all day without risk of sudden unrequested jumps into pits.

The Apple II joystick is a weird beast, and unlike anything else of the era. This means there’s no Apple II equivalent of plugging a Sega controller into an Atari, or vice versa. If you want to play games on an Apple II the right way, you either need to find an (expensive) original Apple joystick, or build your own from scratch. [FozzTexx] is still working on finalizing his design, but you can follow the gits for the most recent version.

You May Have A Nixie Tube Clock, But Can Yours Levitate?

Nixie tubes, electromagnets, levitation, and microcontrollers — this project has “Hackaday” written all over it!

Time Flies: Levitating Nixie Clock comes from [Tony Adams], and uses a lot of technology we’ve seen before, but in a new and interesting way. A nixie tube clock is nothing new, but using electromagnets to levitate it above a base certainly paired with inductive coupling to transmit power using no wires make this floating nixie build a real treat.

Continue reading “You May Have A Nixie Tube Clock, But Can Yours Levitate?”

Taking The Converted PC PSU Bench Supply A Step Further

A quality bench power supply is essential for electronics work. Nobody wants to go through the trouble of digging through their electronics bin just to find a wall wart with the right output. And, even if you were so inclined, it would be folly to assume that its output would actually be clean.

You could, of course, purchase a purpose-built bench power supply. But, this is Hackaday, and I’m sure many of you would rather build one yourself from an inexpensive PC power supply. Normally, you’d do this by separating out the different voltage lines into useful groups, such as 12V, 5V, and 3.3V. [Supercap2f] wanted to take this a step further, both to get a more useful unit and to practice his PCB-making.

His design uses a custom circuit design to fuse the circuits, and to provide some basic logic. Using the LCD display, you can see which lines are powered on. There is even a simple 3D printed cover to keep everything neat and tidy. [Supercap2f] has posted all of the design files, so you can build one of these yourself. We’ve seen similar builds in the past, but this is another nice one that anyone with the ability to etch PCBs can build.

Vending Coins For Your Vending Machine

Anyone who has worked in an office with a vending machine knows this problem well: someone wants a snack or a drink from the vending machine, but doesn’t have any small change. So, they proceed to walk around the office trying to find someone to make some change for them. It’s a hassle, and a surprisingly common one. Sure, a lot of vending machines now accept credit cards, but they’re still in the minority.

This was the problem facing Belgium-based automation company November Five. As automation and IoT specialists, their first thought was to hack the vending machine itself. But, unfortunately, they didn’t own it; as many of you know, vending machines are generally owned by the distributor. So, they needed a solution that allowed their employees access to the vending machine, without actually modifying the vending machine itself.

The solution they came up with was to attach an RFID-activated coin dispenser to the vending machine. Everyone at the company already has an RFID badge for opening doors and such, so the system wouldn’t add any burden to the employees. And keeping track of how many coins each employee used was a simple task of logging requests.

Continue reading “Vending Coins For Your Vending Machine”