BREWSTER Fetches Your Beer Automatically

brewster-fetches-from-the-refriderator

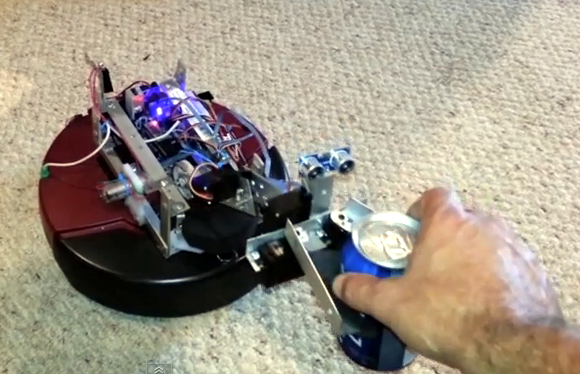
Afraid that if you leave the room you’ll miss the best play of the game? Now you don’t need to move your rear end in order to grab the next brewski. BREWSTER was developed to fetch cold beers from the fridge and deliver them to you automatically.

The robot started as a roomba but has been heavily repurposed with the addition of a mechanical arm on top of the chassis. This not only lets BREWSTER grip a can of beer, but it can first open the mini fridge and reach far enough inside to get one from the back. This requires no modification to the refrigerator, but the low clearance of the roomba does call for a mini-fridge sitting at floor level. Check out a demo run in the video after the break. We think the current version is running on a pre-coded route; this project is just waiting for a spin-off that has mapping and machine vision.

The alternative to this single can delivery would be to make the entire icebox into a robot.

Continue reading “BREWSTER Fetches Your Beer Automatically”

Web Connectivity And Other Addons For An Automatic Schnauzer Feeder

web-enabled-automatic-dog-feeder

[Ben Miller] and his dad combined forces to create this automatic dog feeder. It not only keeps their two schnauzers happy, but gives them peace of mind as they can double-check that he feeding happened by pulling up an image on the Internet. Make sure you make it through all three posts of the build to get the entire picture.

The project started with some research which turned up a project that used a commercially available automatic feeder. That one used Arduino, but because of the cost the board plus a WiFi shield is a bit high, [Ben] went with a Raspberry Pi and a USB WiFi dongle instead. The Pi is much more powerful and adds the functionality for capturing images via a webcam.

After a convoluted process of connecting the Pi to the existing button traces on the automatic feeder it was time to start coding. The system runs from a Perl script which monitors a Gmail account for remote commands (in addition to a regular feeding schedule). The final touch is a bit of mechanical engineering which splits the output into two bowls so the dogs each have their own serving.

We still use the Autodine we built several years back but its single-serving limitation has always kept a second version on our project list. Hopefully seeing a well-executed system like this will motivate us to get building!

The Nibbler: A 4-bit CPU Built With 7400 Logic

nibbler-schematic

Maybe we shouldn’t say “built” since [Steve Chamberlin] hasn’t actually heated up his iron yet. From the finished schematic above that is puzzling at first, until you realize the scope of the project. His Nibbler implements a 4-bit CPU using 7400 logic chips. Because he’s come up with the architecture himself he’s taking a lot of steps to check all of his work before committing to a PCB.

We linked to his category for the project which is still in progress. Most recently he wrote a program to prove that it’ll run on the hardware. That’s a feat considering this is still just a design idea. It was made possible because he wrote a simulator based on the design. The C++ tool simulates data and control buses and features a full set of debugging tools.

Careful testing of the design before the build is the best possible way to go. The simulator and debugging tools will be useful for software development even after the hardware is built. And testing before wiring is a must as these things get out of control quickly in terms of soldering complexity.

[via Dangerous Prototypes]

Hidden RFID Reader Locks Workstation Unless Keys Are Present

We don’t know how [Kristoffer Marshall] found himself with free time at work, but he used it to beef up his computer security. Above is the finished project. There is literally nothing to see here. He’s rigged up a hidden RFID reader which locks and unlocks his workstation.

The security of the system depends on xscreensaver, which has a password protected lock feature already built into it. When the tag is removed from the reader’s field it fires up the screensaver using a Perl script.

But waking up from the screensaver is a bit more tricky. The package doesn’t allow you to wake it from the command line — most likely for security. He found the xdotool to be of great use here. It is a command line tool which simulates keyboard and mouse entry. His script detects when the xscreensaver password prompt is on the screen and uses the xdotool to fill in [Kristoffer’s] password. Since the script knows what has focus it won’t give away your password by accident.

See the complete setup in the clip after the break.

Continue reading “Hidden RFID Reader Locks Workstation Unless Keys Are Present”

Extruded Rail And 3D Printed Connectors Form A Proper Laser Engraver

3d-printed-laser-engraver

Fast and accurate is a good description of this laser engraver built by [Ragnar] and [Gunnar]. The’re planning to show it off at the Trondheim Maker Faire after the new year but they took it out in the wild for the PSTEREO Mini Maker Faire (also in Trondheim) this past August. The video below gives an overview of the build process and the engraver at work. But we also enjoyed reading the post about a few missteps in the early prototyping process. We call this one a proper laser engraver because it was purpose built from the ground-up. We still like seeing the engravers hacked from optical drives, but this really is a horse of a different color in comparison.

From the start they’re using familiar parts when it comes to CNC builds. The outer frame is made of extruded aluminum rail, with precision rod for the gantry to slide upon. Movement is facilitated with stepper motors and toothed belts, with all of the connecting and mounting parts fabricated on a 3D printer. The mistake made with an early (and unfortunately mostly assembled) prototype was that the Y axis was only driven on one side when it really needed to be driven on both. But filament is relatively cheap so a few tweaks to the design were able to fix this and get the production back on track.

Continue reading “Extruded Rail And 3D Printed Connectors Form A Proper Laser Engraver”

Potassium Chlorate From Household Products

To the upper right we have very pure potassium chlorate, so much so that it bursts into flames when mixed with sugar and catalyzed with some sulfuric acid. [Mr. Home Scientist] produced the KClO3 using household chemicals and some rudimentary equipment sourced on eBay.

The experiment started off with concentrated bleach containing 8.25% sodium hypochlorite. He needed sodium chlorate so a hot plate was used to boil the bleach until crystals started to form. A more efficient way to achieve this reaction would be using electrolysis (check out the HHO generator we saw recently for a homemade rig). The next step is to add potassium chloride, which is sourced from the grocery store as a sodium-free salt alternative. After mixing with the filtered remains of the bleach reaction the two are combined. There is no precipitate from this — an indication that not everything is as it should be. But an overnight stay in the refrigerator results in the potassium chlorate crystals seen above.

Fiery testing (seen below) lets him know the experiment worked. From here the product can be used for things like making solid rocket engines.

Continue reading “Potassium Chlorate From Household Products”

Pair Of MIDI Dongles To Inspire Some Weekend Music Hacking

pair-of-midi-dongles

This pair of dongles is a fun way to get your feet wet working with MIDI hardware. They’re called MIDIvampire-I and MIDIvampire-II. Just plug one end into your MIDI-ready instrument and the other into a pair of speakers and you’re off and running. Mark I is a polyphonic synth, and Mark II is a drum machine, but both use basically the same hardware which you may already have on hand.

The single chip on each board is an ATmega328 often found anchoring Arduino boards. The other silicon component is an S1112B30MC voltage regulator. The rest of the components are passives, with MIDI and headphone jacks for connectivity. They’re selling these if you want the easy way out, but we thought we’d bring them to your attention in case you needed a breadboarding project this weekend. The firmware, BOM, schematic, and board artwork are all available on the Wiki pages linked in the articles above. After the break you can see a couple of demo videos which walk through all of the features.

Continue reading “Pair Of MIDI Dongles To Inspire Some Weekend Music Hacking”