Star Wars Themed MAME Cabinet Is Perfect In This Basement Bar

star-wars-themed-mame-cabinet

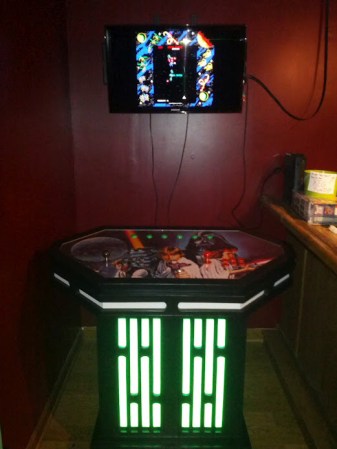
Fans of the Star Wars series will immediately recognize these illuminated vertical bars as a piece of the style from the original movie. They decorate the MAME cabinet recently installed in this home bar. You’ve got to admit, it looks amazing. But we’re always on the prowl for the build log and this annotated 46 image set has no shortage of goodies.

The project started off as a very ordinary looking plywood frame. But it takes shape quickly as the rounded-over grills were added to the box. Holes were cut behind them to accept the acrylic that serves as a diffuser and to allow the LEDs to shine through from the inside. There are several shelves which will be used to store additional gaming systems in the future. For now all that’s inside is a pretty beefy computer that runs the emulators, allowing games to be played via the arcade buttons or using wireless Xbox controllers.

Make sure you get all the way to the end of the build images. We were delighted by the custom icons in the arcade buttons. Instead of the common player one and player two images there are silhouettes of Star Wars characters and objects. This attention to detail really makes the build something special!

[Thanks Jason]

Satellite Dish Solar Cooker Bakes Potatoes And More

baked-potatoes-in-a-dish-solar-cooker

Hone your survival skills by harnessing the sun’s rays to cook your meals. [Robert] and his daughter turned an old satellite dish into a solar cooker. The image above shows them baking some potatoes, but the temperatures inside the cast iron vessel are high enough to let you cook most foods.

The dish was originally used for satellite television but has been collecting dust in the shed for quite some time. When [Robert] came across a roll of foil tape in his workshop he decided to give the project a whirl. His daughter helped out by peeling away the tape backing (this can be much harder than it sounds) while he applied the reflective material trying to keep it free of wrinkles. After a close call [Robert] donned a pair of welding goggles when positioning the dish. If the light intensity can get the pot up as high as 428 degree Fahrenheit we’re sure it can cause flash blindness.

Unlike other dish cookers we’ve seen, [Robert] didn’t use the original mount for holding the dish in place. He just set it on three bricks and directed it by hand. To keep the intensity focused on the kettle he had to reposition it every 15 minutes.

We wonder if the heat is too much for building a sun tracking solar power harvester?

A Blinky Fedora To Ring In The New Year

[Garrett Mace] decided to dress festive for New Year’s Eve. What he came up with is a fedora ringed in LEDs that react to music. The hardware uses 5050 LEDs on strips. Three of them encircle the head-gear providing a total of 114 RGB pixels. Each is a WS2811 module — a part which we’re seeing more and more of lately.

The video clip after the break starts off with a few minutes of demonstration. [Garrett] managed to code all kinds of animations for the hardware including several different styles of color sweeps and fades. You may start to think that the three bands always display the same patterns but keep watching and you’ll see a sparkle pattern that proves each dot can be addressed individually.

About 2:20 seconds into the video [Garrett] explains how he pulled it off and shows off the driver hardware. The strips are glued to a band of webbing that slides over the hat. The wires that drive the lights were fed through the center of some paracord and connect to an Arduino housed in a 3D printed case. Power is provided by a portable USB battery with a ShiftBrite shield and an MSGEQ7 chip complete the parts list.

Continue reading “A Blinky Fedora To Ring In The New Year”

Adding An LCD Screen Terminal For TP-Link Routers

Routers running embedded Linux offer quite a bit of power depending on what you need to do. To extend the usefulness of his TP-Link router [Roman] built a rig that adds an LCD screen to display the terminal. But it ended up being quite a bit more powerful than that.

The first portion of the project was to build a USB video card for the display. [Roman] went with an STM32 development board which resolves the USB device end with the QVGA screen driver (translated). This seems like it would be the lion’s share of the project, but he still needed a driver on the router to interface with the device. This thrust him into the world of USB-class drivers (translated). It even included building graphics support into the kernel of OpenWRT. The final piece of the puzzle was to write a frame buffer (translated) that would help regulate the output to the screen. The result works so well he is even able to play games using ScummVM. See for yourself in the clip after the break.

Continue reading “Adding An LCD Screen Terminal For TP-Link Routers”

Home Built Stun Baton Turns You Into A Cop From Demolition Man

It seems much like a cattle prod, but [Pode Coet] definitely had people in mind when he built this stun baton. It’s not for the faint of heart — especially since a wrong move could stop your ticker cold. But the design and fabrication are top-notch, and he didn’t hold back when it comes to build images and details.

The enclosure is a hunk of PCV pipe with a cap on each end. The business end includes two electrodes separated by a 10mm air gap. The spark has no trouble jumping across that gap, and if you get it close enough to the victim it’ll use their body as a path of least resistance. The butt end of the baton features the charging port which takes 5VDC power and a pair of LEDs for feedback. This power port feeds a charger stored within to top off the Lithium cell which itself only puts out about 3.8V. This potential is fed into a boost circuit to ramp up to 16V before feeding a Royer circuit which jumps it up to 900V. That is connected to the final stage which gets it to the target of 10kV!

You can see and hear a demonstration of the baton in the clip after the break. To bad [Caleb] wasn’t around to take the thing for a proper test drive.

Continue reading “Home Built Stun Baton Turns You Into A Cop From Demolition Man”

Reverse Engineering ST-Link/V2 Firmware

reverse-engineering-stlink-v2

The chip seen just above the center of this image is an ARM Cortex-M3. It provides the ability to interface and program the main chip on the STM32F3 Discovery board. The protocol used is the ST-Link/V2 which has become the standard for ST Microelectronics development boards. The thing is, that big ARM chip near the bottom of the image has multiple UARTs and bridging a couple of solder points will connect it to the ST-Link hardware. [Taylor Killian] wanted to figure out if there is built-in firmware support to make this a USB-to-serial converter and his path to the solution involved reverse engineering the ST-Link/V2 firmware.

The first part of the challenge was to get his hands on a firmware image. When you download the firmware update package the image is not included as a discrete file. Instead he had to sniff the USB traffic during a firmware update. He managed to isolate the file and chase down the encryption technique which is being used. It’s a fun read to see how he did this, and we’re looking forward to learning what he can accomplish now that’s got the goods he was after.

Google Talk Used For Home Automation Communications Via Android

home-automation-using-instant-messaging

To call [Carnivore’s] home automation project impressive would be an understatement. He’s pulled together a system that is fast, well presented, and easy to use. To interface with items in his home he’s using X10 modules, and this example simply switches some table lamps. But the underlying setup seems incredibly polished and should be a snap to extend for just about any purpose.

The guide linked above has all the gritty details, but the best overview is provided in the video after the break. [Carnivore] shows off the Windows 8 machine that acts as the server. It has am X10 transceiver connected to communicate with the appliances. He can control the system from the screen seen above, but everything can also be accessed from his Android phone. Communication between the two is handled by Google Talk, an instant messaging application — but the commands are home screen shortcuts and don’t need to be typed into the Google Talk app. He modified the source code of a program called TweetMyPC to use the Google Talk API which looks for keywords in received messages. The lag on an instant message is far lower compared to SMS or Email so commands are received very close to real-time. Feedback is sent from the server to the phone using a text message.

Continue reading “Google Talk Used For Home Automation Communications Via Android”