Network Controlled Decorative LED Matrix Frame

LED-Pixel-FrameThere is nothing better than a project that you can put on display for all to see. [Tristan’s] most recent project, a Decorative LED Matrix Frame, containing 12×10 big square pixels that can display any color, is really cool.

Having been built around a cheap IKEA photo frame this project is very doable, at least for those of you with a 3D printer. The 3D printer is needed to create the pixel grid, which ends up looking very clean in the final frame. From an electronics perspective, the main components are a set of Adafruit Neopixel LED strips, and an Arduino Uno with an Ethernet shield. The main controller even contains a battery backup for the real time clock (RTC) when the frame is unplugged; a nice touch. Given that the frame is connected to the local network, [Tristan] designed the frame to be controlled by a simple HTML5 interface (code available on GitHub). This allows any locally connected device to control the frame.

Be sure to check out the build details, they are very well done. If you are still not convinced how cool this project is, be sure to check out a video of it in action after the break! It makes us wish that you could play Tetris on this frame. Very nice job [Tristan]!

Continue reading “Network Controlled Decorative LED Matrix Frame”

Reflow Oven Controller With Graphic LCD

Reflow Controller

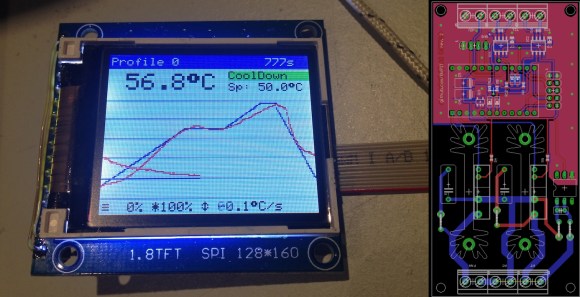
A reflow oven is one of the most useful tools you will ever have, and if you haven’t built one yet, now is as good a time as any. [0xPIT’s] Arduino based reflow oven controller with a graphic LCD is one of the nicest reflow controllers we’ve seen.

Having a reflow oven opens up a world of possibilities. All of those impossible to solder surface mount devices are now easier than ever. Built around the Arduino Pro Micro and an Adafruit TFT color LCD, this project is very straight forward. You can either make your own controller PCB, or use [0xPIT’s] design. His design is built around two solid state relays, one for the heating elements and one for the convection fan. “The software uses PID control of the heater and fan output for improved temperature stability.” The project write-up is also on github, so be sure to scroll down and take a look at the README.

All you need to do is build any of the laser cutters and pick and place machines that we have featured over the years, and you too can have a complete surface mount assembly line!

Attiny PWM Generator And Servo Tester

PWM-Servo-Tester

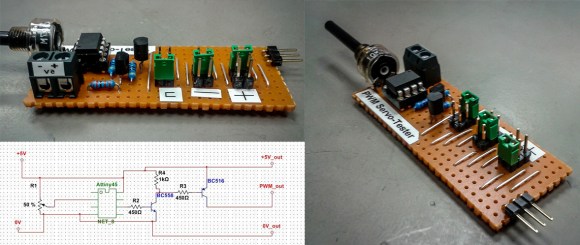
Having the right tool for the job makes all the difference, especially for the types of projects we feature here at Hackaday. [Jana Marie] must agree with this sentiment, one of her latest projects involves building a tool to generate a PWM signal and test servos using an Attiny25/45/85.

Tools come in all kinds of different shapes and sizes. Even if it might not be as widely used as [Jana’s] earlier work that combines an oscilloscope and signal generator, having a tool that you can rely upon to test servos and generate a PWM can be very useful. This well written Instructable provides all the details you need to build your own, including the schematic and the necessary code (available on GitHub). The final PWM generator looks great. For simple projects, sometimes a protoboard is all you need. It would be very cool to see a custom PCB made for this project in the future.

What tools have you build recently? Indeed, there is a tool for every problem. Think outside the (tool) box and let us know what you have made!

A Tweeting Litter Box

SmartLitterBox

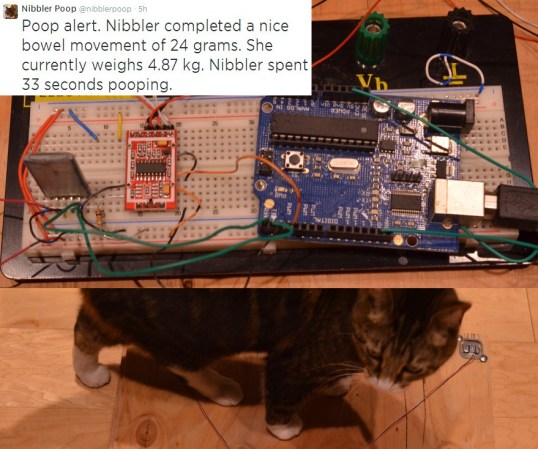
How can you not be interested in a project that uses load cells, Bluetooth, a Raspberry Pi, and Twitter. Even for those of our readers without a cat, [Scott’s] tweeting litter box is worth the read.

Each aspect of this project can be re-purposed for almost any application. The inexpensive load cells, which available from eBay and other retailers, is used to sense when a cat is inside the litter box. Typically sensors like the load cell (that contain a strain gauge) this use a Wheatstone bridge, which is very important for maximizing the sensitivity of resistive sensor. The output then goes to a HX711, which is an ADC specifically built for load cells. A simple alternative would be using an instrumentation amplifier and the built-in ADC of the Arduino. Now, the magic happens. The weight reading is transmitted via an HC-06 Bluetooth module to a Raspberry Pi. Using a simple Perl script, the excreted weight, duration, and the cat’s resulting body weight is then tweeted!

Very nice work! This is a well thought out project that we could see being expanded to recognize the difference between multiple cats (or any other animal that goes inside).

Android Based Wireless ECG

ECG

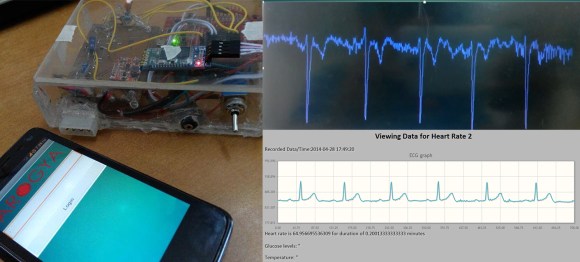
The title of [Nuclearrambo’s] post says it all, “Android based wireless ECG monitoring (Temperature sensor and glucometer included).” Wow! What a project!

The project is built around the HC-06 bluetooth module and the Stellaris LaunchPad from TI, an inexpensive ARM developer kit. Building an ECG is a great way to learn about instrumentation amplifiers, a type of differential amplifier used for its extremely high common mode rejection ratio (CMRR). Please be sure to keep in mind that there are a myriad of safety issues and regulation concerns for medical device, and there is no doubt that an ECG is considered a medical device. Sadly, [Nuclearrambo’s] post does not include all of the code and design files you need to build the system, which is understandable considering this is a medical device. That being said, he provides a lot of information about building high-quality ECG instrumentation and the web interface.

It would be great if [Nuclearrambo] could post the Android application code and Stellaris LaunchPad code. Even with these omissions, this post is still worth reading. Designing medical devices requires a lot of know-how, but who knows, maybe your next project can save your life!

Bare Bones Arduino IR Receiver

TV Remote

Old infrared remote controls can be a great way to interface with your projects. One of [AnalysIR’s] latest blog posts goes over the simplest way to create an Arduino based IR receiver, making it easier than ever to put that old remote to good use.

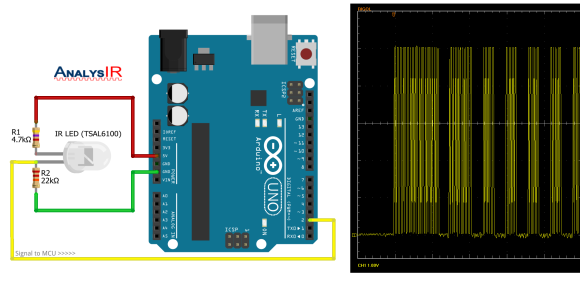
Due to the popularity of their first IR receiver post, the silver bullet IR receiver, [AnalysIR] decided to write a quick post about using IR on the Arduino. The part list consists of one Arduino, two resistors, and one IR emitter. That’s right, an emitter. When an LED (IR or otherwise) is reverse biased it can act as a light sensor. The main difference when using this method is that the IR signal is not inverted as it would normally be when using a more common modulated IR receiver module. All of the Arduino code you need to get up and running is also provided. The main limitation when using this configuration, is that the remote control needs to be very close to the IR emitter in order for it to receive the signal.

What will you control with your old TV remote? It would be interesting to see this circuit hooked up so that a single IR emitter can act both as a transmitter and a receiver. Go ahead and give it a try, then let us know how it went!

The Lightgame Project: A Multiplayer Arduino Game

lightgame_3Summer is upon us. The Lightgame Project is a multiplayer reaction time based game built around the Arduino. It’s a perfect rainy day project for those restless kids (and adults!). Designed by two undergraduate students [Efstathios] and [Thodoris] for a semester long project, all the hard work has already been done for you.

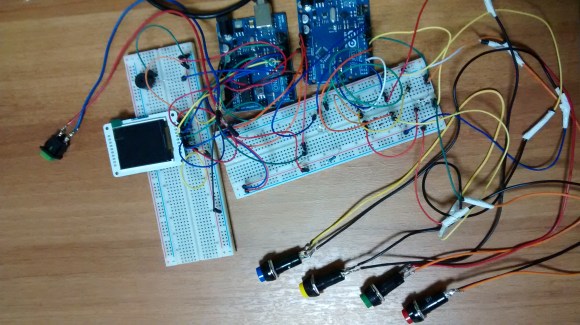
There are tons of reasons we love games that you can build yourself. For one, it’s an amazing way to get children interested in hobby electronics, making, and hacking. Especially when they can play the game with (and show off to) their friends. Another reason is that it is a perfect way to share your project with friends and family, showcasing what you have been learning. The game is based on your reaction time and whether or not you press your button when another players color is shown. The project is built around two Arduinos connected via I2C. The master handles the mechanics of the game, while the slave handles the TFT LCD and playing music through a buzzer.

I2C is a great communication protocol to be familiar with and this is a great project to give it a try. [Efstathios] and [Thodoris] did a great job writing up their post, plus they included all the code and schematics needed to build your own. It would be great to see more university professors foster open source hardware and software with their students. A special thanks goes out to [Dr. Dasygenis] for submitting his student’s work to us!

Continue reading “The Lightgame Project: A Multiplayer Arduino Game”