LeanPipe

Building Things With Lean Pipe

Sometimes you just want to build something quickly and easily. Maybe you just need a basic structure for your actual project, or perhaps you want to be able to easily modify the design. Maybe you don’t have access to many fancy tools to build a solid, lightweight structure. Another possibility is that you want to be able to break down your structure and move it at a later date. In cases like these, you might want to consider using lean pipe.

Lean pipe is kind of like K’NEX for adults. It’s made up of metal pipe and specialized fittings. If you’ve ever worked with PVC pipe before then this may sound familiar. The difference is lean pipe is stronger and designed specifically for building sturdy structures. The fixtures designed for use with lean pipe are much easier to work with than PVC pipe. With PVC pipe, it seems like you never have the exact right fitting and you have to build your own adapters, quickly increasing the cost of the design.

A typical lean pipe fitting will either slide over the end of a section of pipe, or wrap around it somewhere in the middle. An adjustment screw can then be tightened to clamp the fitting in place around the sections of pipe. The video below does a good job demonstrating the different possibilities with fittings. The primary issue with this material is that you might not be able to find it at your local hardware store. Luckily, a quick Internet search will turn up a number of online purchasing options.

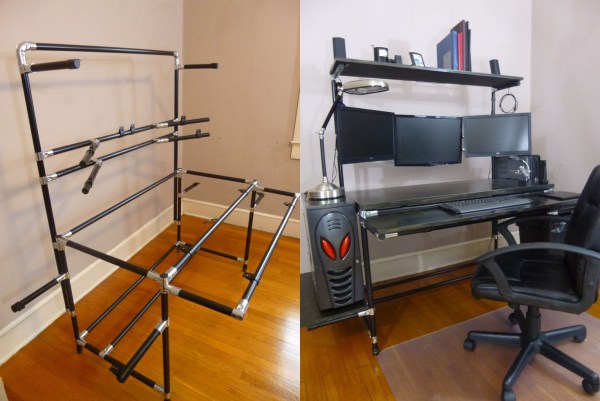
So what can you build with this stuff? Cody has been building himself computer desks with an industrial look. He first starts out with the frame design. This is the part that’s made from the lean pipe. Once the frame is completed he just needs to work on the wood surfaces. All he really needs to do is cut the wood to shape and then finish it to look nice. It then lays in place and can be bolted down for extra security. Continue reading “Building Things With Lean Pipe”

RasPi Power Controller

WiFi Controlled Power Outlets With Raspberry Pi

[Tim] was looking for a way to control his power outlets using WiFi. He looked into purchasing a WeMo but he realized that he could build something even better with more bang for his buck. He started out by purchasing a five pack of Etekcity wireless remote control outlet switches. These are kind of like the WeMo, only they aren’t controlled via WiFi. Instead, they come with an RF controller. [Tim] just needed to find a way to bridge the gap between the RF remote and WiFi.

[Tim] decided to use a Raspberry Pi as the brains of the controller. He also purchased a SMAKN 433MHz RF receiver and transmitter for communicating with the wireless outlet switches. The wiring for the modules is pretty simple. There are only four wires. There are power and ground wires for each module. Then the transmitter needs two GPIO pins while the receiver only needs one.

[Tim] began with a fresh installation of Raspbian. He then installed Wiring Pi, which gives you the ability to interface with the GPIO pins in a way that is similar to Arduino. He also installed Apache and PHP to create a web interface for switching the outlets. The last step was to write some custom software. The software included a script that allowed [Tim] to sniff out the controls of his RF remote. The correct codes are entered into the “toggle.php” file, and everything is set. All [Tim] has to do now is browse to his Pi’s web server and click a button. All of the custom code is available via git.

Converting Morse Code To Text With Arduino

Morse code used to be widely used around the globe. Before voice transmissions were possible over radio, Morse code was all the rage. Nowadays, it’s been replaced with more sophisticated technologies that allow us to transmit voice, or data much faster and more efficiently. You don’t even need to know Morse code to get an amateur radio license any more. That doesn’t mean that Morse code is dead, though. There are still plenty of hobbyists out there practicing for the fun of it.

[Dan] decided to take a shortcut and use some modern technology to make it easier to translate Morse code back into readable text. His project log is a good example of the natural progression we all make when we are learning something new. He started out with an Arduino and a simple microphone. He wrote a basic sketch to read the input from the microphone and output the perceived volume over a Serial monitor as a series of asterisks. The more asterisks, the louder the signal. He calibrated the system so that a quiet room would read zero.

He found that while this worked, the Arduino was so fast that it detected very short pulses that the human ear could not detect. This would throw off his readings and needed to be smoothed out. If you are familiar with button debouncing then you get the idea. He ended up just averaging a few samples at a time, which worked out nicely.

The next iteration of the software added the ability to detect each legitimate beep from the Morse code signal. He cleared away anything too short. The result was a series of long and short chains of asterisks, representing long or short beeps. The third iteration translated these chains into dots and dashes. This version could also detect longer pauses between words to make things more readable.

Finally, [Dan] added a sort of lookup table to translate the dots and dashes back into ASCII characters. Now he can rest easy while the Arduino does all of the hard work. If you’re wondering why anyone would want to learn Morse code these days, it’s still a very simple way for humans to communicate long distances without the aid of a computer.

VendingTweets

A Tweeting Vending Machine

[Sigurd] manage to obtain an old vending machine from his dorm. The only problem was that the micocontroller on the main board was broken. He and his friend decided they could most likely get the machine back into working order, but they also knew they could probably give it a few upgrades.

This system uses two Arduino Pro Minis and an Electric Imp to cram in all of the new features. One Arduino is connected to the machine’s original main board. The Arduino interfaces with some of the shift registers, relays, and voltage regulators. This microcontroller also lights up the buttons on the machine as long as that particular beverage is not empty. It controls the seven segment LED display, as well as reading the coin validator.

The team had to reverse engineer the original coin validator in order to figure out how the machine detected and counted the coins. Once they figured out how to read the state of the coins, they also built a custom driver board to drive the solenoids.

A second Arduino is used to read NFC and RFID cards using a Mifare RC522 reader. The system uses its own credit system, so a user can be issued a card with a certain amount of pre-paid credit. It will then deduct credit appropriately once a beverage is vended. The two Arduinos communicate via Serial.

The team also wanted this machine to have the ability to communicate with the outside world. In this case, that meant sending cheeky tweets. They originally used a Raspberry Pi for this, but found that the SD card kept getting corrupted. They eventually switched to an Electric Imp, which worked well. The Arduino sends a status update to the Imp every minute. If the status changes, for example if a beverage was dispensed, then the Imp will send a tweet to let the world know. It will also send a tweet to the maintenance person if there is a jam or if a particular slot becomes empty. Continue reading “A Tweeting Vending Machine”

hologram

Dead Simple Hologram Effect

We’ve all seen holograms in movies, and occasionally we see various versions of the effect in real life. The idea of having a fully three-dimensional image projected magically into space is appealing, but we haven’t quite mastered it yet. [Steven] hasn’t let that stop him, though. He’s built himself a very simple device to display a sort of hologram.

His display relies on reflections. The core of the unit is a normal flat screen LCD monitor laid on its back. The other component looks like a four-sided pyramid with the top cut off. The pyramid is made from clear plastic transparency sheets, held together with scotch tape. It’s placed on top of the LCD with the narrow end facing down.

[Steven] then used the open source Blender program to design a few 3D animations. Examples include a pterodactyl flying and an approximation of the classic Princess Leia hologram from Star Wars Episode 4. The LCD screen displays the animation from four different angles at once. The images are displayed up and onto the transparency sheet, which then get reflected to your eyes. The result is an image that looks almost as if it’s floating in space if viewed from the proper angle. If you move around the screen you can see the image from all four sides, which helps to sell the effect. Not bad for a few dollars worth of parts. Continue reading “Dead Simple Hologram Effect”

Spy Pen

Turning An Ordinary Pen Into A Covert Radio Receiver

[Ben Krasnow’s] latest project will be good for anyone who wants a complicated way to cheat on a test. He’s managed to squeeze a tiny FM radio receiver into a ballpoint pen. He also built his own bone conduction microphone to make covert listening possible. The FM radio receiver is nothing too special. It’s just an off the shelf receiver that is small enough to fit into a fatter pen. The real trick is to figure out a way to listen to the radio in a way that others won’t notice. That’s where the bone conduction microphone comes in.

A normal speaker will vibrate, changing the air pressure around us. When those changes reach our ear drums, we hear sound. A bone conduction mic takes another approach. This type of microphone must be pressed up against a bone in your skull, in this case the teeth. The speaker then vibrates against the jaw and radiates up to the cochlea in the ear. The result is a speaker that is extremely quiet unless it is pressed against your face.

Building the bone conduction mic was pretty simple. [Ben] started with a typical disk-shaped piezoelectric transducer. These devices expand and contract when an alternating current is passed through them at a high enough voltage. He cut the disk into a rectangular shape so that it would fit inside of the clicker on the ballpoint pen. He then encased it in a cylinder of epoxy.

The transducer requires a much higher voltage audio signal than the litter radio normally puts out. To remedy this problem, [Ben] wired up a small impedance matching transformer to increase the voltage. With everything in place, all [Ben] has to do to listen to the radio is chew on the end of his pen. While this technology might help a cheater pass an exam, [Ben] also notes that a less nefarious use of this technology might be to place the speaker inside of the mouthpiece of a CamelBak. This would allow a hiker to listen to music without blocking out the surrounding noise. Continue reading “Turning An Ordinary Pen Into A Covert Radio Receiver”

AlarmLamp

Prefix Your Phone Alarm With A Desk Lamp

If you are like [Gbola], then you have a hard time waking up during the winter months. Something about the fact that it’s still dark outside just makes it that much more difficult to get out of bed. [Gbola] decided to build his own solution to this problem, by gradually waking himself up with an electric light. He was able to do this using all off-the-shelf components and a bit of playing around with the Tasker Android application.

[Gbola] started out with a standard desk lamp. He replaced the light bulb with a larger bulb that simulates the color temperature of natural daylight. He then switched the lamp on and plugged it into a WeMo power switch module. A WeMo is a commercial product that attempts to make home automation accessible for consumers. This particular module allows [Gbola] to control the power to his desk lamp using his smart phone.

[Gbola] mentions that the official WeMo Android application is slow and includes no integration with Tasker. He instead decided to use the third-party WeMoWay application, which does include Tasker support. Tasker is a separate Android application that allows you to configure your device to perform a set task or series of tasks based on a context. For example you might turn your phone to silent mode when your GPS signal shows you are at work. WeMoWay allows [Gbola] to interact with his WeMo device based on any parameter he configures.

On top of all of that, [Gbola] also had to install three Tasker plugins. These were AutoAlarm, Taskkill, and WiFi Connect. He then got to work with Tasker. He configured a custom task to identify when the next alarm was configured on the phone. It then sets two custom variables, one for 20 minutes before the alarm (turn on the lamp) and one for 10 minutes after (turn it off).

[Gbola] then built a second task to actually control the lamp. This task first disconnects and reconnects to the WiFi network. [Gbola] found that the WeMoWay application is buggy and this “WiFi reset” helps to make it more reliable. It then kills the WeMoWay app and restarts it. Finally, it executes the command to toggle the state of the lamp. The project page has detailed instructions in case anyone wants to duplicate this. It seems like a relatively painless way to build your own solution for less than the cost of a specialized alarm clock lamp.