WirePrint

WirePrint Is A Physical ‘Print Preview’ For 3D Printers

3D printers may be old news to most of us, but that’s not stopping creative individuals from finding new ways to improve on the technology. Your average consumer budget 3D printer uses an extrusion technology, whereby plastic is melted and extruded onto a platform. The printer draws a single two-dimensional image of the print and then moves up layer by layer. It’s an effective and inexpensive method for turning a computer design into a physical object. Unfortunately, it’s also very slow.

That’s why Hasso Plattner Institute and Cornell University teamed up to develop WirePrint. WirePrint can slice your three-dimensional model into a wire frame version that is capable of being printed on an extrusion printer. You won’t end up with a strong final product, but WirePrint will help you get a feel for the overall size and shape of your print. The best part is it will do it in a fraction of the time it would take to print the actual object.

This is a similar idea to reducing the amount of fill that your print has, only WirePrint takes it a step further. The software tells your printer to extrude plastic in vertical lines, then pauses for just enough time for it to cool and harden in that vertical position. The result is much cleaner than if this same wire frame model were printed layer by layer. It also requires less overall movement of the print head and is therefore faster.

The best part about this project is that it’s a software hack. This means that it can likely be used on any 3D printers that use extrusion technology. Check out a video of the process below to see how it works. Continue reading “WirePrint Is A Physical ‘Print Preview’ For 3D Printers”

Thermal Printer Brain Transplant

Thermal Printer Brain Transplant Is Two Hacks In One

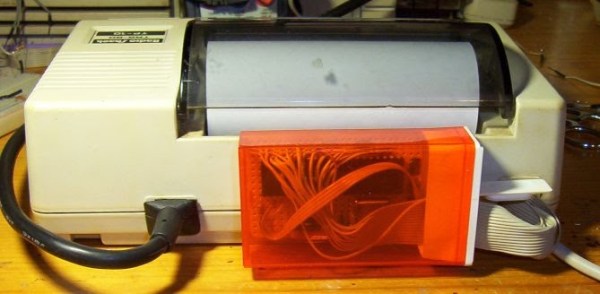
You know how sometimes you just can’t resist collecting old hardware, so you promise yourself that you will get around to working on it some day? [Danny] actually followed through on one of those promises after discovering an old Radio Shack TRS-80 TP-10 thermal printer in one of his boxes of old gear. It looks similar to a receipt printer you might see printing receipts at any brick and mortar store today. The original printer worked well enough, but [Danny] wasn’t satisfied with its 32 character per line limitation. He also wanted to be able to print more complex graphics. To accomplish this goal, he realized he was going to have to give this printer a brain transplant.

First, [Danny] wanted to find new paper for the printer. He only had one half of a roll left and it was 30 years old. He quickly realized that he could buy thermal paper for fax machines, but it would be too wide at 8.5 inches. Luckily, he was able to use a neighbor’s saw to cut the paper down to the right size. After a test run, he knew he was in business. The new fax paper actually looked better than the old stuff.

The next step was to figure out exactly how this printer works. If he was going to replace the CPU, he was going to need to know exactly how it functioned. He started by looking at the PCB to determine the various primary functions of the printer. He needed to know which functions were controlled by which CPU pins. After some Google-Fu, [Danny] was able to find the original manual for the printer. He was lucky in that the manual contained the schematic for the circuit.

Once he knew how everything was hooked up, [Danny] realized that he would need to learn how the CPU controlled all of the various functions. A logic analyzer would make his work much easier, but he didn’t happen to have one lying around. [Danny] he did what any skilled hacker would do. He built his own!

He built the analyzer around an ATMega664. It can sample eight signals every three microseconds. He claims it will fill its 64k of memory in about one fifth of a second. He got his new analyzer hooked up to the printer and then got to work coding his own logic visualization software. This visualization would provide him with a window to the inner workings of the circuit.

Now that he was able to see exactly how the printer functioned, [Danny] knew he would be able to code new software into a bigger and badder CPU. He chose to use another ATMega microcontroller. After a fair bit of trial and error, [Danny] ended up with working firmware. The new firmware can print up to 80 characters per line, which is more than double the original amount. It is also capable of printing simple black and white graphics.

[Danny] has published the source code and schematics for all of his circuits and utilities. You can find them at the bottom of his project page. Also, be sure to catch the demonstration video below. Continue reading “Thermal Printer Brain Transplant Is Two Hacks In One”

Facebook Roommate Group

Using Facebook Ads To Prank Your Friends

Most tech savvy individuals are well aware of the vast amounts of data that social networking companies collect on us. Some take steps to avoid this data collection, others consider it a trade-off for using free tools to stay in touch with friends and family. Sometimes these ads can get a bit… creepy. Have you ever noticed an ad in the sidebar and thought to yourself, “I just searched for that…” It can be rather unsettling.

[Brian] was looking for ways to get back at his new roommate in retaliation of prank that was pulled at [Brian’s] expense. [Brian] is no novice to Internet marketing. One day, he realized that he could create a Facebook ad group with only one member. Playing off of his roommate’s natural paranoia, he decided to serve up some of the most eerily targeted Facebook ads ever seen.

Creating extremely targeted ads without giving away the prank is trickier than you might think. The ad can’t be targeted solely for one person. It needs to be targeted to something that seems like a legitimate niche market, albeit a strange one. [Brian’s] roommate happens to be a professional sword swallower (seriously). He also happens to ironically have a difficult time swallowing pills. naturally, [Brian] created an ad directed specifically towards that market.

Sword Swallowing Ad

The roommate thought this was a bit creepy, but mostly humorous. Slowly over the course of three weeks, [Brian] served more and more ads. Each one was more targeted than the last. He almost gave himself away at one point, but he managed to salvage the prank. Meanwhile, the roommate grew more and more paranoid. He started to think that perhaps Facebook was actually listening in on his phone calls. How else could they have received some of this information? As a happy coincidence, all of this happened at the same time as the [Edward Snowden] leaks. Not only was the roommate now concerned about Facebook’s snooping, but he also had the NSA to worry about.

Eventually, [Brian] turned himself in using another custom Facebook ad as the reveal. The jig was up and no permanent damage was done. You might be wondering how much it cost [Brian] for this elaborate prank? The total cost came to $1.70. Facebook has since changed their ad system so you can only target a minimum of 20 users. [Brian] provides an example of how you can get around the limitation, though. If you want to target a male friend, you can simply add 19 females to the group and then target only males within your group of 20 users. A pretty simple workaround

This prank brings up some interesting social questions. [Brian’s] roommate seemed to actually start believing that Facebook might be listening in on his personal calls for the purposes of better ad targeting. How many other people would believe the same thing? Is it really that far-fetched to think that these companies might move in this direction? If we found out they were already doing this type of snooping, would it really come as a shock to us?

Subway radar

LEDs Turn This Paper Map Into A Tram Tracker

Public transit can be a wonderful thing. It can also be annoying if the trains are running behind schedule. These days, many public transit systems are connected to the Internet. This means you can check if your train will be on time at any moment using a computer or smart phone. [Christoph] wanted to take this concept one step further for the Devlol hackerspace is Linz, Austria, so he built himself an electronic tracking system (Google translate).

[Christoph] started with a printed paper map of the train system. This was placed inside what began as an ordinary picture frame. Then, [Christoph] strung together a series of BulletPixel2 LEDs in parallel. The BulletPixel2 LEDs are 8mm tri-color LEDs that also contain a small controller chip. This allows them to be controlled serially using just one wire. It’s similar to having an RGB LED strip, minus the actual strip. [Christoph] used 50 LEDs when all was said and done. The LEDs were mounted into the photo frame along the three main train lines; red, green, and blue. The color of the LED obviously corresponds to the color of the train line.

The train location data is pulled from the Internet using a Raspberry Pi. The information must be pulled constantly in order to keep the map accurate and up to date. The Raspberry Pi then communicates with an Arduino Uno, which is used to actually control the string of LEDs. The electronics can all be hidden behind the photo frame, out of sight. The final product is a slick “radar” for the local train system.

ROM dump

Raiders Of The Lost ROM

Once upon a time, arcades were all the rage. You could head down to your local arcade with a pocket full of quarters and try many different games. These days, video arcades are less popular. As a result, many old arcade games are becoming increasingly difficult to find. They are almost like the artifacts of an ancient age. They are slowly left to rot and are often lost or forgotten with time. Enter, MAME.

MAME (Multiple Arcade Machine Emulator) is a software project, the goal of which is to protect gaming history by preventing these arcade machines from being lost or forgotten. The MAME emulator currently supports over 7000 titles, but there are still more out there that require preservation. The hackers who work on preserving these games are like the digital Indiana Jones of the world. They learn about lost games and seek them out for preservation. In some cases, they must circumvent security measures in order to accurately preserve content. Nothing as scary as giant rolling boulders or poison darts, but security nonetheless.

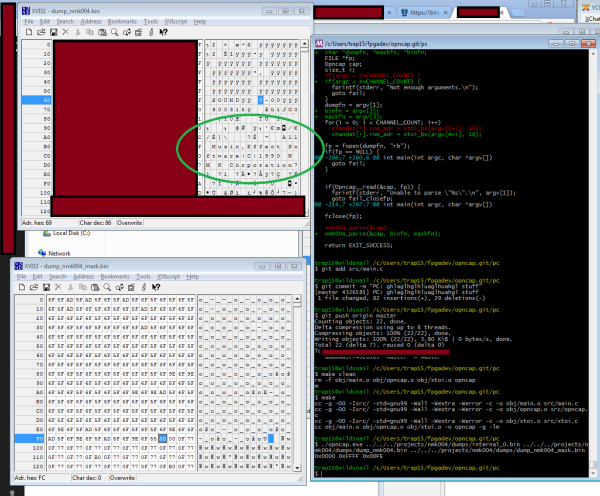
Many of the arcade cabinets produced by a publisher called NMK used a particular sound processor labeled, “NMK004”. This chip contains both a protected internal code ROM and an unprotected external ROM that controls the sound hardware. The actual music data is stored on a separate unprotected EEPROM and is different for each game. The system reads the music data from the EEPROM and then processes it using the secret data inside the NMK004.

The security in place around the internal ROM has prevented hackers from dumping its contents for all this time. The result is that NMK games using this chip have poorly emulated sound when played using MAME, since no one knows exactly how the original chip processed audio. [trap15] found it ridiculous that after 20 years, no one had attempted to circumvent the security and dump the ROM. He took matters into his own hands.

The full story is a bit long and contains several twists and turns, but its well worth the read. The condensed version is that after a lot of trial and error and after writing many custom tools, [trap15] was able to finally dump the ROM. He was able to accomplish this using a very clever trick, speculated by others but never before attempted on this hardware. [trap15] exploited a vulnerability found in the unprotected external ROM in order to trick the system into playing back the protected internal ROM as though it were the sound data stored on the EEPROM. The system would read through the internal ROM as though it were a song and play it out through the speakers. [trap15] recorded the resulting audio back into his PC as a WAV file. He then had to write a custom tool to decode the WAV file back into usable data.

[trap15] has released all of his tools with documentation so other hackers can use them for their own adventures into hardware hacking. The project was a long time in the making and it’s a great example of reverse engineering and perseverance.

[Thanks Ryan]

Inductive charger

Inductive Charger Mod Allows For Non-Stop Wireless Rocking

When you want to jam out to the tunes stored on your mobile devices, Bluetooth speakers are a good option. Battery power means you can take them on the go and the Bluetooth connection means you don’t have to worry about cables or wires dangling around. Unfortunately the batteries never seem to last as long as we want them too. You can always plug the speaker back in to charge up the battery… but when you unhook those cords they always seem to end up falling back behind the furniture.

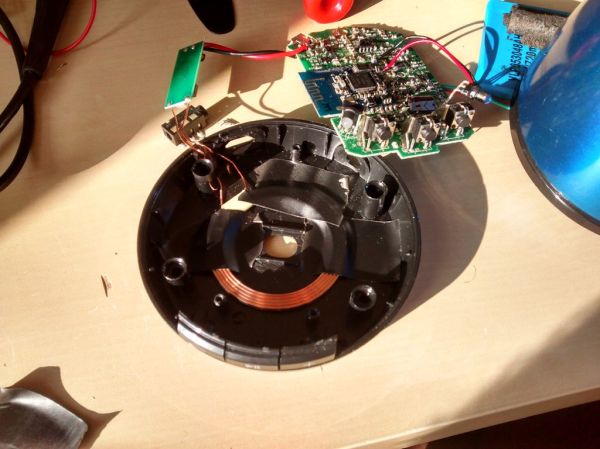
[Pierre] found himself with this problem, but being a hacker at heart meant that he was able to do something about it. He modified his JAM Classic Bluetooth Wireless Speaker to include an inductive charger. It used to be a lot of work to fabricate your own inductive charging system, or to rip it out of another device. But these days you can purchase kits outright.

The JAM speaker was simply put together with screws, so no cracking of the plastic was necessary. Once the case was removed, [Pierre] used a volt meter to locate the 5V input line. It looks like he just tapped into the USB port’s power and ground connections. The coil’s circuit is soldered in place with just the two wires.

All [Pierre] had left to do was to put the speaker back together, taking care to find space for the coil and the new circuit board. The coil was taped to the round base of the speaker. This meant that [Pierre] could simply tape the charging coil to the underside of a glass table top. Now whenever his Bluetooth speaker gets low on battery, he can simply place it on the corner of the table and it will charge itself. No need to mess with cables.


kegerator

End Table Kegerator Hides The Tap When You’re Not Looking

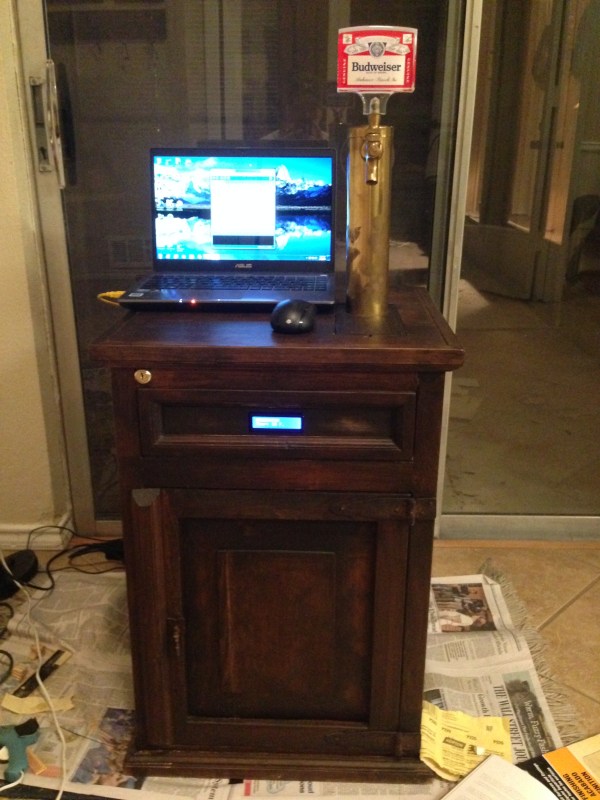
What’s better than an ordinary end table? How about an end table that can serve you beer? [Sam] had this exact idea and used his skills to make it a reality. The first step of the build was to acquire an end table that was big enough to hold all of the components for a functional kegerator. This proved to be a bit tricky, but [Sam] got lucky and scored a proper end table from a garage sale for only $5.00.

Next, [Sam] used bathroom sealant to seal up all of the cracks in the end table. This step is important to keep the inside cold. Good insulation will keep the beer colder, while using less electricity. Next, a hole was cut into the top of the table for the draft tower.

The draft tower is mounted to a couple of drawer slides. This allows the tower to raise up and down, keeping it out of sight when you don’t want it. The tower raises and lowers using a simple pulley system. A thin, high strength rope is attached to the tower. The other end is attached to a spool and a small motor. The motor can wind or unwind the spool in order to raise and lower the tower.

The table houses an Arduino, which controls the motor via a homemade H bridge. The Arduino is hooked up to a temperature sensor and a small LCD screen. This way, the users can see how cold their beer will be before they drink it.

To actually keep the beer cold, [Sam] ripped apart a mini fridge. He moved the compressor and condenser coils to the new table. He had to bend the coils to fit, taking care not to kink them. Finally he threw in the small keg, co2 tank and regulator. The final product is a livingroom gem that provides beer on demand.

Demo video (which is going the wrong way) can be found after the break.

Continue reading “End Table Kegerator Hides The Tap When You’re Not Looking”