Hacking Toy RC Cars With The HackRF One

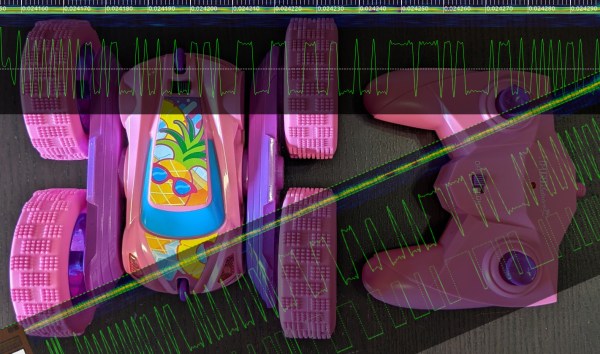
The origin story for many who’d call themselves a member of the hacker community usually starts with taking things apart as a child just to see how they worked. For [Radoslav], that trend doesn’t seem to have slowed down, and he’s continued taking toys apart. Although since it’s his daughters little radio controlled car, he stuck to a non-destructive teardown. The result? He’s able to control the car with his laptop through a HackRF One SDR transceiver as shown in the video below the break.

[Radoslav] is no stranger to reverse engineering embedded devices, IoT gadgets, and probably more. So he started with what information was publicly available about the radio control interface in use. Many electronic devices sold in the US must be certified by the FCC (Federal Communications Commission) and prominently display their ID number, and this toy was no exception. The FCC database gave [Radoslav] enough information to know that the communication protocol is modulated with GFSK, a type of Frequency Shift Keying.

He fired up his favorite radio signal analysis tool and and got to work on the protocol itself. Along the way he found that communication between the car and controller is bidirectional but also very easy to get around. The result is that he can drive the car around with his laptop- definitely a cool hack, but for this one, the journey was surely the goal, not the destination.

If hacking on RC cars really gets your wheels turning, you might like this little RC car that can drive on the ceiling. Or if you’re feeling a bit hungry, check out how you can use the HackRF to nab a table at your local restaurant.

Continue reading “Hacking Toy RC Cars With The HackRF One”

DIY Arduino Based EV Charger Saves Money, Looks Pro

Electric vehicles (EVs) are something of a hot topic, and most of the hacks we’ve featured regarding them center on conversions from Internal Combustion to Electric. These are all fine, and we hope to see plenty more of them in the future. There’s another aspect that doesn’t get covered as often: How to charge electric vehicles- especially commercially produced EV’s rather than the DIY kind. This is the kind of project that [fotherby] has taken on: A 7.2 kW EV charger for his Kia.

Faced with spending £900 (about $1100 USD) for a commercial unit installed by a qualified electrician, [fotherby] decided to do some research. The project wasn’t outside his scope, and he gave himself a head start by finding a commercial enclosure and cable that was originally just a showroom unit with no innards.

An Arduino Pro Mini provides the brains for the charger, and the source code and all the needed information to build your own like charger is on GitHub. What’s outstanding about the guide though is the deep dive into how these chargers work, and how straightforward they really are without being simplistic.

Dealing with mains power and the installation of such a serious piece of kit means that there are inherent risks for the DIYer, and [fotherby] addresses these admirably by including a ground fault detection circuit. The result is that if there is a ground fault of any kind, it will shut down the entire circuit at speeds and levels that are below the threshold that can harm humans. [fotherby] backs this up by testing the circuit thoroughly and documenting the results, showing that the charger meets commercial standards. Still, this isn’t a first-time project for the EV enthusiast, so we feel compelled to say “Don’t Try This At Home” even though that’s exactly what’s on display.

In the end, several hundred quid were saved, and the DIY charger does the job just as well as the commercial unit. A great hack indeed! And while these aren’t common, we did cover another Open Source EV charger about a year ago that you might like to check out as well.

Continue reading “DIY Arduino Based EV Charger Saves Money, Looks Pro”

DIY Bench PSU Looks Like A Million Bucks But Is Easy On The Budget

As one becomes more and more involved in hobbies that involve electronics of almost any kind, it becomes necessary to graduate from wall warts and USB power breakout boards and move up to something more substantial. One great way to do this is to repurpose an old computer PSU, and that’s exactly what the excellent writeup by [Mukesh Sankhla] shows us how to do.

Starting with an ATX power supply from a derelict computer that was otherwise heading to to the bin, [Mukesh] walks us through the teardown of the power supply as well as how we can rebuild it in a snazzy 3d printed case complete with a voltage readout.

Now it’s easy to say “Sure, this is just another ATX PSU project” but the care that went into making a nice case adds a lot to build. There’s another element that is extremely important: The power resistor across the 5 Volt power bus. There are cheap kits online that will break out an ATX PSU into banana plugs, but they omit this vital piece. Depending on the ATX power supply being used, they may be unstable without the load.

The project also leaves a lot of room for adding your own hacks such as variable voltage and current limiting. We think this PSU would be a great (and great looking) addition to any hacker’s workbench. If ATX Power Supply get your electrons flowing, check out this entire computer built into a gutted ATX PSU.

Genaille’s Rods: When Paint Sticks Do Math

What is a hacker, if not somebody who comes up with solutions that other just don’t see? All the pieces may be in place, but it takes that one special person to view the pieces as greater than the sum of their parts. As [Chris Staecker] explains in the video below the break, Henri Genaille was one such person.

When French mathematician Edouard Lucas (himself well known for calculating the longest prime number found by hand) posed a mathematical problem at the French Academy, a French railway engineer named Henri Genaille developed the rods we’re discussing now.

Genaille’s Rods are designed to perform multiplication. But rather than require computation by the user, the rods would simply need to be laid out in the correct order. The solution could readily be found by just following the lines in the correct pattern. This might sound a lot like cheating, and that’s exactly what it is. No manual math needed to be done. Genaille also created rods for doing long division, which we’re sure were every bit as enthralling as the multiplication rods. Demonstrations of both are included in the video below.

While Genaille’s Rods have gone the way of the slide rule, we can’t help but wonder how many engineers and scientists carried around a set of marked up wooden sticks in their pocket protector.

If designing and building manual mathematical machines is something that you think really adds up to a good time, check out this post on how to design and build your own circular slide rule!

Continue reading “Genaille’s Rods: When Paint Sticks Do Math”

Physical Control Panel Elevates Flight Sim Experience

Like so many of us, [pgsanchez] has been bitten by the flight simulator bug. It’s a malady that can only be treated, but never cured — and like so many hobbies, it has a nasty tendency to spawn more hobbies. A software developer by trade, [pgsanchez] is also adept with Arduino and electronics, and his blog post about the PGS-2 Flight Simulator Control Panel demonstrates his fine abilities well, as does the video below the break.

A player of Digital Combat Simulator, he grew tired of having to remember awkward key combinations to control the simulator. Flying a jet, even in a simulator, can require quick thinking bound with quick reflexes, so having a button to press, a switch to flip, or a knob to turn can be vastly superior to even the simplest keyboard based command.

An Arduino interfaces the buttons to the computer, and a white acrylic case is employed to keep all the parts flying in formation. Yes, a white case — with great care taken to allow the case to be backlit. The effect is excellent, and it looks like the panel would be right at home in the Sukhoi Su-25T that it’s designed to control in the game.

We appreciated the attention to detail in the panel, as even the gear status lights and flap indicators match those in the simulator, a nice touch! What more could [pgsanchez] build? We’d like to see! If you’re into flight sims and the like, you might be interested in this fully 3D printed flight sim controller.

Continue reading “Physical Control Panel Elevates Flight Sim Experience”

Learning Electronics By Just Doing It

Learning anything new, especially so broad and far reaching as electronics, can be hard. [IMSAI Guy] knows this because he gets asked regularly “how do I learn electronics?” Many of you reading this will have a few ideas to pass along (and we encourage you to share your take on it in the comments below) but there is an even greater number of people who are asking the same question, and [IMSAI Guy]’s take on it is one that this particular Hackaday writer can relate to.

The ARRL Handbook can be found at hamfests, radio clubs, libraries, or at arrl.org

According to [IMSAI Guy], an excellent place to start is the ARRL Handbook. The ARRL Handbook is an electronics and RF engineering guide published by the Amateur Radio Relay League in the US. It’s a wonderful reference, and past editions can be had very inexpensively and are every bit as handy. Many hams will have a copy they could be talked out of, and you can likely find one at your local library. Where to start in the Handbook, then?

[IMSAI Guy] recommend starting with whatever catches your fancy. As an example, he starts with Op Amps, and rather than diving straight into the math of how they work or even worrying to much about what they are- he just builds a circuit and then plays with it to intrinsically understand how it works, a “learn by doing” approach that he has found extremely helpful just as many of us have. We also appreciated is very straightforward approach to the math: Don’t bother with it unless you need to for some reason, and definitely don’t start by learning it first.

In fact, that same reasoning is applied to any subject: Learn it as you need it, and don’t start by learning but rather by doing. The learning will come on its own! Be sure to check out the entire video and let us know what you think, and how you approached learning electronics. Thanks to [cliff] for the great Tip!

Continue reading “Learning Electronics By Just Doing It”

The Apollo Digital Ranging System: More Than Meets The Eye

If you haven’t seen [Ken Shirriff]’s teardowns and reverse engineering expeditions, then you’re in for a treat. His explanation and demonstration of the Apollo digital ranging system is a fascinating read, even if vintage computing and engineering aren’t part of your normal fare.

The average Hackaday reader should be familiar with the concept of determining the distance of a faraway object by measuring how long it takes a sound or radio wave to be reflected, such as in sonar and radar. Going another step and measuring Doppler Shift – the difference in the returned signal’s frequency – will tell us the velocity of the object relative to our position. It’s so simple that an Arduino can do it. But in the days of Apollo, there was no Arduino. In fact, there were no Integrated Circuits. And Apollo missions went all the way to the moon- far too distant for relatively simple Radar measurements. Continue reading “The Apollo Digital Ranging System: More Than Meets The Eye”