Unorthodox Toolbox Switcheroo: Barbecue!

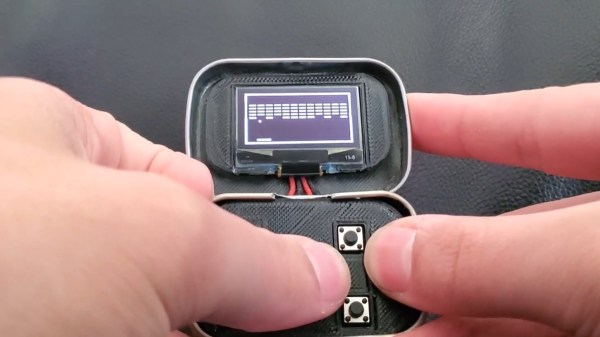
Despite all the progress in cooking methods over the past millennia, nothing can ever replace the primeval sensation of staring into the embers as your food slowly gets ready. Barbecues are the obvious choice to satisfy this cave nostalgia, and while size might matter in some cases, sometimes you just want the convenience of being able to take your grilling device to the beach, park, or just really anywhere but home. Other times you’re [Laura Kampf] and don’t want to use an old toolbox for storing tools.

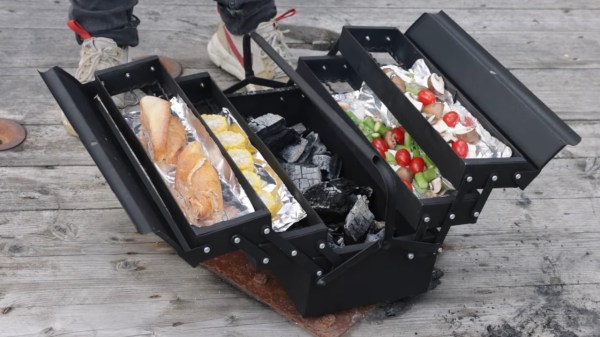
It all started with one of those typical three-layer folded cantilever toolboxes that [Laura] really likes for their mechanical construction, but not so much from a usability point of view. Being someone with a knack for turning random stuff into barbecues, this was an intriguing enough device to take apart. After plenty of time spent grinding bolts and paint off, she cut out the tray bottoms to weld metal mesh pieces as grill grates in their place — but you can watch the whole progress in the video below then.

The folding mechanics play out really nicely here. Not only can you access the grill goods by moving them away from the burning coals that are placed in the center bottom part of the box, it also provides you with two different heat layers. The individual lids on each side add even more variety, and this might even work as portable little smoker.

We’ve seen [Laura]’s work a few times before already, and in case you haven’t, go check out her beer keg motorcycle side car, wheelbarrow bicycle trailer, or Zippo lighter turned drill bit storage box.

Continue reading “Unorthodox Toolbox Switcheroo: Barbecue!”

A Breath Of Fresh Air For Some Arcade Classics

It’s said that good things come in small packages, which is hard to deny when we look at all the nifty projects out there that were built into an Altoids tin. Now, if that’s already true for the regular sized box, we can be doubly excited for anything crammed into their Smalls variety ones, which is what [Kayden Kehe] decided to use as housing for his mintyPico, a tiny gaming console running homebrew versions of Snake, Breakout, Pong, and a few more.

As the “Pico” might have already given away, the project is built around a Raspberry Pi Pico board, and being intended as portable device, [Kayden] went with a version that also houses LiPo battery charging circuitry. A set of 3d-printed parts pack the board along with a matching battery and a button panel neatly into the tin itself, while a size-appropriate SSH1106 OLED goes into the lid. All design files along with the MicroPython code of the games can be found on the project’s GitHub page.

You may have felt this strange sense of familiarity when you read the project’s name, and indeed, the mintyPi gaming console was a major inspiration for [Kayden] here, as was the Pico Snake project. Considering this was his junior year high school project, this is certainly an impressive and nice mash-up of those two projects.

Continue reading “A Breath Of Fresh Air For Some Arcade Classics”

Mattress-made MIDI Device Plays Exotic Tunes

Ever heard of a handpan? If not, imagine a steel drum turned inside out, and in case that doesn’t help either, just think of a big metal pan you play music with by tapping your hands on its differently pitched tone fields. But as with pretty much any musical instrument, the people around you may not appreciate your enthusiasm to practice playing it at any time of the day, and being an acoustic instrument, it gets difficult to just plug in your headphones. Good news for the aspiring practitioners of Caribbean music though, as [Deepsoul77] created a MIDI version of this rather young and exotic instrument.

Using the foam salvaged from an old mattress as the core of the handpan, [Deepsoul77] cut a couple of plywood pads as tone fields that will be attached to the foam. Each plywood tone field will then have a piezo element mounted in between to pick up the hand tapping. Picking up the tapping itself and turning it into MIDI signals is then handled by an Alesis trigger interface, which is something you would usually find in electronic drums. From here on forward, it all becomes just a simple USB MIDI device, with all the perks that brings along — like headphone usage or changing MIDI instruments to make anything sound like a trumpet.

Turning what’s essentially a drum kit into a melodic instrument is definitely neat, and to no surprise, we’ve also seen the actual home made drum kit with piezo elements. Of course, using MIDI to quiet down an acoustic instrument isn’t new either, though it also works somewhat the other way around. But then again, it doesn’t always have to be MIDI either.

Big Time Character LCD Clock

While the SSD1306 OLED has somewhat become the go-to display for up-to-date projects, the good old character displays with their Hitachi HD44780 controller don’t seem to be disappearing just yet either. And why would they, especially if you want to show just text, having a built-in font has certainly its perk compared to worrying about integrating your own characters — which you can still do on top as well. Or perhaps you can combine both worlds, which is what [oldmaninSC] did with his digital clock that takes an entire 16×2 LCD to show each single digit.

The whole clock uses 16 individual, upright rotated 16×2 LCDs that are arranged in two rows of eight LCDs each, turning the entire construct sort of into a giant 8×2 display itself. For some additional information such as the date, there’s also a smaller font available that uses only half the height, allowing up to four total rows of information. To communicate with each LCD via I2C, two TCA9548A I2C multiplexers are connected to an Arduino, along with an RTC to keep track of the time and date itself.

As the TCA9548A has three pins dedicated to define its own address, the entire clock could be scaled up to a total of 64 LCDs — so how about a 16×4 display made out of 16×4 displays? Sure, adding smooth scrolling might become a bit tricky at some point, but imagine playing Tetris on that one!

Turning GitHub Into A URL Shortening Service

URL shortening services like TinyURL or Bitly have long become an essential part of the modern web, and are popular enough that even Google killed off their own already. Creating your own shortener is also a fun exercise, and in its core doesn’t require much more than a nifty domain name, some form of database to map the URLs, and a bit of web technology to glue it all together. [Nelsontky] figured you don’t even have to build most of it yourself, but you could just (ab)use GitHub for it.

Using GitHub Pages to host the URL shortening website itself, [nelsontky] actually repurposes GitHub’s issue tracking system to map the shortened identifier to the original URL. Each redirection is simply a new issue, with the issue number serving as the shortening identifier, and the issue’s title text storing the original URL. To map the request, a bit of JavaScript extracts the issue number from the request, looks it up via GitHub API, and if a valid one was found (and API rate limits weren’t exceeded), redirects the caller accordingly. What’s especially clever about this is that GitHub Pages usually just serves static files stored in a repository, so the entire redirection logic is actually placed in the 404 error handling page, allowing requests to any arbitrary paths.

While this may not be as neat as placing your entire website content straight into the URL itself, it could be nicely combined with this rotary phone to simply dial the issue number and access your bookmarks — perfect in case you always wanted your own website phone book. And if you don’t like the thought of interacting with the GitHub UI every time you want to add a new URL, give the command line tools a try.

Climbing Everest One Hill At A Time – And Keeping Track Of It

The internet is full of self-proclaimed challenges, ranging from some absolutely pointless fads to well-intended tasks with an actual purpose. In times of TikTok, the latter is of course becoming rarer, as a quick, effortless jump on the bandwagon is just easier for raising your internet points. Cyclists on the other hand love a good challenge where they compete with one another online, testing their skills and gamifying their favorite activity along the way. One option for that is Everesting, where you pick a hill of your choice, and within a single session you ride it up and down as many times as it takes until you accumulated the height of Mount Everest on it. Intrigued by the idea, but not so much its competitive aspect, [rabbitcreek] became curious how long it would take him to reach that goal with his own casual bicycle usage, so he built a bicycle computer to measure and keep track of it.

While the total distance and time factors into the actual challenge, [rabbitcreek]’s primary interest was the accumulated height, so the device’s main component is a BMP388 barometric pressure sensor attached to a battery-powered ESP32. An e-paper display shows the total height and completed percentage, along with some random Everest-related pictures. Everything is neatly packed together in a 3D-printed case that can be mounted on the bicycle’s handlebar, and the STL files are available along with the source code in his write-up.

Of course, if you’re actually interested in the challenge itself, you probably have an assortment of sports tracking equipment anyway, but this is a nice addition to keep track as you go, and has a lower risk of ransomware attacks. And in case [rabbitcreek] sounds like a familiar name to you, he’s indeed become a Hackaday regular with his environmental hacks like the tide clock, a handheld particle sniffer, or logging temperatures in the Alaskan wilderness.

Axe Hacks: Spinning Knobs And Flipping Switches

From a guitar hacking point of view, the two major parts that are interesting to us are the pickups and the volume/tone control circuit that lets you adjust the sound while playing. Today, I’ll get into the latter part and take a close look at the components involved — potentiometers, switches, and a few other passive components — and show how they function, what alternative options we have, and how we can re-purpose them altogether.

In that sense, it’s time to heat up the soldering iron, get out the screwdriver, and take off that pick guard / open up that back cover and continue our quest for new electric guitar sounds. And if the thought of that sounds uncomfortable, skip the soldering iron and grab some alligator clips and a breadboard. It may not be the ideal environment, but it’ll work.

Continue reading “Axe Hacks: Spinning Knobs And Flipping Switches”