IKEA Cloud Lamp Displays The Weather With An ESP8266

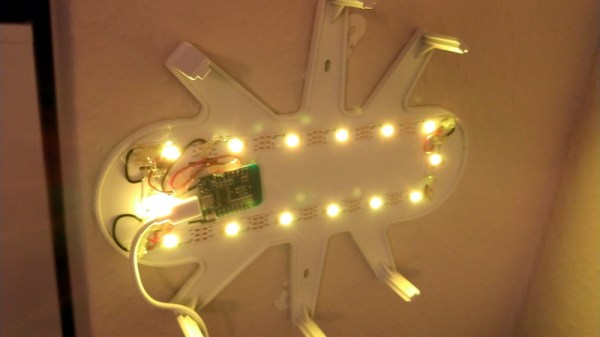
The IKEA DRÖMSYN is a wall mounted cloud night light that’s perfect for a kid’s room. For $10 USD, it’s just begging for somebody to cram some electronics in there and make it do something cool. Luckily for us, [Jodgson] decided to take on the challenge and turned this once simple lamp into a clever weather display. It even still works as an LED lamp, if you’re into that sort of thing.

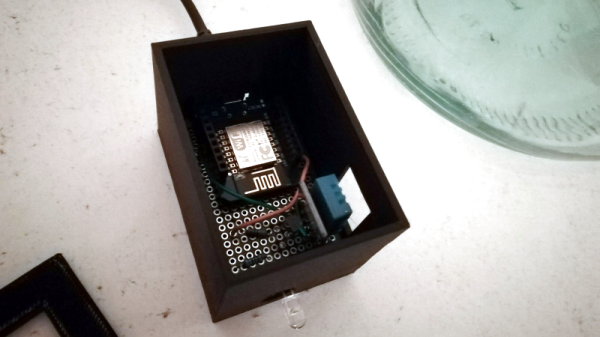
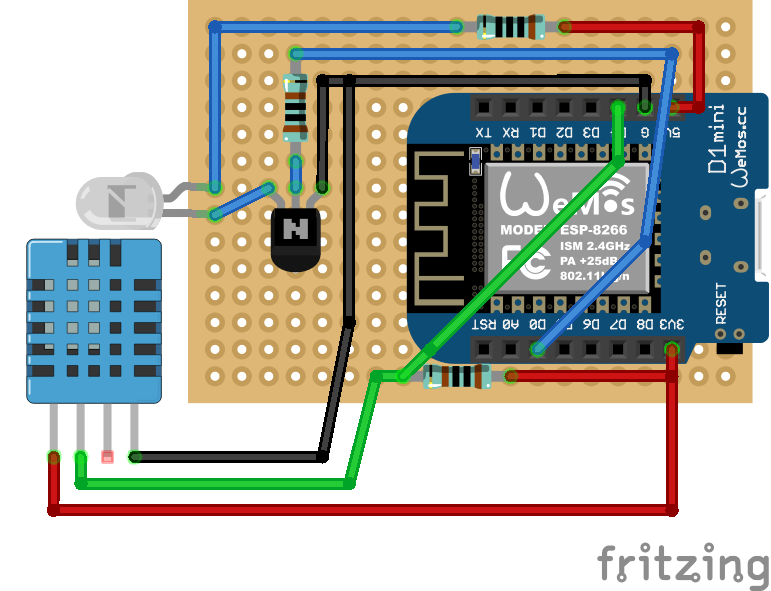
After stripping out the original hardware, [Jodgson] installed a Wemos D1 Mini and a string of fourteen SK6812 RGB LEDs that run down the length of the cloud’s internal structure. Weather data is pulled down with the OpenWeatherMap API, and conditions are displayed through various lighting colors and effects.

Sunny days are represented with a nice yellow glow, and a cloudy forecast looks like…well it’s already a white cloud so that one’s pretty easy. If rain is expected the cloud turns blue and the bottom LEDs flicker a bit to represent raindrops. When there’s a thunderstorm, the cloud will intermittently flash random LEDs on the strip a bit brighter than their peers; a really slick effect that gets the point across immediately.

This isn’t the first time we’ve seen somebody take a cheap light from IKEA and turn it into something much more impressive with the ESP8266. Just like with that previous project, we wouldn’t be surprised to see this particular modification popping up more in the future.

HestiaPi: A Stylish Open Hardware Thermostat

A common complaint about open hardware and software is that the aesthetic aspects of the projects often leave something to be desired. This isn’t wholly surprising, as the type of hackers who are building these things tend to be more concerned with how well they work than what they look like. But there’s certainly nothing wrong with putting a little polish on a well designed system, especially if you want “normal” people to get excited about it.

For a perfect example, look no further than the HestiaPi Touch. This entry into the 2019 Hackaday Prize promises to deliver all the home automation advantages of something like Google’s Nest “smart” thermostat without running the risk of your data being sold to the highest bidder. But even if we take our tinfoil hat out of the equation, it’s a very slick piece of hardware from a functional and visual standpoint.

As you probably guessed from the name, the thermostat is powered by the Raspberry Pi Zero, which is connected to a custom PCB that includes a couple of relays and a connector for a BME280 environmental sensor. The clever design of the 3D printed case means that the 3.5 inch touch screen LCD on the front can connect directly to the Pi’s GPIO header when everything is buttoned up.

Of course, the hardware is only half the equation. To get the HestiaPi Touch talking to all the other smart gadgets in your life, it leverages the wildly popular OpenHAB platform. As demonstrated in the video after the break, this allows you to use the HestiaPi and its mobile companion application to not only control your home’s heating and air conditioning systems, but pretty much anything else you can think of.

The HestiaPi Touch has already blown past its funding goal on Crowd Supply, and the team is hard at work refining the hardware and software elements of the product; including looking at ways to utilize the unique honeycomb shape of the 3D printed enclosure to link it to other add-on modules.

Continue reading “HestiaPi: A Stylish Open Hardware Thermostat”

Smarten Up Your Air Conditioning With The ESP8266

If you’re looking for “smart” home appliances, there’s no shortage of options on the market. Even relatively low-end gadgets are jumping on the Internet of Things bandwagon these days (for better or for worse). But what if you’re not looking to purchase a brand new major appliance right now? In that case, you might be interested in seeing how [Giulio Pons] added some high-tech features to his existing air conditioner on the cheap.

Since his AC unit had an infrared remote control, the first thing [Giulio] needed to do was come up with a way to emulate it. An easy enough project using the ESP8266 and an IR LED, especially when he found that somebody had already written a IR communications library for his particular brand of AC. From there, he could start tacking on sensors and functionality.

With the addition of a DHT11 sensor, [Giulio] can have the AC turn on and off based on the current room temperature. It also gives him an easy way to verify the AC is actually on and operating. By checking to see if the room starts cooling off after sending the IR command to start the AC, his software can determine whether it should try resending the code, or maybe send a notification to alert him that something doesn’t seem right. Of course, it wouldn’t be a proper ESP8266 project without some Internet connectivity, so he’s also created a smartphone application that lets him control the system while away from home.

Now admittedly nothing in this project is exactly new, we’ve seen plenty of hackers switch on their AC with the ESP8266 at this point. But what we particularly liked was how well thought out and documented the whole process was. The rationale behind each decision is explained, and he even documented things like his network topology to help illustrate how the whole system comes together. Even if the techniques are well known by many of us, this is the kind of project documentation that makes it accessible to newcomers. Our hats off to [Giulio] for going the extra mile.

In the past we’ve seen a similar project that allowed you to control your AC from Slack, and our very own [Maya Posch] took us on a whirlwind tour of the very impressive ESP8266-powered environmental monitoring system she helped develop.

A Wii Playing The GameCube, Disguised As A Game Boy SP

It may be hard to believe, but thanks to the expert work of Nintendo aficionado [Bill Paxton], the Game Boy Advance SP and GameCube lovechild that you see before you started its life as a Wii. That means not only can it play commercial GameCube and Wii games, but also has access to the wide library of homebrew games and emulators available for those systems.

To create this marvel, [Bill] first had to expertly cut away extraneous components from the Wii’s motherboard. He then mated the “trimmed” PCB to a new board that holds the controls as well as some other ancillary components such as the audio amplifier and USB port. He even managed to squeeze a battery in there, as demonstrated in the video after the break.

Finally, he designed a 3D printed enclosure that incorporates GameCube-style controls (complete with printed buttons) into the classic clamshell Game Boy SP shape. Because of the complexity of the design, [Bill] decided to have it professionally printed at Shapeways rather than trying to run it off of his home printer, which he says helps sells the professional look. It did take him some trial and error before he got the hang of painting the printed material to his satisfaction, but we think the end result was certainly worth the effort.

It probably won’t come as a huge surprise to find that this isn’t the first time [Bill] has pulled off a stunt like this. A few years back he created a very similar “GameCube SP”, but by the looks of it, this revised attempt improves on the original version in every way possible.

Continue reading “A Wii Playing The GameCube, Disguised As A Game Boy SP”

Hail To The King, Baby: Reverse Engineering Duke

If you’re a fan of DOS games from the 1990s, you’ve almost certainly used DOSBox to replay them on a modern computer. It allows you to run software in a virtual environment that replicates an era-appropriate computer. That’s great for historical accuracy, but doesn’t do you much good if you’re trying to leverage modern computing power to breathe some new life into those classic titles. For that, you need to dig in a little deeper.

For the last two and a half years, [Nikolai Wuttke] has been doing exactly that for 1993’s Duke Nukem II. The end result is RigelEngine, an open source drop-in replacement for the original game binary that not only runs on a modern Windows, Linux, or Mac OS machine, but manages to improve on the original in a number of ways. An accomplishment made even more impressive once you learn that the original source code for the game has been lost to time, and that he had to do everything blind.

In a blog post chronicling his progress so far, [Nikolai] explains the arduous process he used to make sure his re-implementation was as accurate as possible to the original game. He spent untold hours studying the original game’s disassembled code in Ida Pro, handwriting out pages of notes and pseudocode as he tried to understand what was happening behind the scenes. Once a particular enemy or element of the game was implemented in RigelEngine, he’d record the gameplay from his version and compare it to the original frame by frame so he could fine tune the experience.

So what’s the end result of more than two years of work and over 25K lines of code? Thanks to the incredible advancements in computing power since the game’s release nearly 30 years ago, [Nikolai] has managed to remove the need for loading screens. His engine is also capable of displaying an unlimited number of particle effects on the screen at once, and multiple sound effects can now be played simultaneously. In the future he’s looking to implement smooth character movement (in the original game, movement was in 8 pixel increments) and adaptive volume for sound effects based on their distance from Duke. Ultimately, RigelEngine should be able to replace the original graphics with new high resolution textures once some issues with the rendering buffer gets sorted out.

It’s hard to overstate how important some of these classic games are to those who grew up playing them. With John Romero still releasing DLC for the original DOOM and hackers disassembling nearly 40 year old games to fix bugs, it doesn’t seem like they’re in any danger of being forgotten.

Continue reading “Hail To The King, Baby: Reverse Engineering Duke”

Maker Media Ceases Operations

Over the years we’ve had the dubious honor of bidding farewell to numerous companies that held a special place in the hearts of hackers and makers. We’ve borne witness to the demise of Radio Shack, TechShop, and PrintrBot, and even shed a tear or two when Toys “R” Us shut their doors. But as much as it hurt to see those companies go, nothing quite compares to this. Today we’ve learned that Maker Media has ceased operations.

Between the first issue of Make magazine in 2005 and the inaugural Maker Faire a year later, Maker Media deftly cultured the public face of the “maker movement” for over a decade. They didn’t create maker culture, but there’s no question that they put a spotlight on this part of the larger tech world. In fact, it’s not an exaggeration to say that the shuttering of Maker Media could have far reaching consequences that we won’t fully understand for years.

While this news will surely come as a crushing blow to many in the community, Maker Media founder and CEO Dale Dougherty says they’re still trying to put the pieces together. “I started the magazine and I’m committed to keeping that going because it means something to a lot of people and means something to me.” At this point, Dale tells us that Maker Media is officially in a state of insolvency. This is an important distinction, and means that the company still has a chance to right the ship before being forced to declare outright bankruptcy.

In layman’s terms, the fate of Make magazine and Maker Faire is currently uncertain. The intent is to restructure the organization and rehire enough people to keep the brand alive, but it may take rethinking their business model entirely. While they aren’t looking to crowdsource the resurrection of Make, Dale said he believes the answer may ultimately come from the community’s willingness to financially support them, “my question is can we perhaps rely on the community to offer support for what we’re doing in ways we have not asked for in the past.” Ideas currently being discussed include the sort of annual membership and pledge drives used by public broadcasting.

It’s impossible to overstate the positive influence that Make has had on the public’s perception of DIY. It put on a global pedestal the sort of projects which otherwise might have never been seen outside the basement workshops or garages they were constructed in. Through their events and outreach programs, Make showed an entire generation of young people that building something just for the joy of building it was something to be proud of. Make proved that nerds could be cool in a way that had never been done before, and worryingly, may never be done again. Let’s take a look at that legacy.

Continue reading “Maker Media Ceases Operations”

The ArduBoy Community Rolled Their Own Cartridge

The Arduboy, as you might have guessed from the name, was designed as a love letter to the Nintendo Game Boy that many a hacker spent their formative years squinting at. While the open source handheld is far smaller than the classic DMG-01, it retains the same general form factor, monochromatic display, and even the iconic red LED to the left of the screen. But one thing it didn’t inherit from the original was the concept of removable game cartridges. That is, until now.

Over the last year, [Mr.Blinky] and a group of dedicated Arduboy owners have been working on adding a removable cartridge to the diminutive handheld. On paper it seemed easy enough, just hang an external SPI flash chip off of the test pads that were already present on the Arduboy PCB, but to turn that idea into a practical cartridge required an immense amount of work and discussion. The thread on the Arduboy community forums covers everything from the ergonomics of the physical cartridge design to the development of a new bootloader that could handle loading multiple games.

Early cartridge prototypes.

The first problem the group had to address was how small the Arduboy is: there’s simply no room in the back to add in a cartridge slot. So a large amount of time is spent proposing different ways of actually getting the theoretical cartridge attached to the system. There was some talk of entirely redesigning the case so it could take the cartridge internally (like the real Game Boy), but this eventually lost out for a less invasive approach that simply replaced the rear of the Arduboy with a 3D printed plate that gave the modders enough room to add a male header along the top edge of the system.

As an added bonus, the cartridge connector doubles as an expansion port for the Arduboy. While perfecting the design, various forum users have chimed in with different gadgets that make use of the new port, from WS2812B LEDs to additional input devices like joysticks or a full QWERTY keyboard. Even if you aren’t interested in expanding the storage space on your Arduboy, being able to plug in new hardware modules certainly opens up some interesting possibilities.

In fact, the project so impressed Arduboy creator [Kevin Bates] that he chimed in on the topic last month to announce he would start looking into integrating the community’s cartridge modification into the production hardware. If all goes well, pretty soon there might be an official upgrade path for those who want to expand what this tiny nostalgia machine is capable of.

Continue reading “The ArduBoy Community Rolled Their Own Cartridge”