ESP8266 Upgrade Gives IKEA LEDs UDP Superpowers

It can be difficult to resist the impulse buy. You see something interesting, the price is right, and even though you know you should do your research first, you end up putting it in your cart anyway. That’s how [Tobias Girstmair] ended up being the not-so proud owner of a LEDBERG RGB LED strip from IKEA, and what eventually pushed him to replace wimpy original controller with an ESP8266.

So what was the problem with the original controller? If you can believe it, it was incapable of producing white light. When IKEA says an LED is multi-color, they apparently mean it’s only multi-color. A quick check of the reviews online seem to indicate that the white version is sold as a different SKU that apparently looks the same externally and has confused more than a few purchasers.

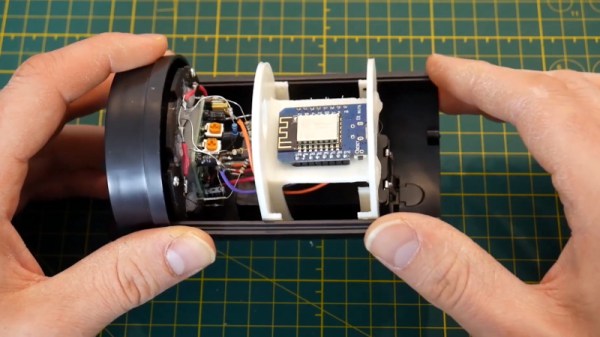
Rather than having to pick one or the other, [Tobias] decided he would replace the original controller with an ESP-03, hoping that would give him granular enough control over the LEDs to coax a suitably white light out of them. He didn’t want to completely start from scratch, so one of the first decisions he made was to reuse the existing PCB and MOSFETs. Some handy test points on the PCB allowed him to hook the digital pins of the ESP right to the red, blue, and green LED channels.

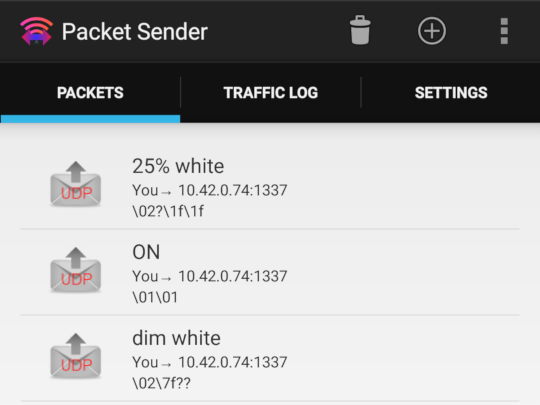
Then it was just a matter of coming up with the software. To keep things simple, [Tobias] decided to create a “dumb” controller that simply sets the LED color and intensity according to commands it receives over a simplified UDP protocol. Anything beyond that, such as randomized colors or special effects, is done with scripts that run on his computer and fire off the appropriate UDP commands. This also means he can manually control his newly upgraded LEDBERG strips from basically anything that can generate UDP packets, such as an application on his Android phone.

It might not be the most robust implementation we’ve ever seen, but all things considered, it looks as though this modification could be a pretty good way to get some cheap network controlled RGB lighting in your life.

The Augmented Reality Breadboard Of The Future

You’d be hard pressed to find a carpenter who didn’t own a hammer, or a painter that didn’t have a couple of brushes kicking around. Some tools are simply so fundamental to their respective craft that their ownership is essentially a given. The same could be said of the breadboard: if you’re working with electronics on the hobby or even professional level, you’ve certainly spent a decent amount of time poking components and wires into one of these quintessential prototyping tools.

There’s little danger that the breadboard will loose its relevance going forward, but if [Andrea Bianchi] and her team have anything to say about it, it might learn some impressive new tricks. Developed at the Korean Advanced Institute of Science and Technology, VirtualComponent uses augmented reality and some very clever electronics to transform the classic breadboard into a powerful mixed-reality tool for testing and simulating circuits. It’s not going to replace the $3 breadboard you’ve got hiding at the bottom of your tool bag, but one day it might be standard equipment in electronics classrooms.

The short version is that VirtualComponent is essentially a dynamic breadboard. Holes in the same row are still electrically linked like in the classic breadboard, but with two AD75019 cross-point switch arrays and an Arduino in the base, it has the ability to virtually “plug in” components at arbitrary locations as selected by the user. So rather than having to physically insert a resistor, the user can simply tell the software to connect a resistor between two selected holes and the cross-point array will do the rest.

What’s more, many of those components can be either simulated or at least augmented in software. For example, by using AD5241 digital potentiometers, VirtualComponent can adjust the value of the virtual resistor. To provide variable capacitance, a similar trick can be pulled off using an array of real capacitors and a ADG715 digital switch to connect them together; essentially automating what the classic “Decade Box” does. In the demonstration video after the break, this capability is extended all the way out to connecting a virtual function generator to the circuit.

The whole system is controlled by way of an Android tablet suspended over the breadboard. Using the tablet’s camera, the software provides an augmented reality view of both the physical and virtual components of the circuit. With a few taps the user can add or edit their virtual hardware and immediately see how it changes the behavior of the physical circuit on the bench.

People have been trying to improve the breadboard for years, but so far it seems like nothing has really stuck around. Given how complex VirtualComponent is, they’ll likely have an even harder time gaining traction. That said, we can’t help but be excited about the potential augmented reality has for hardware development.

Continue reading “The Augmented Reality Breadboard Of The Future”

A Laser Aiming Module For First Person Hacking

You’ve perhaps noticed that [Jeremy Cook] is rather prolific on YouTube, regularly putting out videos on his latest and greatest creations. He wanted to add a head-mounted GoPro to his video production bag of tricks, but found it was a little trickier than expected to get the camera to point where he was actually looking. The solution? A 3D printed laser “sight” for the GoPro that let’s him zero it in while creating videos.

The idea here is very simple: put a small laser module on the same mount as the GoPro itself so you’ll have a handy red dot showing more or less where the camera is looking. The position of the red dot relative to the center-point of the camera’s field of view is going to vary slightly with range, but with something like a GoPro that’s shooting a very wide area to begin with, it’s not really a problem in practice.

Sounds like a good idea, but won’t that leave a weird red dot in all the videos? [Jeremy] is already ahead of you there, and added a small push button switch to the front of the module so he can quickly and easily turn the laser on and off. The idea is that he turns the laser on, gets the dot roughly where he wants the camera pointed, and then turns it back off.

[Jeremy] has put the STL files for the single-piece 3D printed module up on his GitHub for anyone who might find them useful. Besides the printed part, you just need to provide a suitably sized 3.7 V LiPo battery and the laser diode itself. If you need to find a good supply of cheap lasers, you might want to check the clearance rack at the big box store.

Continue reading “A Laser Aiming Module For First Person Hacking”

3D Printering: The Past And Future Of Prusa’s Slicer

If you own a desktop 3D printer, you’re almost certainly familiar with Slic3r. Even if the name doesn’t ring a bell, there’s an excellent chance that a program you’ve used to convert STLs into the G-code your printer can understand was using Slic3r behind the scenes in some capacity. While there have been the occasional challengers, Slic3r has remained one of the most widely used open source slicers for the better part of a decade. While some might argue that proprietary slicers have pulled ahead in some respects, it’s hard to beat free.

So when Josef Prusa announced his team’s fork of Slic3r back in 2016, it wasn’t exactly a shock. The company wanted to offer a slicer optimized for their line of 3D printers, and being big proponents of open source, it made sense they would lean heavily on what was already available in the community. The result was the aptly named “Slic3r Prusa Edition”, or as it came to be known, Slic3r PE.

Ostensibly the fork enabled Prusa to fine tune print parameters for their particular machines and implement support for products such as their Multi-Material Upgrade, but it didn’t take long for Prusa’s developers to start fixing and improving core Slic3r functionality. As both projects were released under the GNU Affero General Public License v3.0, any and all of these improvements could be backported to the original Slic3r; but doing so would take considerable time and effort, something that’s always in short supply with community developed projects.

Since Slic3r PE still produced standard G-code that any 3D printer could use, soon people started using it with their non-Prusa printers simply because it had more features. But this served only to further blur the line between the two projects, especially for new users. When issues arose, it could be hard to determine who should take responsibility for it. All the while, the gap between the two projects continued to widen.

With a new release on the horizon that promised to bring massive changes to Slic3r PE, Josef Prusa decided things had reached a tipping point. In a recent blog post, he announced that as of version 2.0, their slicer would henceforth be known as PrusaSlicer. Let’s take a look at this new slicer, and find out what it took to finally separate these two projects.

Continue reading “3D Printering: The Past And Future Of Prusa’s Slicer”

Go Back In Time With A Laser Cut Wood 3D Printer Kit

About a decade ago, the only way the average hacker was getting their hands on a desktop 3D printer was by building it themselves from a kit. Even then, to keep costs down, many of these kits were made out of laser cut wood. For a few years, wooden printers from companies like MakerBot and PrintrBot were a common sight in particularly well equipped hackerspaces. But as the market expanded and production went up, companies could afford to bend metal and get parts injection molded; the era of the wooden 3D printer was over nearly as soon as it had started.

But [Luke Wallace] thinks there’s still some life left in the idea. For his entry into the 2019 Hackaday Prize, he’s proposing a revival of the classic laser cut 3D printer kit. But this time, things are a bit different. Today, laser cutters are cheap enough that these kits could conceivably be manufactured at your local hackerspace. With a total bill of materials under $100 USD, these kits could be pumped out for less than the cheapest imports, potentially driving adoption in areas where the current options are too expensive or unavailable.

Of course, just a laser cut wood frame wouldn’t be enough to break the fabled $100 barrier. To drive the cost down even farther, [Luke] has redesigned essentially every component so it could be made out of wood. If its not electronic, there’s a good chance its going to be cut out of the same material the frame is made out of. Probably the biggest change is that the traditional belt and pulley system has been replaced with rack and pinion arrangements.

After cutting all the pieces, essentially all you need to provide is the stepper motors, a RAMPS controller, the hotend, and the extruder. He’s even got a design for a laser cut wood extruder if you want to go back to the real olden days and save yourself another few bucks. Or skip the LCD controller and just run it over USB.

But what do the prints look like? [Luke] has posted a few pictures of early test pieces on the project’s Hackaday.io page, and to be honest, they’re pretty rough. But they don’t look entirely unlike the kind of prints you’d get on one of those early printers before you really got it dialed in, so we’re interested in seeing how the results improve with further refinements and calibration. (Editor’s note: Since writing this, he got backlash compensation up and running, and it looks a ton better already. Very impressive for something running on wooden gears!)

Dummy Security Camera Is Smarter Than It Looks

The idea behind a dummy security camera is that people who are up to no good might think twice about doing anything to your property when they think they’re being recorded. Obviously a real security camera would be even better, but sometimes that’s just not economically or logistically possible. Admittedly they’re not always very convincing, but for a few bucks, hopefully it’s enough to make the bad guys think twice.

But what if that “fake” camera could do a little more than just look pretty up on the wall? [Chris Chimienti] thought he could improve the idea by adding some electronics that would notify him if motion was detected. As an added bonus, any would-be criminals who might be emboldened by the realization the camera itself is fake might find themselves in for a rude surprise when the notifications start firing off.

In the video after the break, [Chris] really takes his time walking the viewer through the disassembly of the dummy camera. As it turns out, these things look like they’d make excellent project enclosures; they come apart easily, have nothing but empty space inside, and even have an integrated battery compartment. That alone could be a useful tip to file away for the future.

He then goes on to explain how he added some smarts to this dummy camera. Up where the original “lens” was, he installed a PIR sensor, some white LEDs, a light sensor, and the original blinking red LED. All of this was mounted to a very slick 3D printed plate which integrates into the camera’s body perfectly. The new hardware is connected up to a similarly well mounted Wemos D1 Mini inside the camera. The rest of the video goes through every aspect of the software setup, which is sure to be of interest to anyone who’s ever thought of rolling their own IoT device.

This type of PIR sensor is hacker favorite, and we’ve seen a number of projects using them for all sorts of creative purposes. We’ve even seen them paired with the ESP8266 before for Internet-connected motion sensing, albeit without the tidy security camera enclosure.

Continue reading “Dummy Security Camera Is Smarter Than It Looks”

Modern Evolution Of The Classic Water Rocket

Whether it was home-built from scraps or one of the various commercial versions that have popped over up over the years, there’s an excellent chance that the average Hackaday reader spent at least a couple of their more formative summers flying water rockets. You might not have realized it at the time, but with shirt soaked and head craned skywards, you were getting a practical physics lesson that was more relatable than anything out of a textbook. Water rockets are a great STEM tool for young people, but in a post-Fortnite world, the idea could use a little modernization to help keep kids engaged.

With his entry into the 2019 Hackaday Prize, [Darian Johnson] hopes to breathe some new life into this classic physics toy. His open source kit would provide a modular water rocket intended for a wide range of ages thanks to various payloads and upgrade options. The younger players would be content to simply see it take off, but high school students could outfit the craft with an electronic payload to capture performance data or an automatic parachute.

[Darian] has been building and flying rockets with his own children and other youth in community for years now, and has found them to be a huge hit. They became so popular that he started thinking of a way to not produce them in larger quantities, but make them stronger so they would survive more flights.

Of course, the fuselages are easy enough; there’s no shortage of one-liter bottles you can recycle. But for the nose cone, fins, and ultimately even the launch pad, [Darian] turned to 3D printing. This allows him to continually optimize the design while delivering repeatable performance. When he had a semi-printable water rocket on his hands, he started to wonder if he could get older kids interested by adding some electronics into the mix.

His current proof of concept is a flight data recorder using a Adafruit nRF52 Bluefruit LE Feather, a BMP280 sensor to determine altitude via barometric pressure, and an SD card breakout for local data storage. Long term, [Darian] wants to be able to stream flight data to student’s phones over Bluetooth, with the SD card providing a local copy which can be analyzed after the flight.

[Darian] has leaned heavily on the open source community for the various components of his water rocket kit, and is dedicated to giving back. He hopes that his final kit will allow communities to create engaging STEM activities at little to no cost. This includes creating a repository of lesson plans and designs contributed from others experimenting with water rockets. It’s a noble goal, and we’re excited to see how the project progresses.