High-End Headphones Get Flexible Boom Upgrade

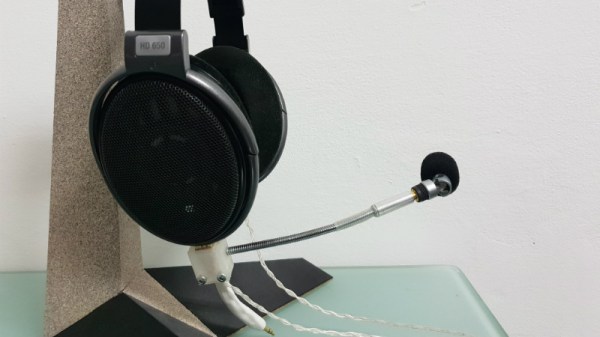
It seems a reasonable assumption that anyone who’d be willing to spend a few hundred dollars on a pair of headphones is probably the type of person who has a passion for high quality audio. That, or they work for the government. We’re fairly sure [Daniel Harari] falls into that former category though, given how much thought he gave to adding a decent microphone to his Sennheiser HD650 headphones.

Not happy with the results he got from microphones clipped to his shirt or mounted on a stand, [Daniel] realized what he really wanted was a sensitive boom microphone. This would be close enough to his mouth that it wouldn’t pick up stray noises, but at the same time not obstruct his field of view or otherwise get in the way.

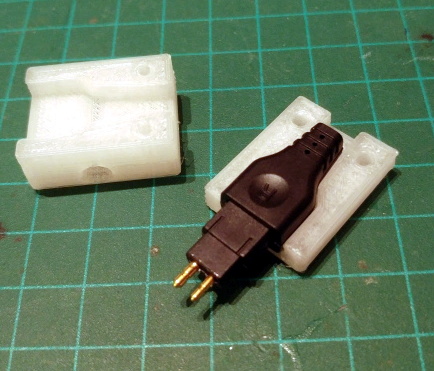
He found a few options on the market which would allow him to mount a boom microphone to his HD650’s, but he didn’t want to stick anything to them and risk scratching the finish so those weren’t really an option. [Daniel] decided to go the DIY route, and eventually settled on a microphone that would mount to the headphone’s existing connector which plugs in at the bottom of the cup.

To make his mount, he 3D printed a two piece clamp that could be screwed together and securely attach to the connector without making any permanent changes. Once he had that base component printed, he salvaged the flexible metallic neck from a cheap USB light and used that to hold the female 3.5mm connector. Into that he’s plugged in a small commercially available microphone that is usually used on voice recorders, which [Daniel] said sounds much better than even the larger mics he had tested.

Finally, he used Sugru to encapsulate the wires and create a flexible strain relief. The whole assembly is very light, easily movable, and perhaps most importantly, didn’t require any modifications or damage to a pair of headphones which have a retail price that could double as a car payment.

It’s been a few years since we’ve seen anyone brave enough to hack their pricey Sennheiser headphones. But in the past we covered a modification which gave them an infusion of Bluetooth and even one that reversed a sneaky manufacturer hardware limitation.

Hackaday Visits The Electric City

Much to the chagrin of local historians, the city of Scranton, Pennsylvania is today best known as the setting for the American version of The Office. But while the exploits of Dunder Mifflin’s best and brightest might make for a good Netflix binge, there’s a lot more to the historic city than the fictional paper company. From its beginnings as a major supplier of anthracite coal to the introduction of America’s first electrically operated trolley system on its streets, Scranton earned its nickname “The Electric City” by being a major technological hub from the Industrial Revolution through to the Second World War.

Today, the mines and furnaces of Scranton lie silent but not forgotten. In the 1980’s, the city started turning what remained of their industrial sites into historic landmarks and museums with the help of State and Federal grants. I recently got a chance to tour some of these locations, and came away very impressed. They’re an exceptional look into the early technology and processes which helped turn America into an industrial juggernaut.

While no substitute for visiting these museums and parks for yourself, hopefully the following images and descriptions will give you an idea of what kind of attractions await visitors to the modern day Electric City.

Continue reading “Hackaday Visits The Electric City”

Teensy Liberates The ThinkPad Keyboard

[Frank Adams] liked the keyboard on his Lenovo ThinkPad T61 so much that he decided to design an adapter so he could use it over USB with the Teensy microcontroller. He got the Trackpoint working, and along the way managed to add support for a number of other laptop boards as well. Before you know it, he had a full-blown open source project on his hands. Those projects can sneak up on you when you least expect it…

The first step of the process is getting your laptop keyboard of choice connected up to the Teensy, but as you might expect, that’s often easier said than done. They generally use a flexible printed circuit (FPC) “ribbon cable” of some type, but may also be terminated in any number of weirdo connectors. [Frank] goes over the finer points of getting these various keyboards connected to his PCB, from searching the usual suspects such as Aliexpress and Digikey for the proper connector to throwing caution to the wind and cutting off problematic nubs and tabs to make it fit.

You might be on your own for figuring out the best way to connect your liberated keyboard up, but [Frank] has done his part by designing a few PCBs which handle routing the appropriate connections to the Teensy LC or 3.2 microcontroller. He’s such a swell guy he’s even written the firmware for you. As of right now there’s currently a dozen keyboards supported by his software and hardware setup, but he also gives tips on how to get the firmware modified for your own board if you need to.

It should come as no surprise that it was a Thinkpad keyboard that got [Frank] going down this path; as we’ve documented over the years, hackers love their Thinkpads. From fitting them with more modern motherboards to going full on matryoshka and putting a second computer inside of one, it’s truly the laptop that launched a thousand hacks.

Continue reading “Teensy Liberates The ThinkPad Keyboard”

Amazon Thinks ARM Is Bigger Than Your Phone

As far as computer architectures go, ARM doesn’t have anything to be ashamed of. Since nearly every mobile device on the planet is powered by some member of the reduced instruction set computer (RISC) family, there’s an excellent chance these words are currently making their way to your eyes courtesy of an ARM chip. A userbase of several billion is certainly nothing to sneeze at, and that’s before we even take into account the myriad of other devices which ARM processors find their way into: from kid’s toys to smart TVs.

ARM is also the de facto architecture for the single-board computers which have dominated the hacking and making scene for the last several years. Raspberry Pi, BeagleBone, ODROID, Tinker Board, etc. If it’s a small computer that runs Linux or Android, it will almost certainly be powered by some ARM variant; another market all but completely dominated.

It would be a fair to say that small devices, from set top boxes down to smartwatches, are today the domain of ARM processors. But if we’re talking about what one might consider “traditional” computers, such as desktops, laptops, or servers, ARM is essentially a non-starter. There are a handful of ARM Chromebooks on the market, but effectively everything else is running on x86 processors built by Intel or AMD. You can’t walk into a store and purchase an ARM desktop, and beyond the hackers who are using Raspberry Pis to host their personal sites, ARM servers are an exceptional rarity.

Or at least, they were until very recently. At the re:Invent 2018 conference, Amazon announced the immediate availability of their own internally developed ARM servers for their Amazon Web Services (AWS) customers. For many developers this will be the first time they’ve written code for a non-x86 processor, and while some growing pains are to be expected, the lower cost of the ARM instances compared to the standard x86 options seems likely to drive adoption. Will this be the push ARM needs to finally break into the server and potentially even desktop markets? Let’s take a look at what ARM is up against.

Continue reading “Amazon Thinks ARM Is Bigger Than Your Phone”

Professional Results From Cheap Air Compressors

The portable air compressors sold at big box hardware stores like Lowe’s and Home Depot are perfectly suited for the jobs they’re advertised for: namely throwing some nails into the wall or filling tires. But if you try to respray your car with that $50 Black Friday pancake air compressor, you’re going to have a bad day. The relatively small amount of air they hold is almost guaranteed to be contaminated with oil and moisture, making it unsuitable for painting or even just blowing the dust out of electronics.

But all is not lost. [Stephen Saville] has done an excellent job documenting his work to turn these low cost homeowner-grade air compressors into something suitable for spraying auto body panels. But even if you aren’t looking to put a sick pearlescent finish on the family minivan, these tips are worth checking out. From increasing the usable volume of air in the system to separating out contaminants, these modifications can unlock a whole new world of pneumatic projects.

The big one (literally and figuratively) is the swirl tube [Stephen] builds out of an old CO2 cylinder. The idea is that this will centrifugally clean the air, not unlike a cyclonic dust separator. As the air enters the top of the cylinder and spins around, contact with the cold metal will cause any moisture to condense out and collect down at the bottom. Oil and other particles in the air should also get spun out, leaving a central column of cleaner air. The collected water and contaminants at the bottom can be occasionally purged out by way of the cylinder’s original valve.

With a source of clean and dry air sorted, [Stephen] next wanted a way to get it around his shop. Using scrap metal pipes he puts together a system that not only gives him air where he needs it, but also increases the volume of compressed air he has available. By using large smooth metal pipes rather than something like flexible rubber hose, the plumbing puts very little resistance on air flow. The pipes therefore can be considered something of an extension of the compressor’s primary tank.

In the video after the break, [Stephen] shows off his new air system by laying down a very nice looking coat of paint on a car hood, but he also goes through the whole build process if you want to see the nuts and bolts of his system. He gives some great tips on welding and working with dissimilar metals which are worth the price of admission alone.

Outfitting the workshop with an integrated compressed air system sounds like the perfect second project to tackle once you’ve got the built-in dust collection system up and running.

Continue reading “Professional Results From Cheap Air Compressors”

Adopting An Orphaned Ultralight

Owning and flying your own small airplane offers a nearly unmatched level of freedom and autonomy. Traveling “as the crow flies” without having to deal with traffic on the ground immediately shrinks your world, and makes possible all sorts of trips and adventures. Unfortunately the crippling downsides of plane ownership (storage and maintenance costs, knowledge that you might die in a fiery crash, etc), keeps most of us planted squarely on terra firma.

But not [ITman496]. His dream of owning an ultralight has recently come true, and he’s decided to share his experience with the world. He’s got a long way to go before he slips the surly bonds of Earth, but there’s no better place to start than the beginning. In a recent blog post he documents the process of getting his new toy home, and details some of the work he plans on doing to get it airworthy.

The plane in question is a Mini-MAX that [ITman496] has determined is not only older than he is, but has never flown. It was built by a retired aircraft mechanic who unfortunately had problems with his heart towards the end of assembly. He wisely decided that he should find a safer way to spend his free time than performing solo flights in an experimental aircraft, so he put the plane up for sale.

After a considerable adventure transporting the plane back home, [ITman496] found it was stored in such good condition that the engine started right up. But that doesn’t mean it’s ready for takeoff by any stretch of the imagination. For his own safety, he’s planning on tearing down the entire plane to make sure everything is in good shape and assembled correctly; so at least he’ll only have himself to blame if anything happens when he’s in the air.

One the plane’s structure is sound, he’ll move on to some much needed engine modifications including a way to adjust the air-fuel mixture from inside the cockpit, improvements to the cooling system, and installation of a exhaust system that’s actually intended for the two-stroke engine he has. When that’s done, [ITman496] is going to move onto the real fun stuff: creating his own “glass cockpit”.

For Hackaday readers who don’t spend their time playing make believe in flight simulators, a “glass cockpit” is a general term for using digital displays rather than analog gauges in a vehicle. [ITman496] has already bought two daylight-readable 10.1″ IPS displays which he plans on driving over HDMI with the Raspberry Pi. No word on what his software setup and sensor array will look like, but we’re eager to hear more as the project progresses.

If you’re not lucky enough to find a mostly-complete kit plane nearby on Craigslist, you could always just make your own airplane out of sheets of foam.

Sniffing RFID Readers With A Piece Of Paper

We feature plenty of printed projects here on Hackaday, though they tend to be of the three dimensional type thanks to the proliferation of affordable 3D printers. But in this case, [Milosch Meriac] has managed to put together a printable design that’s not only a very cool hack, but is made up of a scant two dimensions. His creation, which could perhaps be considered something of an interactive circuit diagram, allows anyone with a paper printer and a few passive components to make a functional low-frequency RFID sniffer.

[Milosch] tells us the goal of the project is to lower the barrier for experimenting with the RFID technology that’s increasingly part of our everyday lives. Rather than having to use something expensive and complicated such as an oscilloscope, experimenters can simply plug their DIY RFID sniffer into their computer’s line-in jack and explore the produced waveform with open source tools.

To create a paper RFID sniffer, you start by printing the image out on a thick piece of paper, like card stock. You then apply foil tape where indicated to serve as traces in this makeshift PCB, and start soldering on the components as described in the text. [Milosch] says the assembly procedure is so simple even a kid can do it, and the total cost of each assembled sniffer is literally pennies; making this an excellent project for schools or really any large group.

If you want to play it safe the sniffer can be connected to a USB sound card rather than your machine’s primary sound hardware, and still come in dirt cheap. [Milosch] stops short of explaining the software side of things in this particular project, but any tool which can use input from the sound card as a makeshift oscilloscope should be a good start.

In the past we’ve seen [Milosch] perform low frequency RFID sniffing through the sound card with the powerful baudline tool, but if you want a little more capable hardware, we can point you in the right direction.