The German Space Program That Never Was

A previous post discussed the creation of the V-2 rocket, the first man-made object to reach space. Designed and built at the Peenemünde Army Research Center during World War II, the V-2 was intended to be a weapon of mass destruction, but ended up being far more effective as a tool of discovery than it ever did on the battlefield. In fact, historians now estimate that more people died during the development and construction of the V-2 than did in the actual attacks carried out with it. But even though it failed to win the war for Germany, it still managed to change the world in another way: as it served as the basic blueprint for all subsequent rockets right up to modern-day vehicles.

But the V-2 wasn’t the only rocket-powered vehicle that the Germans were working on, a whole series of follow-up vehicles were in the design phase when the Allies took Berlin in 1945. Some were weapons, but not all. Pioneers like Walter Dornberger and Wernher von Braun saw that rocketry had more to offer mankind than a new way to deliver warheads to the enemy, and the team at Peenemünde had begun laying the groundwork for a series of rockets that could have put mankind into space years before the Soviets.

Continue reading “The German Space Program That Never Was”

Tis The Season For Terror With DIY Krampus

The holiday season is full of many sounds; walking through your neighborhood on a winter night you may hear time-honored songs, the tinkling of glasses, and the laughter of good company. But if the chilly wind also brings to your ear the panicked sounds of screaming children, you may have wandered a bit to close to [Tyler Garner]’s house.

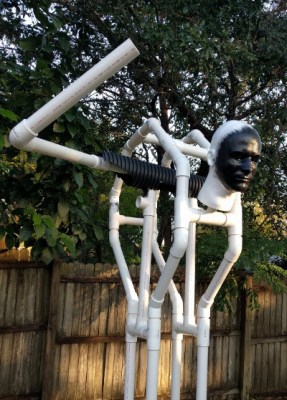
Rather than old Saint Nick or a couple of reindeer, [Tyler] decided to top the roof of his home with a disturbingly well done rendition of everyone’s favorite��Austro-Bavarian goat-demon, Krampus. While he did finish the build off with a store-bought Krampus mask, every other component was made with about a 60/40 ratio of hardware to craft store scores. While your holiday decorations this year may not include any spawns of hell, the general construction techniques and resourcefulness [Tyler] shows in this build may come in handy when Halloween rolls around again.

The “skeleton” of Krampus is made up of PVC pipes and fittings mounted on an MDF base. Not only do the PVC fittings make it easy to recreate the rough anatomy of a humanoid figure, but if you don’t glue them all together, you can take it apart later for storage. We might have gone with something a little heartier than MDF for the base, but at least [Tyler] added a few pieces of galvanized pipe at the bottom to give it a little weight down low.

Things start to get interesting when [Tyler] adds sections of drainage pipe to his PVC skeleton to give it a more girth, as he was finding the bare PVC didn’t have a realistic presence when the robes were thrown over them. [Tyler] also uses expanding spray foam to soften up areas such as the hunched back, which may look messy but has the dual advantages of being cheap and fast.

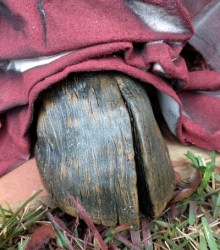
The figure’s robes are made up of a patchwork of burlap, waterproofed with a spray on liner intended for pickup truck beds. With the application of red and black spray paint and the customary white fringe, it really nails the look.

A particularly nice detail is the hoof peeking out from beneath the robes, which [Tyler] made out of painted air-dry clay. It’s an awesome detail, though almost impossible to see once Krampus is mounted on the roof. Maybe it’s just us, but we think putting so much effort into a nearly hidden feature of a project is the true mark of a master craftsman; this is a secret little hoof that [Bob Ross] himself would be proud of.

While we can’t say we’ve played host to holiday scamps like Krampus or Belsnickle before, Hackaday has certainly seen its fair share of festive hacks over the years.

Refinishing A Vintage KitchenAid Mixer

If you know anyone who is serious about baking, there’s a good chance you’ve seen one of these classic KitchenAid mixers. Built to last, they are often handed down generation to generation (or at least, when a newer model comes out), which is how [Kaitlin Flannery] received hers. While it didn’t look too bad considering its long life and the fact it’s been through a motor replacement already, she decided to spruce it up a bit by stripping it down and repainting the whole machine.

Sanding between coats of paint.

These KitchenAid mixers are solidly built and look highly serviceable, it’s refreshing to see a teardown that doesn’t involve any finicky plastic clips or glue. A standard philips screwdriver gets you inside the case, and a couple more screws allow the trim pieces to be removed.

Most of the work [Kaitlin] does is not completely unlike what you might have to do if you wanted to respray the fender of your car. You take off as much extra hardware as your patience allows, put painters tape over everything you want to keep over-spray off of, and then go to town.

To get the smooth metallic finish that you’d expect on a kitchen appliance, [Kaitlin] sands with 220 paper between the coats of hardware store Rust-Oleum. Generally we’d advise switching over to wet sanding at a higher grit once a few coats of paint have been laid down, but we can’t argue with the final results [Kailtin] got. The last coat is followed up with a clear enamel, which will help protect the finish from scratches; very important for a kitchen appliance.

[Kaitlin] does mention that she mistakenly taped off a bit more than she should have, and there’s still some of the original color visible on the rear of the machine. But beyond that, the finish looks fantastic, and with the new motor installed it looks like this machine is going to stick around long enough to get handed down a second time at least.

Hackaday has regrettably made few inroads into the kitchen as of late, one might get the impression that there isn’t a whole lot of overlap between the workbench and the counter-top. If you’ve got something you’ve made or remade sitting in your kitchen as you read this, by all means let us know.

Peer Review In The Age Of Viral Video

Recently, a YouTube video has been making the rounds online which shows a rather astounding comparison between two printed models of the US Capitol. Starting with the line “3-D PRINTERS CAN NOW PRINT TWICE AS FAST”, the video shows that one print took four hours to complete, and the other finished in just two hours by virtue of vibration reducing algorithms developed at the University of Michigan. The excitement around this video is understandable; one of the biggest limitations of current 3D printer technology is how long it takes to produce a model of acceptable quality, and if improvements to the software that drives these machines could cut total print time in half, the ramifications would be immense.

In only a few weeks the video racked up tens of thousands of views, and glowing articles popped up with headlines such as: “How to cut 3D print times in half by the University of Michigan” and “University of Michigan professor doubles 3D printing speeds using vibration-mitigating algorithm“. Predictably, our tips line lit up with 3D printer owners who wanted to hear more about the incredible research that promised to double their print speed with nothing more than a firmware update.

The only problem is, the video shows nothing of the sort. What’s more, when pushed for details, the creators of the video are now claiming the same thing.

Continue reading “Peer Review In The Age Of Viral Video”

Racing Simulator Built From Scrapheap Finds

Paradise means something different for everyone, it could be a sitting by a fire on a rainy night or lying on a sun-kissed beach. But for us, and makers like [liltreat4you], it’s a well stocked scrap pile out behind the house. After buying a racing wheel and pedals for his Xbox, he took a trip out to his little slice of paradise and found nearly all the hardware he needed to build a professional looking race simulator. According to his breakdown, most of the money he spent on this build ended up going into that sweet red paint job and the speed-enhancing stickers.

Everything the light touches is our kingdom.

Not all of us are as lucky as [liltreat4you], and we probably won’t just happen upon a driver’s seat out of a Mazda, or a bunch of perfectly bent metal pipes from an old trampoline out on the back forty. But trolling Craigslist or cruising around for flea markets can still get you parts like these for cheap, so try not to be too discouraged if your backyard isn’t quite as well stocked.

Once he had the metal pipes and seat from the car, the rest of the build came together pretty quickly. After building an oval out of his salvaged pipes, he attached the seat and the arms that would eventually hold the steering wheel and display. A plate was also added at the bottom for the pedals to sit on. By using long bolts, [liltreat4you] was even able to add a degree of adjustment to the wheel position. Being that he got his seat out of a real car, there’s the usual adjustment you’d expect there as well.

Speaking of which, [liltreat4you] casually mentions that you should disconnect the battery of the donor vehicle before taking out the seat, as it’s possible that the removal of the seat or the disconnection of the seat harness can cause the airbags to deploy. We can neither confirm nor deny this, but it’s probably safe advice to follow.

The purists out there may claim that what [liltreat4you] has put together doesn’t quite meet the definition of simulator in its current form. But with the addition of some instrumentation and just a bit of physical feedback, he’ll be well on his way to the complete driving experience.

ESP8266 Home Monitor Is Stylishly Simplistic

It’s often said that “Less is More”, and we think that the chic ESP8266 environmental monitor posted by Thingiverse user [bkpsu] definitely fits the bill. Dubbed “Kube”, the device is a 3D printed white cube with an OLED display in the center, which [bkpsu] says was designed specifically for the approval of his wife. Weirdly, she didn’t like the look of bare PCBs on the wall.

Multiple Kubes allow for whole-house monitoring.

Inside, things are a little more complex. The Kube uses the NodeMCU development board, and a custom breakout that [bkpsu] designed to interface with the display and sensors. For temperature and humidity monitoring, the Kube is using the ever-popular DHT22, and [bkpsu] mentions that he has future plans for things like motion sensors and direct control of RGB LED strips. All the data collected by the Kube is piped into openHAB via MQTT.

On the very detailed Thingiverse page, [bkpsu] gives background information on his design goals for the project, tips for printing out a high-quality case, a parts list with Amazon links, and pinout information for getting it all wired up. The PCB is even available on OSH Park for those who want a Kube of their own.

Even with all the stick home monitoring and automation products on the market today, many hackers simply can’t bring themselves to buying a turn-key commercial product. But we think with the results hackers have been getting rolling their own solutions, they just might be on to something.

FatPiBoy: Respin Game Boy With A Pop-Out Controller

Have you ever found yourself wishing you had a clone of the Game Boy, except it was actually twice as wide, and instead of holding it in your hands you pop a tiny separate controller out of the middle and play it that way? No? Well, neither have we. But that didn’t stop [Christian Reinbacher] from designing and building exactly that, and by the looks of the finished product, we have to say he might be onto something.

To be fair, the charmingly-named FatPiBoy is not really meant to be played like the GameBoy of yesteryear. It’s more like a game console with built in display; you prop the console up on something, and then remove the controller from the system and play that way.

The controller itself is a commercial product, the 8bitdo Zero, but [Christian] based the rest of the system on parts intended for the Adafruit PiGRRL. For the battery, [Christian] used a 4,500 mAh pack that was originally from his Nexus 7 tablet; a tip to keep in mind next time you’re looking for a big and cheap lithium-ion battery.

[Christian] notes that the case design isn’t perfect. There’s currently no external access to the Pi’s USB ports, and the recess for the 8bitdo Zero could be a few millimeters deeper. Still, we think he did an excellent job finishing the case and giving it a professional look; the case and controller look like nearly a perfect match.

This isn’t the first time we’ve seen a Raspberry Pi put on a GameBoy costume, but the FatPiBoy does bring something new to the table with its removable controller. Of course, if you think the controller [Christian] selected for this build is a bit too small, you can always substitute your own