Thanks For The Memories: Touring The Awesome Random Access Of Old

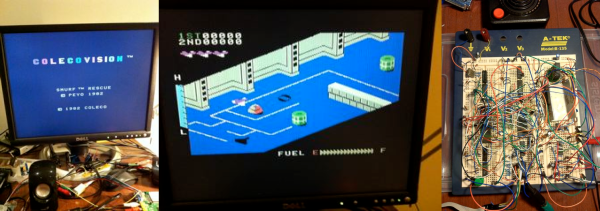
I was buying a new laptop the other day and had to make a choice between 4GB of memory and 8. I can remember how big a deal it was when a TRS-80 went from 4K (that’s .000004 GB, if you are counting) to 48K. Today just about all RAM (at least in PCs) is dynamic–it relies on tiny capacitors to hold a charge. The downside to that is that the RAM is unavailable sometimes while the capacitors get refreshed. The upside is you can inexpensively pack lots of bits into a small area. All of the common memory you plug into a PC motherboard–DDR, DDR2, SDRAM, RDRAM, and so on–are types of dynamic memory.

The other kind of common RAM you see is static. This is more or less an array of flip flops. They don’t require refreshing, but a static RAM cell is much larger than an equivalent bit of dynamic memory, so static memory is much less dense than dynamic. Static RAM lives in your PC, too, as cache memory where speed is important.

For now, at least, these two types of RAM technology dominate the market for fast random access read/write memory. Sure, there are a few new technologies that could gain wider usage. There’s also things like flash memory that are useful, but can’t displace regular RAM because of speed, durability, or complex write cycles. However, computers didn’t always use static and dynamic RAM. In fact, they are relatively newcomers to the scene. What did early computers use for fast read/write storage?

Continue reading “Thanks For The Memories: Touring The Awesome Random Access Of Old”

Breadboard Colecovision

The Colecovision was a state-of-the-art game console back in 1983. Based around the Z-80, it was almost a personal computer (and, with the Adam add-on, it could serve that function, complete with a daisy wheel printer for output). [Kernelcrash] set out to recreate the Colecovision on a breadboard and kept notes of the process.

His earlier project was building a Funvision (a rebranded VTech Creativision) on a breadboard, so he started with the parts he had from that project. He did make some design changes (for example, generating separate clocks instead of using the original design’s method for producing the different frequencies needed).

Continue reading “Breadboard Colecovision”

Triple Threat RTL-SDR System Reads Trunked Radio

In the old days, if you wanted to listen to police, fire, or other two-way radio users, you didn’t need much more than a simple receiver. Today, you are more likely to need something a little more exotic thanks to the adoption of trunked radio systems. To pick up the control channels and all the threads of a talk group conversation, you might need a wide bandwidth receiver.

[Luke Berndt] found he needed 6 MHz to monitor the stations he wanted to hear. This is easily in the reach of dedicated software defined radios (SDR). However, [Luke] wanted to use cheap RTL-SDRs and their bandwidth is about 2 MHz. The obvious hacker solution? Use three of them!

If you haven’t looked at a trunked system before, it essentially allows a large number of users to share a relatively small number of channels. When someone wants to talk, they move to an unused channel just for that transmission. Suppose Alice asks Bob a question that happens to be on channel 12. Bob’s reply might be on channel 4. A follow up from Alice could be on channel 3.

In practice, this means that receiving the signal isn’t difficult to decode. It is just difficult to find (and follow as it jumps around). This is an excellent job for multiple SDRs and the approach even reduces the burden on the CPU, which doesn’t have to decode signals that aren’t essential to the conversation.

[Luke] includes source code and also notes how to change the serial numbers of the dongles since each has to be unique. We have seen so many great projects with the RTL-SDR that it is hard to choose our favorite. It is especially great knowing that the dongle was only meant to receive television, and all these projects are hacks in the best sense of the word.

Thanks [WA5RRior] for the tip.

Arduino RF Network Analyzer

What do you get when you combine a direct digital synthesis (DDS) chip, a power detector, and an Arduino? [Brett Killion] did make that combination and wound up with a practical network analyzer.

The project uses an Analog Devices AD9851 DDS chip clocked at 180 MHz which will output a sine wave at any frequency from 0 Hz and 72 MHz. A Butterworth low pass filter processes the DDS signal and then feeds a two-transistor amplifier. The circuit will output about 0dBm into 50 ohms. The power detector is an Analog Devices AD8307 along with a 50-ohm input load. There is no filtering on the power detector so it can measure from very low frequencies to 500MHz.

Continue reading “Arduino RF Network Analyzer”

Faking A Hollow State Device

There’s been a resurgence of interest in vacuum tubes. Even if you do think audio sounds better through a tube, you have to admit the care and feeding of filaments and plate voltages isn’t trivial. [Ed Nisley] decided to sidestep all that and just build an objet d’art that looks like a tube.

A burned out halogen bulb stands in for the tube, and a ceramic base holds the bulb. It also conceals–what else–an Arduino. The Arduino drives a knock-off Neopixel LED hidden in a faux plate cap. The result is a glass envelope bathed in a cold blue and purple glow that changes under software control.

We’d really like to see this kind of tube inside some rebuilt piece of tube gear. Or maybe Korg should offer LED lighting options for their recent tube in a chip form factor. If you really want to be a top-tier tube hacker, you can always try your hand at repair.

Connect Four Robot Uses Raspberry Pi

Most people play games for entertainment. Hackers build robots to play games for entertainment. That’s what [piandchips] did. He used a Raspberry Pi and a MeArm kit to build a Connect 4-playing robot. The robot–named 4-Bot–has to do two things: the first is it has to be able to manipulate the pieces. Secondly, it has to be able to see the board. The MeArm imbues 4-Bot with the manipulation ability, and a clever scanning system does the trick.

Continue reading “Connect Four Robot Uses Raspberry Pi”

A Spicy Regenerative Reciever

We recently posted a three-part series about using LTSpice to simulate electronic circuits (one, two, three). You might have found yourself wondering: Can you really simulate practical designs with the program? This quick analysis of [QRP Gaijin’s] minimalist regenerative receiver says “yes”.

Continue reading “A Spicy Regenerative Reciever”