
RC Trike Handles Great With Rear Steering

Small robotics builds with three wheels are plentiful. The most typical configuration is to have the two front wheels drive and turn the vehicle in a skid-steer configuration. The third wheel is often a simple caster. However, this isn’t the only way to go, and [markus.purtz] has put together a build that does things differently.

The build is a small, radio-controlled FPV trike. Instead of the usual skid-steer setup, the rear wheel is mounted on a pair of horizontal bearings which allows it to pivot left and right. A servo is used to control the rear wheel position, with a pair of tie rod ends used to connect the horn to the rear steering assembly. It’s not the only unconventional design choice, either – magnets are used to affix the top plate to the vehicle chassis, rather than screws or clips. For video, the user can mount either a small dedicated FPV camera, or a GoPro with the included mount.

Without any code or control details posted, we can’t be 100% sure how it all works. However, from the video, it appears that both front wheels are being driven at the same speed, with steering handled solely by the rear wheel. This is apparent when driving on a smooth surface, where the vehicle can be seen to slide when turning. While it’s unlikely this setup has many advantages over a simpler differential steering build with a caster, it does show that rear steering can be effective on its own.

It’s a build that shows off the benefits of using proper bearings and mechanical parts in a design. With today’s online marketplaces, it’s never been easier to find what you need. Parts are on Thingiverse for those interested in replicating the design. Meanwhile little FPV bots remain popular, and we’re sure we’ll continue to see them coming in. Video after the break.

Continue reading “RC Trike Handles Great With Rear Steering” →
This Arduino Is Feeding The Fishes

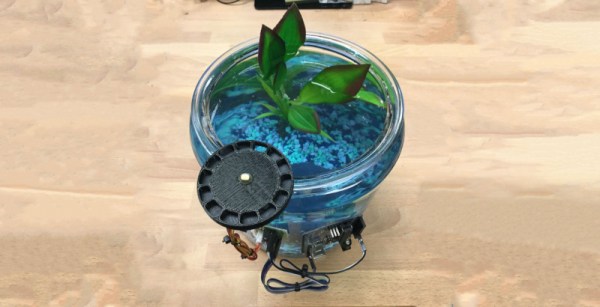
Fish are easy to keep as pets, requiring little more than regular feeding to keep them happy in the short-to-medium term. If you’re going on holiday, it can be nice to know that your pets are being taken care of, but finding someone to take on the chore can be hard. [Trevor_DIY] doesn’t need to worry about that, however – he’s built an automatic feeder to handle the job.

The build uses an Arduino Uno as the brains, with the only additional hardware required being a stepper motor and driver. The stepper motor drives a 3D printed wheel, with 14 slots – each one holding one meal for the fish. This allows the feeder to deliver two meals a day for a full week before requiring attention.

The feeder is configured to feed a breakfast meal, then a dinner meal 8 hours later, and then wait 16 hours before breakfast comes around again. Rather than use a real-time clock, this is simply handled with the Arduino’s built in delay function. While it isn’t super accurate, this should be close enough over a week to keep the fish alive. We’d be interested as to just how far it drifts over time.

Overall, it’s a quick and tidy way to keep the pets going without a lot of fuss. Pet feeders are a popular project, as they solve a common problem faced by owners the world over; this one can even handle wet cat food. Video after the break.

Continue reading “This Arduino Is Feeding The Fishes” →

Why Fix A Remote When You Can Just Build A New Device?

Those who have been around the block, and the sun, a fair few times will know that they certainly don’t make ’em like they used to. It doesn’t particularly matter what “them” is; it’s merely a widely accepted fact that society has trended towards more disposable products over ones that have a long service life. [mcu_nerd] was suffering from this very problem, as their TV remote had its power button begin to fail. Of course, hackers don’t see problems – they merely see opportunities for projects.

[mcu_nerd] decided to skip repairing the TV remote, under the suspicion that disassembling the device would likely lead to its destruction. Instead, an Atmega328P development board was pressed into service as a replacement remote, with the addition of an IR LED and a push button. Whereas the TV-B-Gone existed as a device to cause havoc by switching televisions off, [mcu_nerd]’s TV-B-On does the opposite job.

A later revision was spun up with its own PCB, and features an Attiny85, which is more than capable of handling the job. Showing thoughts of the future in the design, there are provisions for extra buttons to be added should the project require a nicer enclosure, and a space for an external crystal if necessary.

These devices have a long and storied history; we reported on a particularly powerful version back in 2009.

Ramen Lamp Has Us Feeling Hungry

Ramen comes in many forms, and whether you’re eating the 10 cent instant packets during the school year, or dining out at a fancy noodle bar, it’s a tasty meal either way. [ramenkingandi] has long been in love with the classic Japanese fare, and decided to create a homage to the dish – in lamp form.

The lamp build begins, somewhat unsurprisingly, with a lamp – but not how you’d think. A Walmart floor lamp is harvested for its lampshade, which approximates the dimensions of a typical ramen bowl. It’s then fitted with warm yellow LEDs to give it a pleasing glow. Polymer clay is used to create fake ramen ingredients – including noodles, pork, and choy sum. Jewelery wire is used to suspend the chopsticks in mid-air, before resin is poured into the bowl and the ingredients arranged on top. For a final touch, the bowl is painted with an artistic stripe to hide the electronics inside, and the lamp is complete.

It’s a great example of fake Japanese food, which is actually a huge industry in that part of the world. We’d love to have this lamp on display in our own home, fully expecting ramen consumption to increase considerably over time.

Lamps are a common feature around these parts – and some of them have even learned to leap. 

Building A Googie-Style Sign With The Help Of CNC

The Googie style was a major architectural trend of the post-war period in the United States. It remains popular to throwback to this style, and [Wesley Treat] got the job to create a sign in this vein for a local trailer motel (Youtube link, embedded below).

CNC tools make just about any job easier, and this one is no exception. The smooth curves of the sign were carved out of several sections of PVC sheet, and stacked up to form the body of the sign. These were then sanded, coated in putty, and given a lick of  paint. Steps like these could likely be skipped in the interest of saving time, especially given that few will see those parts once the sign is installed. However, [Wesley] takes pride in his work, and the final piece is all the better for it. It’s also important for the piece to impress the client, not just the public.

The front of the sign is also produced in PVC sheet, and given a coat of paint with brush techniques used to create a faux-wood finish. Vinyl is then applied to the textual and graphical elements in order to create a colored backlit effect. The sign is lit with off-the-shelf LED strips, and the whole assembly is weather sealed to protect it from the elements.

The final product is a beautiful piece, harking back to the classic Googie aesthetic and serving as a testament to [Wesley]’s skills. It’s a great example of how easy it is to create great work with the right tools and the proper attention to detail. It also goes to show how great LEDs are for signage, whether you’re at the beach or the lab. Video after the break.

Continue reading “Building A Googie-Style Sign With The Help Of CNC” →

Building A Geodesic Dome Greenhouse

Greenhouses are a great way to improve conditions for your plants, and are an absolute necessity for any serious gardening in colder climates. When the time came for [gentleworks] to build a new greenhouse, rather than going with a conventional design, they decided to go with a geodesic dome instead.

The greenhouse uses a few techniques that will be unfamiliar to those used to run-of-the-mill carpentry. The individual cedar struts meet at a series of hubs, constructed out of short lengths of Schedule 80 PVC pipe. The struts are attached to the pipe with steel straps, screwed into place. This doesn’t give the strongest of holds, but as most of the loads on the struts are compressive in nature, it works well in practice. Plastic sheeting is used as a covering to help let in plenty of light while keeping the cold out. The greenhouse is also heated, and can maintain a 40 deg F temperature differential with 14,000 BTUs.

It’s a build that has us wanting to throw up a dome or two in our own backyard. We’ve seen other geodesic structures before; if you’re working on one yourself, be sure to drop us a line.

Building A DIY Desktop-Sized Arcade Machine

Full-sized arcade cabinets are undeniably cool, but take up a lot of space and can be somewhat of a handful. [PleaseNoFisticuffs] desired something a little more fun-sized, and so built a desktop arcade machine that has some serious style.

It’s a build that’s remarkably accessible for even the inexperienced builder. Paper templates are used to cut out the plywood parts for the cabinet, and the electronic components are all off-the-shelf items. Assembly is readily achievable with high-school level woodworking and soldering skills. Like most similar builds, it relies on the Raspberry Pi running RetroPie, meaning you’ll never run out of games to play.

Where this project really shines, however, is the graphics. Cribbed from Mortal Kombat II and looking resplendent in purple, they’re key to making this cabinet a truly stunning piece. The attention to detail is excellent, too, with the marquee and screen getting acrylic overlays for that classic shine, as well as proper T-moulding being used to finish the edges.

We’d love to have something like this on our desk, though we’d likely get far less work done in such an event. For another take on an arcade build, check out this impressive Undertale pinball cabinet.