They say time flies when you’re having fun, and doubly so when you’re hacking hardware. If you can believe it, we’ve already closed out the first challenge of the 2023 Hackaday Prize, and you know what that means — it’s time to announce the 10 finalists.
As a reminder, each of these projects not only takes home $500 USD, but moves on to the next round of judging. During the recently announced 2023 Supercon, we’ll announce the six projects that were selected by our panel of judges to collect their share of $100,000 in prize money– plus a residency at Supplyframe’s DesignLab and eternal hacker glory for the Grand Prize winner.
Virtual reality has come a long way in the past decade, with successful commercial offerings for gaming platforms still going strong as well as a number of semi-virtual, or augmented, reality tools that are proving their worth outside of a gaming environment as well. But with all this success they still haven’t quite figured out methods of locomotion that feel natural like walking or running. One research group is leaping to solve one of these issues with JumpMod: a wearable device that enhances the sensation of jumping.
The group, led by [Pedro Lopes] at the University of Chicago, uses a two-kilogram weight worn on the back to help provide the feeling of jumping or falling. By interfacing it with the virtual reality environment, the weight can quickly move up or down its rails when it detects that the wearer is about to commit to an action that it thinks it can enhance. Wearers report feeling like they are jumping much higher, or even smashing into the ground harder. The backpack offers a compact and affordable alternative to the bulky and expensive hardware traditionally used for this purpose.
With builds like these, we would hope the virtual reality worlds that are being created become even more immersive and believable. Of course that means a lot more work into making other methods of movement in the virtual space feel believable (like walking, to start with) but it’s an excellent piece of technology that shows some progress. Augmenting the virtual space doesn’t always need bulky hardware like this, though. Take a “look” at this device which can build a believable virtual reality space using nothing more than a webcam.
If you are a Pythonista or a data scientist, you’ve probably used Jupyter. If you haven’t, it is an interesting way to work with Python by placing it in a Markdown document in a web browser. Part spreadsheet, part web page, part Python program, you create notebooks that can contain data, programs, graphics, and widgets. You can run it locally and attach to it via a local port with a browser or, of course, run it in the cloud if you like. But you don’t have to use Python.
You can, however, use things with Jupyter other than Python with varying degrees of success. If you are brave enough, you can use C. And if you look at this list, you’ll see you can use things ranging from Javascript, APL, Fortran, Bash, Rust, Smalltalk, and even MicroPython.
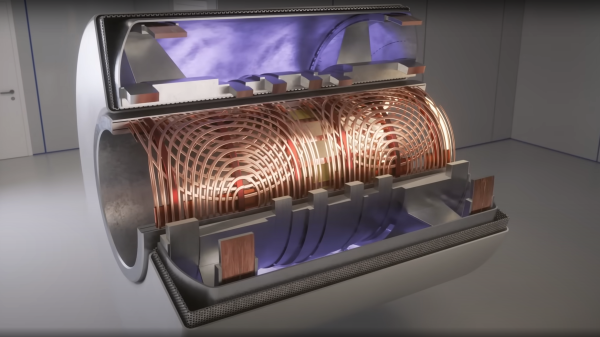
Of all the high-tech medical gadgets we read about often, the Magnetic Resonance Imaging (MRI) machine is possibly the most mysterious of all. The ability to peer inside a living body, in a minimally invasive manner whilst differentiating tissue types, in near real-time was the stuff of science fiction not too many years ago. Now it’s commonplace. But how does the machine actually work? Real Engineering on YouTube presents the Insane Engineering of MRI Machines to help us along this learning curve, at least in a little way.
Both types of gradient coil are stacked around the subject inside the main field coil
The basic principle of operation is to align the spin ‘axis’ of all the subject’s hydrogen nuclei using an enormous magnetic field produced by a liquid-helium-cooled superconducting electromagnet. The spins are then perturbed with a carefully tuned radio frequency pulse delivered via a large drive coil.
After a short time, the spins revert back to align with the magnetic field, remitting a radio pulse at the same frequency. Every single hydrogen nucleus (just a proton!) responds at roughly the same time, with the combined signal being detected by the receive coil (often the same physical coil as the driver.)
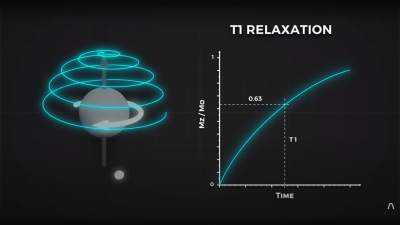
Time taken for the perturbed spin to return to magnetic alignment
There are two main issues to solve. Obviously, the whole body section is ‘transmitting’ this radio signal all in one big pulse, so how do you identify the different areas of 3D space (i.e. the different body structures) and how do you differentiate (referred to as contrast) different tissue types, such as determine if something is bone or fat?
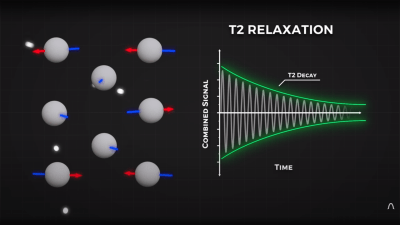
By looking at the decay envelope of the return pulse, two separate measures with different periods can be determined; T1, the spin relaxation period, and T2, the total spin relaxation period. The first one is a measure of how long it takes the spin to realign, and the second measures the total period needed for all the individual interactions between different atoms in the subject to settle down. The values of T1 and T2 are programmed into the machine to adjust the pulse rate and observation time to favor the detection of one or the other effect, effectively selecting the type of tissue to be resolved.
Time taken for the relative phasing inside a tissue locality to settle down to the same average spin alignment
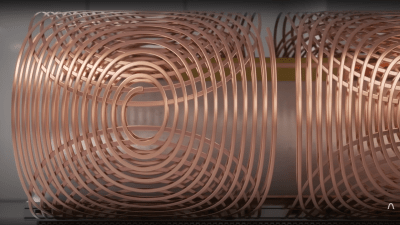
The second issue is more complex. Spatial resolution is achieved by first selecting a plane to virtually slice the body into a 2D image. Because the frequency of the RF pulse needed to knock the proton spin out of alignment is dependent upon the magnetic field strength, overlaying a second magnetic field via a gradient coil allows the local magnetic field to be tuned along the axis of the machine and with a corresponding tweak to the RF frequency an entire body slice can be selected.
All RF emissions from the subject emanate from just the selected slice reducing the 3D resolution problem to a 2D problem. Finally, a similar trick is applied orthogonally, with another set of gradient coils that adjust the relative phase of the spins of stripes of atoms through the slice. This enables the use of a 2D inverse Fourier transform of multiple phase and frequency combinations to image the slice from every angle, and a 2D image of the subject can then be reconstructed and sent to the display computer for the operator to observe.
We can’t remember ever seeing a late-night TV ad for oscilloscopes before but, for some reason, Tektronix did produce a video ad in 1987. You can see it below and enjoy the glorious music and video production standards of the 1980s.
We assume this was made to show at some trade show or the like. Even if there was a Home Shopping Network in 1987, we doubt many of these would have been sold despite the assertion they were “low cost” — clearly a relative term in this case.
You’ve got to wonder if the narrator understood what he was saying or if he was just reading from a script. Pretty impressive either way. We loved these old scopes, although we also like having very capable scopes that don’t strain our backs to lift.
On the bright side, these scopes today are pretty affordable on the used market if you can find one that doesn’t need a repair with an exotic part. For example, we found several 2221s or 2221As for under $200 without looking hard. The shipping, of course, could potentially almost double the price.
While you can get a modern scope for $200, it probably isn’t the same quality as a Tektronix. Then again, the new scope won’t have CRTs and exotic Tektronix parts to wear out, either. Picking a scope is a pretty personal affair, though, so one person’s great scope might be another person’s piece of junk.
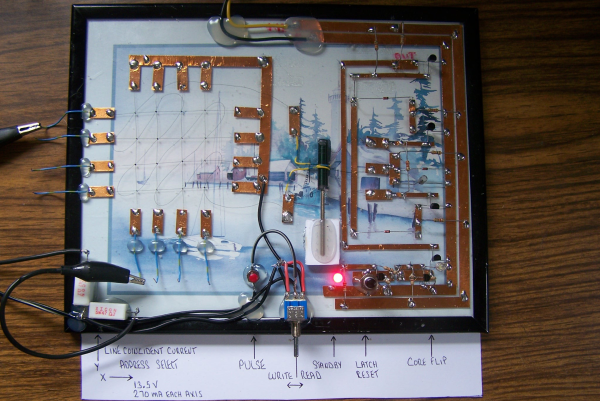
No matter how memory technology marches on, magnetic core memory is still cool. Radiation-hard, nonvolatile, and so pretty. What’s there not to love? [Mark Nesselhaus] is no stranger to fun in-your-face electronics builds — judging from his hackaday.io projects — and this entry to the Hackaday Op-Amp contest is no outlier. This is a sixteen-bit magnetic core RAM demonstrator built upon glass using copper tape and solder, which always looks great and is actually not all that hard to do yourself provided you grab a new scalpel blade from the pack before starting.
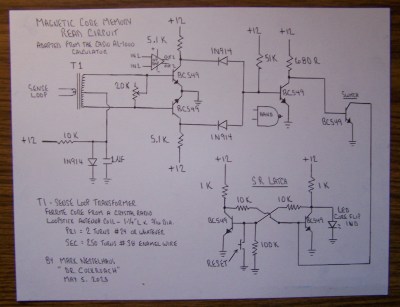
Transformer-coupled differential front-end amplifier driving an SR latch.
For the uninitiated, the crossed X and Y wires each host a hard magnetic toroid which can only be magnetised by a field beyond a certain threshold due to the shape of the B-H curve of ferrite materials. The idea is for a required threshold current, drive the selected X line and Y line each with a current half of this value, so that only the selected core bit ‘sees’ the full field value, and flips state. This means that only a single bit can be written for each core plane, so to form longer words these layers are stacked, producing some wonderful cubic structures. These magnetic circuits are responsible for putting a human on the moon.
Reading the bit state is basically the opposite. A third sense wire is passed sequentially through each bit in the array. By driving a current the opposite way through the selected core bit, if the core was previously magnetised then the sense wire will read a short pulse that can be amplified and registered. The eagle-eyed will realise that reading is a destructive process, so this needs to be followed up by a write-back process to refresh the bit, although the core state will persist without power, giving the memory nonvolatile behaviour.
[Mark] utilises a simple discrete transistor differential transformed-coupled front end which senses the tiny current pulse and passes it along to a Set-Reset latch for visualisation. This simple concept could easily be extended to make this a practical memory, but for now, addressing is courtesy of a pair of crocodile clips and a discrete write/read pulse switch. We will watch with interest how far this goes.
DIY core memory builds are not a regular occurrence around these parts, but we see them from time to time, like this polished 64-bit setup. Core arrays are not the only magnetic memory in town, we’ve also seen DIY core rope memories as well.
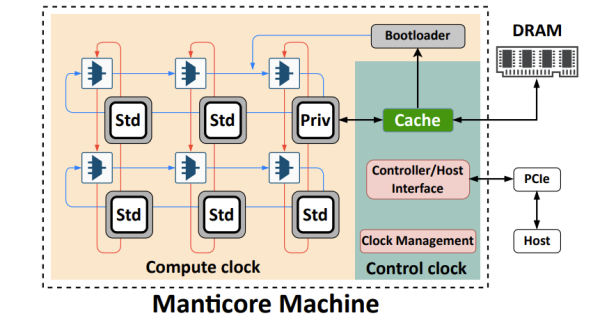
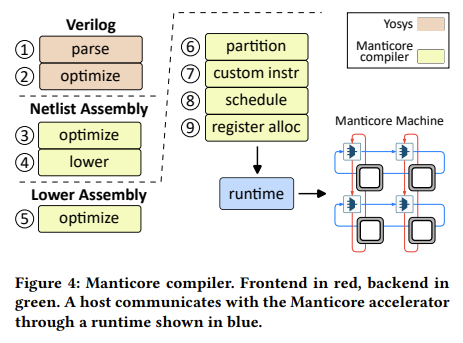
Before a chip design is turned from a hardware design language (HDL) like VHDL or Verilog into physical hardware, testing and validating the design is an essential step. Yet simulating a HDL design is rather slow due to the simulator using either only a single CPU thread, or limited multi-threading due to the requirements of fine-grained concurrency. This is due to the strict timing requirements of simulating hardware and the various clock domains that ultimately determine whether a design passes or fails. In a recent attempt to speed up RTL (transistor) level simulations like these, Mahyar Emami and colleagues propose a custom processor architecture – called Manticore – that can be used to run a HDL design after nothing more than compiling the HDL source and some processing. Continue reading “Exploiting Hardware-Level Parallelism In The Manticore Hardware-Accelerated RTL Simulator”→