You’d be hard pressed to find a hacker or maker who doesn’t have a soft spot for the tantalizing buzz and snap of a high voltage spark gap, but it remains the sort of project that most of us don’t take on personally. There’s a perceived complexity in building a device capable of shooting a proper spark through several inches of open air, with connotations of exotic components and massive hand-wound coils. Plus, nobody wants to inadvertently singe off their eyebrows.
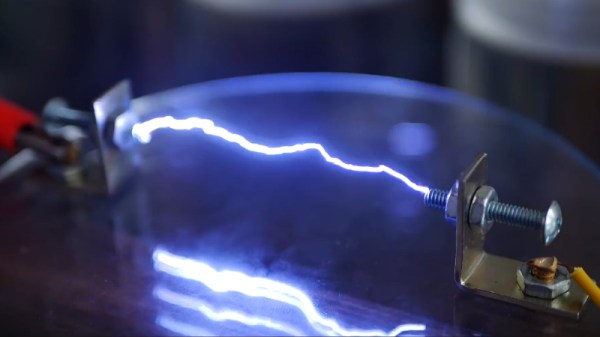
While the latest video from [Jay Bowles] might not assuage anyone’s fear of performing impromptu electrolysis, it does at least prove that you don’t need to have a laboratory full of gear to produce six figure voltages. In fact, you don’t even need much in the way of electronics: the key components of this DIY Marx generator are made with little more than water and some household items.
 This is made possible by the fact that the conductivity of water can be changed depending on what’s been dissolved into it. Straight tap water is a poor enough conductor that tubes of it can be used in place of high voltage resistors, while the addition of some salt and a plastic insulating layer makes for a rudimentary capacitor. You’ll still need wires to connect everything together and some bits of metal to serve as spark gaps, but nothing you won’t find lurking in the parts bin.
Of course, water and a smattering of nails won’t spontaneously generate electricity. You need to give it a bit of a kick start, and for that [Jay] is using a 15,000 volt DC flyback power supply that looks like it may have been built with components salvaged from an old CRT television. While the flyback transformer alone could certainly generate some impressive sparks, this largely liquid Marx generator multiplies the input voltage to produce a serious light show.
We’re always glad to see a new video from the perennially jovial [Jay] come our way. While his projects might not always be practical in the strictest sense, they never fail to inspire a lively discussion about the fascinating applications of high voltage.