US Navy Looking To Retire Futuristic Prototype Ships

From the Age of Sail through to the Second World War, naval combat was done primarily in close quarters and with cannons. Naturally the technology improved quite a bit in those intervening centuries, but the idea was more or less the same: the ship with the most guns and most armor was usually the one that emerged victorious. Over the years warships became larger and heavier, a trend that culminated in the 1940s with the massive Bismarck, Iowa, and Yamato class battleships.

But by the close of WWII, the nature of naval combat had begun to change. Airplanes and submarines, vastly improved over their WWI counterparts, presented threats from above and below. A few years later, the advent of practical long-range guided missiles meant that adversaries no longer had to be within visual range to launch their attack. Going into the Cold War it became clear that to remain relevant, warships of the future would need to be smaller, faster, and smarter.

The aft flight deck of a modular LCS

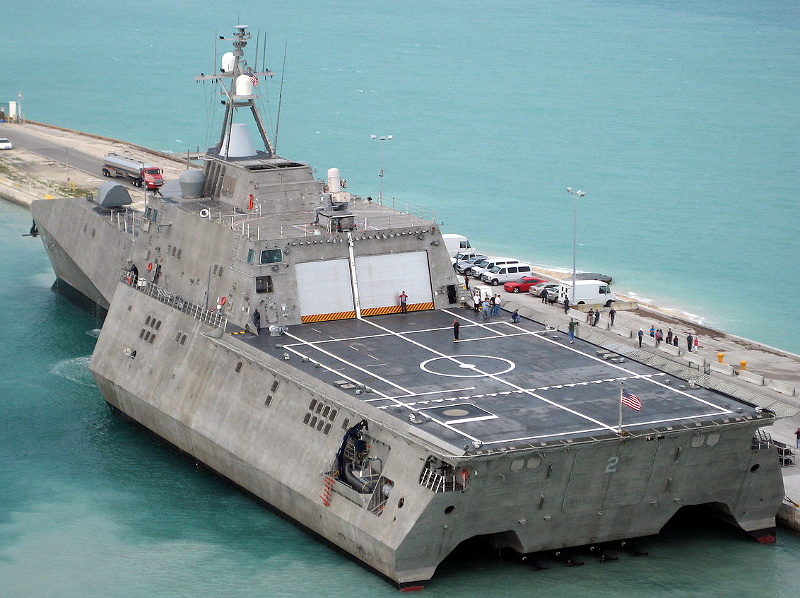
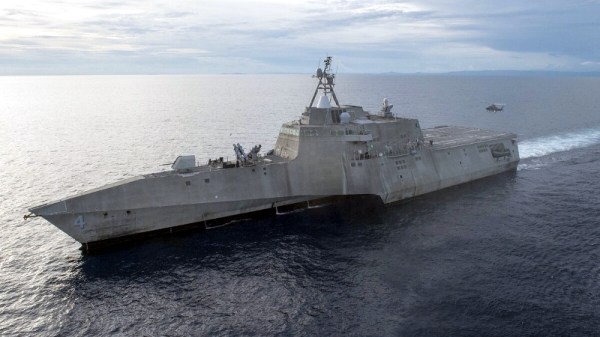
It was this line of thinking that lead the US Navy to embark on the Littoral Combat Ship (LCS) program in the early 2000s. These ships would be more nimble than older warships, able to quickly dash through shallow coastal waters where adversaries couldn’t follow. Their primary armament would consist of guided missiles, with fast firing small-caliber guns being relegated to defensive duty. But most importantly, the core goal of the LCS program was to produce a modular warship.

Rather than being built for a single task, the LCS would be able to perform multiple roles thanks to so-called “mission modules” which could be quickly swapped out as needed. Instead of having to return to home port for a lengthy refit, an LCS could be reconfigured for various tasks at a commercial port closer to the combat area in a matter of hours.

A fleet of ships that could be switched between combat roles based on demand promised to make for a more dynamic Navy. If the changing geopolitical climate meant they needed more electronic reconnaissance vessels and fewer minesweepers, the Navy wouldn’t have to wait the better part of a decade to reshuffle their assets; the changeover could happen in a matter of weeks.

Unfortunately, the Littoral Combat Ships have been plagued with technical problems. Citing the expensive refits that would be required to keep them operational, the Navy is now looking at retiring the first four ships in the fleet, the newest of which is just six years old.

Continue reading “US Navy Looking To Retire Futuristic Prototype Ships”

Camera And Code Team Up To Make Impossible Hovering Laser Effect

Right off the bat, we’ll say that this video showing a laser beam stopping in mid-air is nothing but a camera trick. But it’s the trick that’s the hack, and you’ve got to admit that it looks really cool.

It starts with the [Tom Scott] video, the first one after the break. [Tom] is great at presenting fascinating topics in a polished and engaging way, and he certainly does that here. In a darkened room, a begoggled [Tom] poses with what appears to be a slow-moving beam of light, similar to a million sci-fi movies where laser weapons always seem to disregard the laws of physics. He even manages to pull a [Kylo Ren] on the slo-mo photons with a “Force Stop” as well as a slightly awkward Matrix-style bullet-time shot.  It’s entertaining stuff, and the effect is all courtesy of the rolling shutter effect. The laser beam is rapidly modulated in sync with the camera’s shutter, and with the camera turned 90 degrees, the effect is to slow down or even stop the beam.

The tricky part of the hack is the laser stuff, which is the handiwork of [Seb Lee-Delisle]. The second video below goes into detail on his end of the effect. We’ve seen [Seb]’s work before, with a giant laser Asteroids game and a trick NES laser blaster that rivals this effect.

Continue reading “Camera And Code Team Up To Make Impossible Hovering Laser Effect”

Clean Air And A Gentle Breeze In Your Hoodie

Hoodies are great, and rightfully a hacker’s favorite attire: they shield you from the people around you, keep your focus on the screen in front of you, and are a decent enough backup solution when you forgot your balaclava. More than that, they are also comfortable, unless of course it is summer time. But don’t worry, [elkroketto] has built a solution to provide the regular hoodie wearer with a constant breeze around his face, although his Clean Air Bubble is primarily tackling an even bigger problem: air pollution.

Wanting to block out any environmental factors from the air he breathes, [elkroketto] got himself a thrift store hoodie to cut holes in the back, and attach two radial fans that suck in the air through air filtering cloths. A 3D printed air channel is then connected to each fan, and attached on the inside of the hood, blowing the filtered air straight into his face. Salvaging a broken drill’s battery pack as power supply and adding a 3D printed clip-in case for the step-up converter, the fans should provide him a good 5 hours of fresh air. Of course, one could also add a solar charging rig if that’s not enough.

Keep in mind though, while a wearable air filter might sound particularly useful in current times, [elkroketto] specifically points out that this is not for medical use and won’t filter out any airborne diseases.

CherryPi Mechanical Keyboard Warrants A Long Look

[Gosse Adema] has been poking a Microsoft Natural Elite for the last 20 years, and the curvy old girl is about to give out. Looks like he got bit pretty hard by the DIY mechanical keyboard bug in his quest to replace her. Luckily for us, he documented his build.

Where do we start? A first keeb is decently-sized undertaking, but [Gosse] turned it up a notch and made it as low-profile as he could — it’s 2cm thick with the keycaps on. This ultimately meant designing the board such that the anti-ghosting diodes sit inside a cutout underneath their respective switches, which are low-profile Cherry MX Reds. There is no Eagle template for those yet, so [Gosse] whipped one up and milled a prototype PCB before deciding to go the fab route.

The Raspberry Pi Zero W that controls this keeb lives in a separate controller box in the name of slimness. If you are as-yet unimpressed by this build for some reason, [Gosse] even rolled his own firmware, which he explains as part of this epic journey. Seems the only thing he didn’t do was mold his own keycaps, but not everyone wants to type on blanks. We wonder if [Gosse] is aware of the terrifically low-slung Kailh choc switches, although prefab keycap options for those are even more limited.

Speaking of, here’s a tasty choc-filled game pad.

Procedurally Generating Marble Runs

Marble runs are somehow incredibly soothing to play with and watch, with the gentle clack of the marbles and the smooth, predictable motion. Sadly for some, they never quite got enough time to enjoy them in school. Luckily, [Fernando Jerez] is here with a way to procedurally generate marble runs you can actually play with!

[Fernando] does a great job of explaining the mathematical process of generating the marble runs, using the method of random space filling curves. A maze is drawn on a grid, with points on the grid acting as walls. Each grid cell is then given a value based on points on its corners, and these values then translate into directions of travel. This creates a path through the maze. Scaling this path along the Z-axis, and then replacing the path with a marble track creates the run. It’s then a simple matter of adding a shaft to the loop with a screw to drive marbles back to the top of the run, and you’re all set!

With both animated explanations and actual 3D printed marble runs, [Fernando] demonstrates the concept well. We’d love to print a few runs of our own, and we can’t help but think there’s other great applications for the mathematics behind this concept. If you’re wise to it, drop it in the comments. Otherwise, check out these exquisite creations we’ve featured before!

Lighting Up A Tiny Train Needs Tiny Tools

A tiny toy train that [voidnill] illuminated with a small LED strip fragment demonstrates several challenges that come with both modifying existing products, and working with small things in general. One is that it is hard in general to work around existing design choices and materials when modifying something. The second is that problems are magnified with everything is so small.

[voidnill]’s plentiful photos illustrate everything from drilling out small rivets and tapping the holes for screws to installing a tiny switch, LED strip, and button cells as a power supply. When things are so small, some of the usual solutions don’t apply. For example, cyanoacrylate glue may seem like a good idea for mounting small plastic parts, but CA glue easily wicks into components like the tiny power switch and gums up the insides, rendering it useless.

[voidnill] uses lots of careful cutting and patience to get everything done, and demonstrates the importance of quality tools. The LED strip fragment is driven by three small button cells, and while tape does a serviceable job as a battery holder, [voidnill] believes a 3D printed custom frame for the cells would really do the trick.

The kind of work that goes into making or modifying small things really puts into perspective the amount of effort behind projects like this coffee table with an N-gauge model railway inside it.

Visualizing Energy Fields With A Neon Bulb Array

Everyone knows that one of the coolest things to do with a Tesla coil is to light up neon or fluorescent tubes at a distance. It’s an easy and very visual way to conceptualize how much energy is being pumped out, making it a favorite trick at science museums all over the world. But what would it look like if you took that same concept and increased the resolution? Replace that single large tube with an array of smaller ones. That’s exactly what [Jay Bowles] did in his latest video, and the results are impressive to say the least.

From a hardware standpoint, it doesn’t get much simpler. [Jay] knew from experience that if you bring a small neon indicator close to a Tesla coil, it will start to glow when approximately 80 volts is going through it. The higher the voltage, the brighter the glow. So he took 100 of these little neon bulbs and arranged them in a 10×10 grid on a piece of perfboard. There’s nothing fancy around the backside either, just all the legs wired up in parallel.

When [Jay] brings the device close to his various high-voltage toys, the neon bulbs still glow like they did before. But the trick is, they don’t all glow at the same brightness or time. As the panel is moved around, the user can actually see the shape and relative strength of the field by looking at the “picture” created by the neon bulbs.

The device isn’t just a cool visual either, it has legitimate applications. In the video, [Jay] explains how it allowed him to observe an anomalous energy field that collapsed when he touched the base of his recently completed Tesla coil; an indication that there was a grounding issue. He’s also observed some dead spots while using what he’s come to call his “High-Voltage Lite-Bright” and is interested in hearing possible explanations for what he’s seeing.

We’ve been fans of [Jay] and the impressively produced videos he makes about his high-voltage projects for years now, and we’re always excited when he’s got something new. Most hardware hackers start getting sweaty palms once the meter starts indicating more than about 24 VDC, so we’ve got a lot of respect for anyone who can build this kind of hardware and effectively communicate how it works to others.

Continue reading “Visualizing Energy Fields With A Neon Bulb Array”