A Lightweight Balloon Tracker For High Altitude Missions

It’s pretty easy to take a balloon, fill it up with helium, and send it up in to the upper atmosphere. It’s much harder to keep track of it and recover it when it falls back to Earth. If you’re trying to do that, you might find some value in the Tiny4FSK project from the New England Weather Balloon Society.

Tiny4FSK is intended to be a very small solution for high-altitude tracking. As you might have guessed from the name, it communicates via 4FSK—four frequency shift keying. Basically, it communicates data via four separate tones. Based around the SAMD21G18A microcontroller, it’s designed to run on a single AA battery, which should last for anywhere from 10-17 hours. It communicates via a Si4063 transmitter set up to communicate on 433.2 MHz, using the Horus Binary v2 system. As for data, it’s hooked up with a GPS module and a BME280 environmental sensor for location. The balloon can figure out where it is, and tell you the temperature, pressure, and humidity up there, too.

If you’re looking for a lightweight balloon tracker, this one might be very much up your alley. We’ve featured other projects in this vein, too. Meanwhile, if you’re developing something new in the high-altitude ballooning space, you could keep it to yourself. Or, alternatively, you could tell us via the tipsline and we’ll tell everybody else. Your call!

Gyro Controlled RGB Blinky Ball Will Light Up Your Life

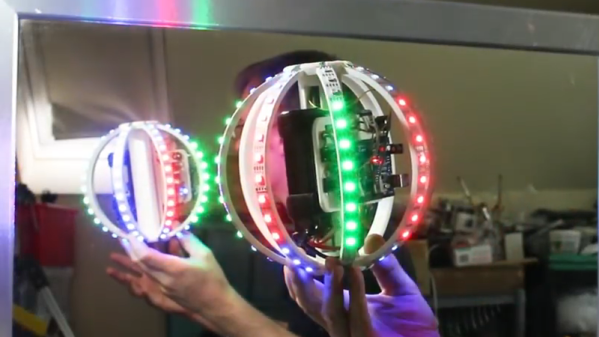
[James Bruton], from the XRobots YouTube channel is known for his multipart robot and cosplay builds. Occasionally, though, he creates a one-off build. Recently, he created a video showing how to build a LED ball that changes color depending on its movement.

The project is built around a series of 3D printed “arms” around a hollow core, each loaded with a strip of APA102 RGB LEDs. An Arduino Mega reads orientation data from an MPU6050 and changes the color of the LEDs based on that input. Two buttons attached to the Mega modify the way that the LEDs change color. The Mega, MPU6050, battery and power circuitry are mounted in the middle of the ball. The DotStar strips are stuck to the outside of the curved arms and the wiring goes from one end of the DotStar strip, up through the middle column of the ball to the top of the next arm. This means more complicated wiring but allows for easier programming of the LEDs.

Unlike [James’] other projects, this one is a quickie, but it works as a great introduction to programming DotStar LEDs with an Arduino, as well as using an accelerometer and gyro chip. The code and the CAD is up on Github if you want to create your own. [James] has had a few of his projects on the site before; check out his Open Dog project, but there’s also another blinky ball project as well.

Continue reading “Gyro Controlled RGB Blinky Ball Will Light Up Your Life”

Oddball Mercury Vapor Rectifier Is A Tube Geek’s Delight

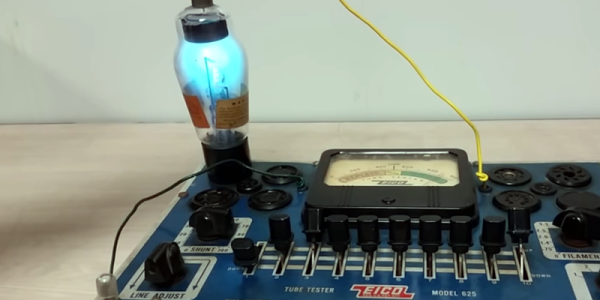
Even if you aren’t a tube aficionado, you can’t help but be mesmerized by the blue glow inside a mercury vapor rectifier when it operates. It looks less like early 20th century tech and more like something that belongs on a Star Trek set. [Uniservo] acquired an 866 rectifier that was interesting due to the markings, which he explains in detail in the video below. Most people though will probably want to skip to closer to its end to see that distinctive blue glow. The exact hue depends on the mercury vapor pressure and usually contains a fair amount of ultraviolet light.

These tubes have an interesting history dating back to 1901, the year [Peter Cooper Hewitt] developed a mercury vapor light which was much more efficient than conventional bulbs. They had two main problems, they required some special process to get the mercury inside to vaporize when you turned them on, but worse still, the light was blue-green which isn’t really appropriate for home and office lighting. In 1902 though, [Hewitt] realized the tube would act as a rectifier. Electrons could readily flow out of the mercury vapor that was the cathode, while the carbon anodes didn’t give up electrons as readily. This was important because up until then, there wasn’t an easy way to convert AC to DC. The usual method was to use an AC motor coupled to a DC generator or a similar mechanical arrangement known as a rotary converter.

In later decades the mercury vapor lamp would wind up with a phosphor coating that converted the ultraviolet light to cool white light and became the fluorescent bulb, so while the rectifier mostly gave way to more efficient methods, [Hewitt’s] bulb has been in use for many years.

Continue reading “Oddball Mercury Vapor Rectifier Is A Tube Geek’s Delight”

IcosaLEDron: A 20-Sided Light Up Ball

Tired of balls that are just balls, and not glowing geometric constructions of electronics and wonderment? Get yourself an IcosaLEDron, the latest in Platonic solids loaded up with RGB LEDs.

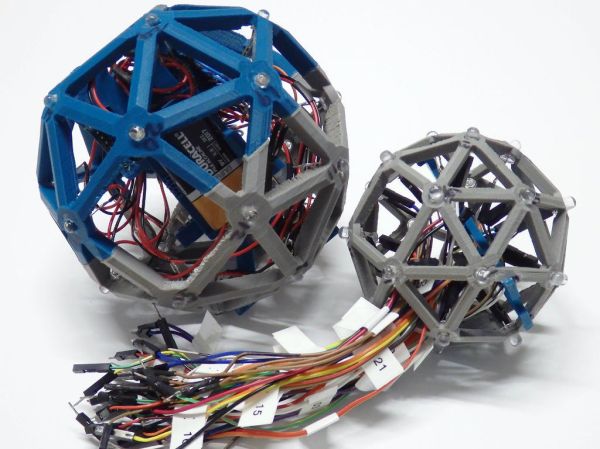
The folks at Afrit Labs wanted a fun, glowy device that would show off the capabilities of IMUs and MEMS accelerometers. They came up with a ball with a circuit board inside and twenty WS2812B RGB LEDs studded around its circumference

The frame of the ball is simply a set of twenty tessellated triangles that can be folded up during assembly. The outer shell of the ball is again printed in one piece, but fabricated out of transparent NinjaFlex, an extraordinarily odd, squishy, and likely indestructible material.

Inside the IcosaLEDron is a PCB loaded up with an ATMega328p, an accelerometer, a LiPo battery charger, and quite a bit of wiring. Once the ball is assembled and locked down, the squishy outer exterior is installed and turned into a throwable plaything.

If 20 sides and 20 LEDs aren’t enough, how about a an astonishing 386-LED ball that’s animated and knows its orientation? That’s a project from Null Space Labs, and looking at it in person is hypnotic.

via Makezine

Play-by-play Of A High Altitude Balloon Flight

[Greg Intermaggio] and [Shumit DasGupta] at Techsplosion launched a high altitude balloon last week that climbed to 90,000 feet above sea level somewhere over California. The play-by-play of the flight is one of the better stories we’ve seen on high altitude balloon builds.

The balloon, christened VGER-1, carried a SPOT satellite GPS messanger to send telemetry back to the ground. We’ve seen a few home brew balloon tracking devices, but [Greg] decided to use an off-the-shelf solution for the sake of simplicity. Like other balloons the VGER-1 carried a CanonPowershot camera with CHDK firmware.

Continue reading “Play-by-play Of A High Altitude Balloon Flight”

Defcon 16: Covert Warballooning Flight


Since last month, when the Defcon warballooning event was announced, [Rick Hill] finished building his rig and even got FAA approval for the flight. Just when everything seemed set, the Riviera Hotel management decided not to allow the takeoff from their property. So, naturally, [Rick] and his team rented a moving truck and covertly inflated the balloon inside. They launched it in an abandoned parking lot and drove through the Vegas strip. They were surprised to find that about one third of the 370 wireless networks they scanned were unencrypted.

[photo: JoergHL]

[via /.]

The one-tube radio setup, in front of a PC monitor

Single Tube SDR Is A Delightful Mix Of Old And New

Software Defined Radio (SDR) is the big thing these days, and why not? A single computer can get rid of a room full of boat anchors, and give you better signal discrimination than all but the best kit. Any SDR project needs an RF receiver, and in this project [mircemk] used a single 6J1 vaccum tube to produce an SSB SDR that combines the best of old and new. 

Single-tube radios are a classic hack, and where a lot of hams got started back in the day, but there is a reason more complicated circuits tend to be used. On the other hand, if you can throw a PC worth of signal processing at the output, it looks like you can get a very sensitive and selective single-sideband (SSB) receiver. 

The 6J1 tube is convenient, since it can run on only 6 V (or down to 3.7 as [mircemk] demonstrates). Here it is used as a mixer, with the oscillator signal injected via the screen grid. Aside from that, the simple circuit consists of a receiving coil, a few resistors and a variable capacitor. How well does it work? Quite well, when paired with a PC; you can judge for yourself in the video embedded below.

We’ve featured a lot of [mircemk]’s projects over the years, like this handsome OLED VU meter, or this frequency analyzer with a VFD  and even a virtual pinball cabinet made from scraps, among many others.

Continue reading “Single Tube SDR Is A Delightful Mix Of Old And New”