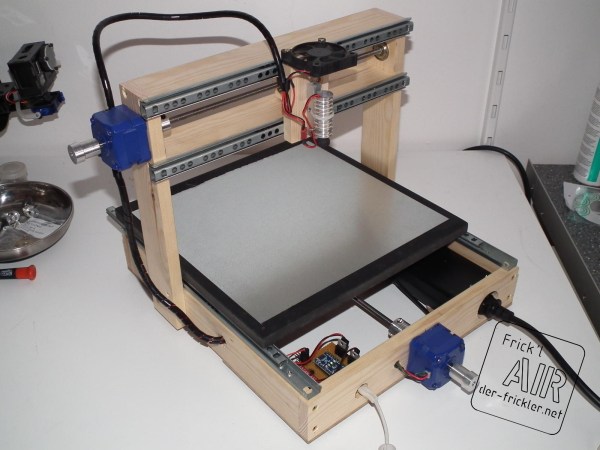
This is the second CNC machine he’s seen through from start to finish. It improves upon the knowledge he acquired when building his CNC mill. The frame is built from pine but also uses bits of plywood and MDF. It can move on the X and Y axes, using drawer sliders as bearings. The pair of blue stepper motors drive the threaded rods which move the platform and the laser mount. Just above the laser he included a small DC fan to keep it from burning up. The control circuitry is made up of an Arduino Nano and a stepper motor driver board. Catch a glimpse of the engraver cutting out some stencil material after the break.
There must be something about Spring that brings out the urge to work with laser diodes. We just saw a similar 1W cutter last week.
For the last ten to fifteen years, optical drives have been fading out of existence. There’s little reason to have them around anymore unless you are serious about archiving data or unconvinced that streaming platforms will always be around. While there are some niche uses for them still, we’re seeing more and more get repurposed for parts and other projects like this tabletop laser engraver.
The build starts with a couple optical drives, both of which are dismantled. One of the shells is saved to use as a base for the engraver, and two support structures are made out of particle board and acrylic to hold the laser and the Y axis mechanism. Both axes are made from the carriages of the disassembled hard drives, with the X axis set into the base to move the work piece. A high-output laser module is fitted to the Y axis with a heat sink, and an Arduino and a pair of A4988 motor controllers are added to the mix to turn incoming G-code into two-dimensional movement.
We’ve all likely seen the amazing images possible with a scanning electron microscope. An SEM can yield remarkably detailed 3D images of the tiniest structures, and they can be invaluable tools for research. But blasting high-energy cathode rays onto metal-coated samples in the vacuum chamber of a bulky and expensive instrument isn’t the only way to make useful images, as this home-brew laser scanning microscope demonstrates.
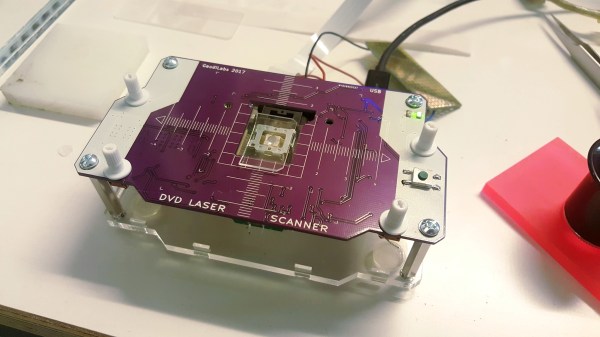
This one comes to us by way of [GaudiLabs], a Swiss outfit devoted to open-source lab equipment that enables citizen science; we saw their pocket-sized thermal cycler for PCR a while back. The basic scheme here is known as confocal laser scanning fluorescence microscopy, where a laser at one wavelength excites fluorescent tags bound to structures in a sample. Light emitted by the tags is collected, and a 3D image is built up from multiple scans of the sample at different focal planes.
Like many DIY projects, this microscope is built from old DVD parts, specifically the pickup heads. The precision optics in these commonly available assemblies, which are good enough to read pits as small as 150 nm on a Blu-Ray DVD, are well-suited for resolving similarly sized microstructures. One DVD pickup is used to scan the laser in the X-axis, while the other head is modified to carry the sample and move it in the Y-axis. The pickup head coils and laser are driven by an Arduino carried on a custom PCB along with the DVD heads. Complete build files are posted on GitHub for anyone interested in recreating this work.
We love tips like this that dig back a bit and find things we missed the first go-around. And the equipment [GaudiLabs] lists really has potential for the budding biohacker, which we also like.
If you’ve played around with laser diodes that you’ve scavenged from old equipment, you know that it can be a hit-or-miss proposition. (And if you haven’t, what are you waiting for?) Besides the real risk of killing the diode on extraction by either overheating it or zapping it with static electricity, there’s always the question of how much current to put into the thing.
[DeepSOIC] decided to answer the latter question — with science! — for a DVD-burner laser that he’s got. His apparatus is both low-tech and absolutely brilliant, and it looks like he’s getting good data. So let’s have a peek.
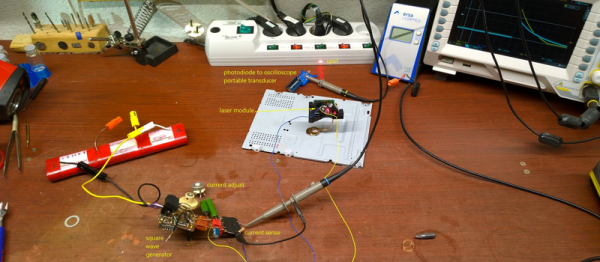
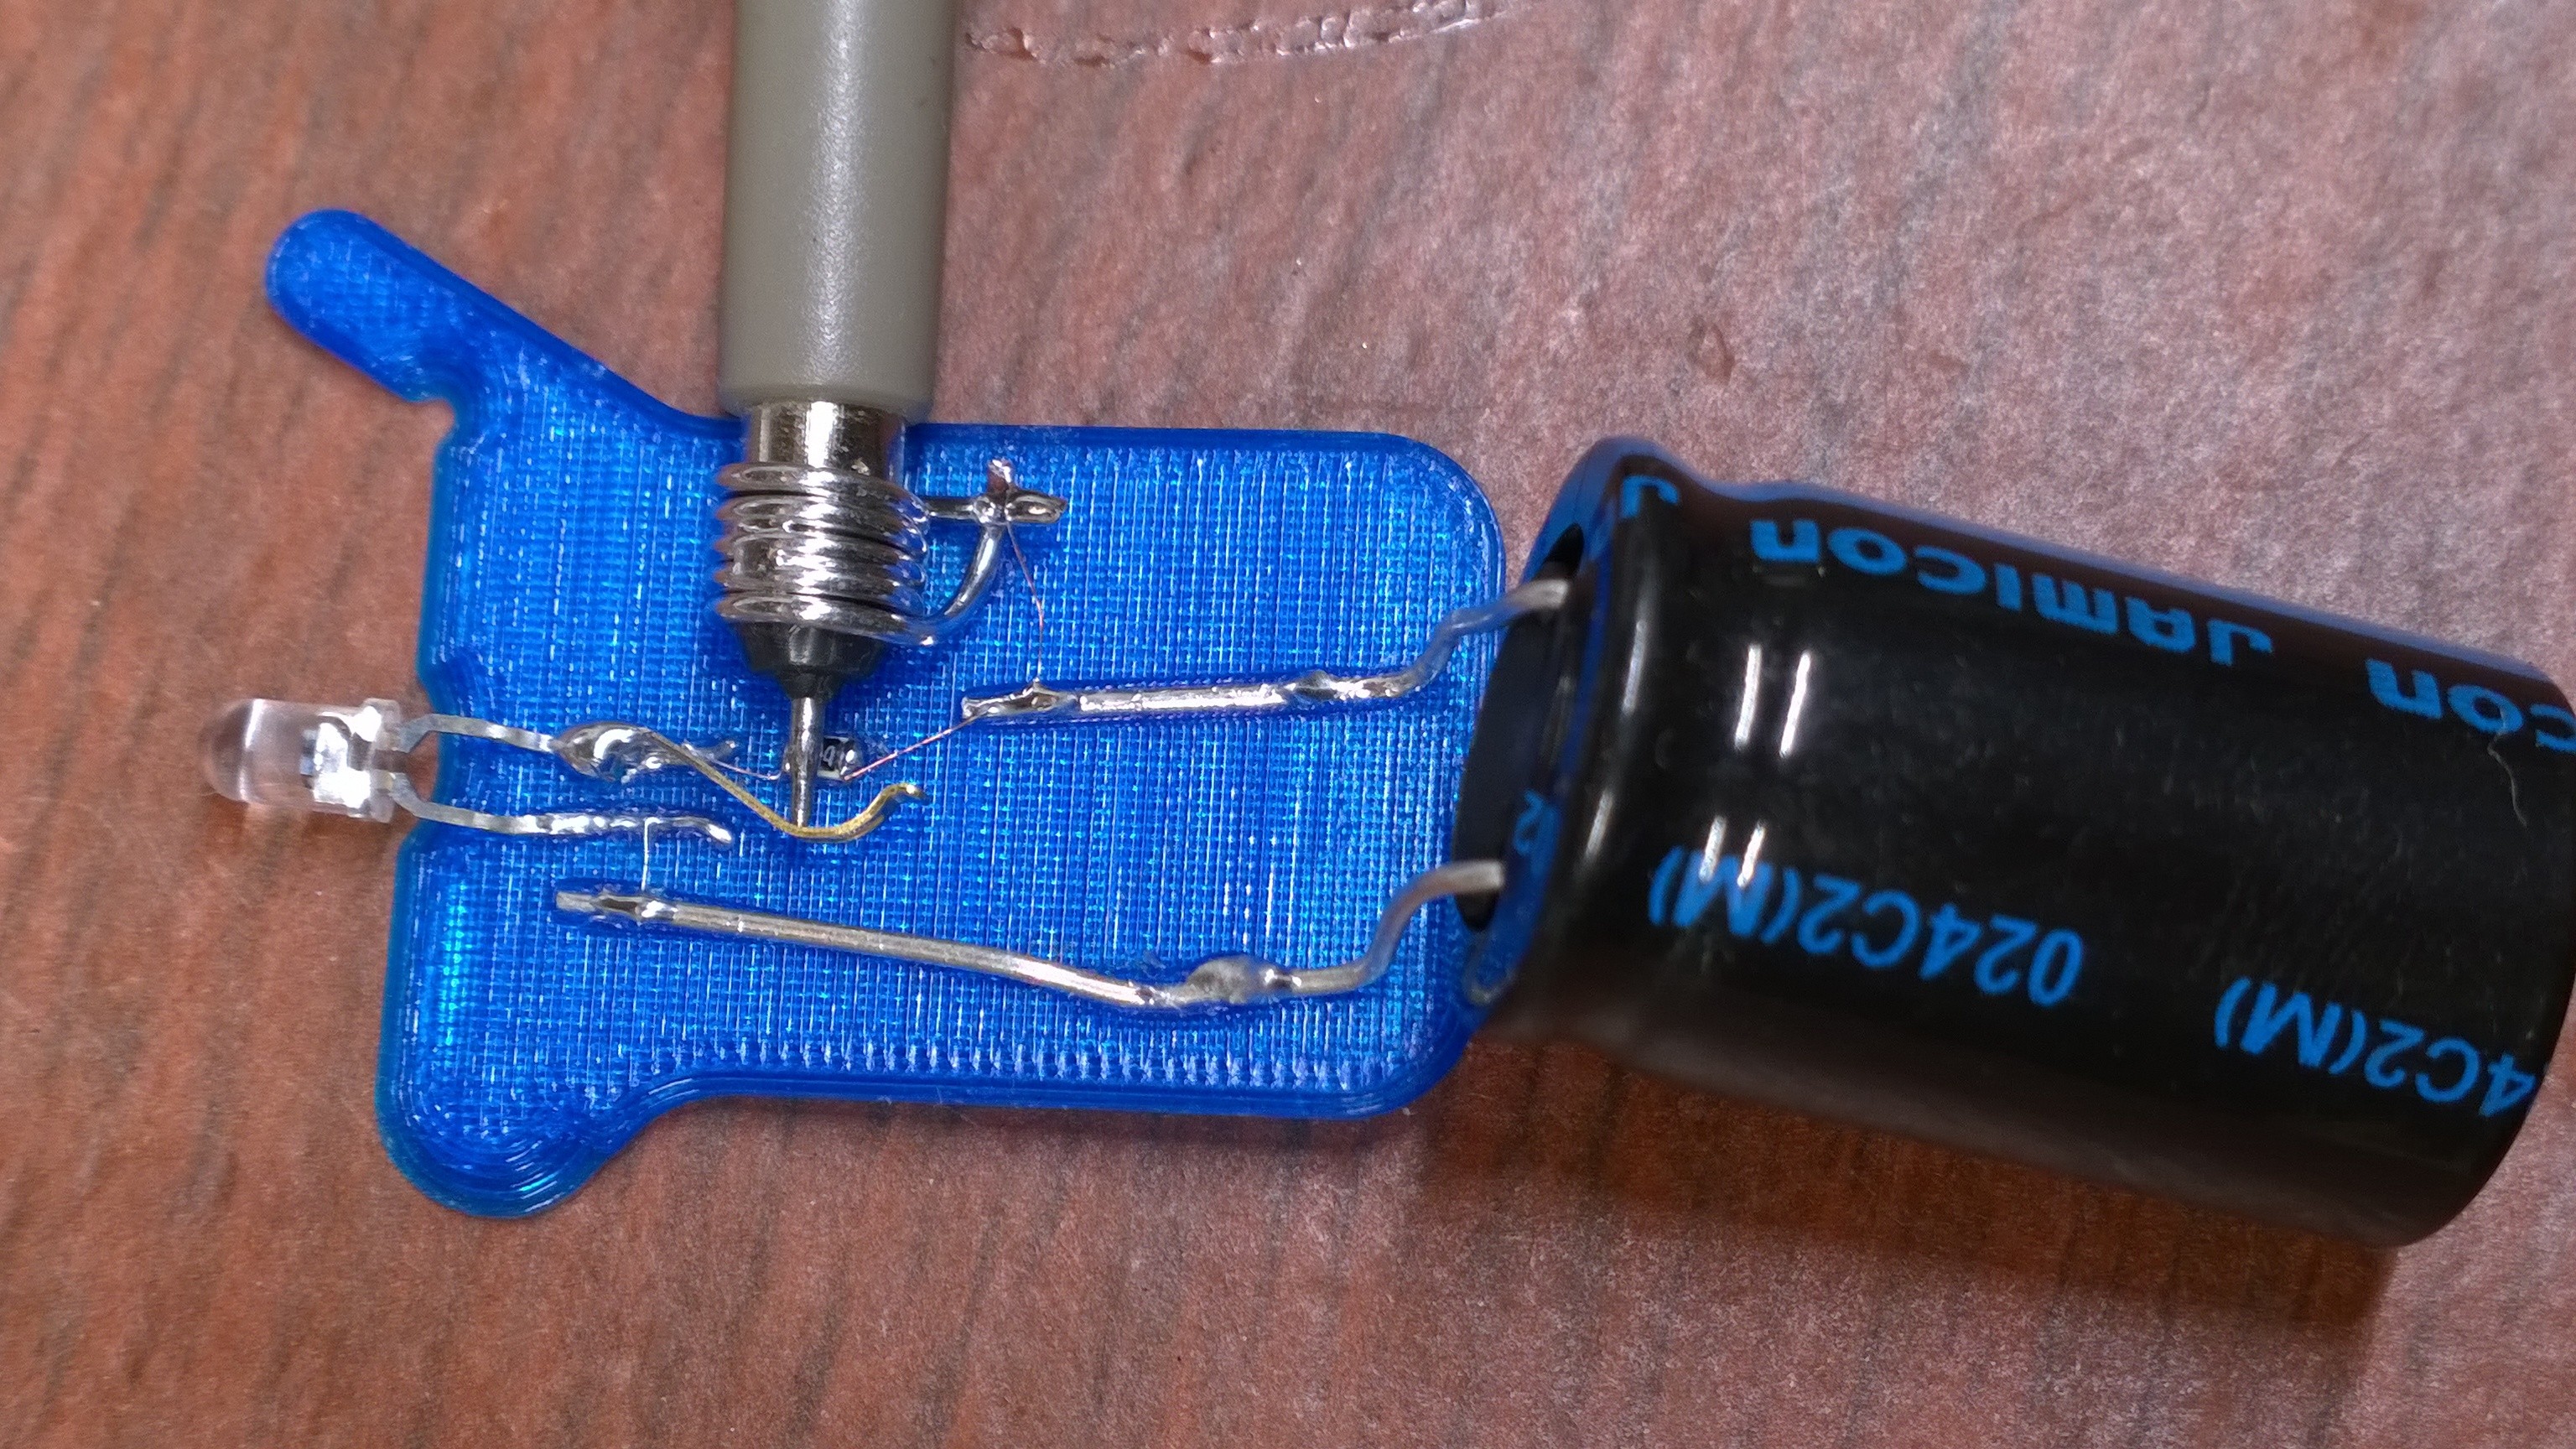
Laser Detector on 3D Printer Scrap
First up is the detector, which is nothing more than a photodiode, 100k ohm load resistor, and a big capacitor for a power supply. We’d use a coin-cell battery, but given how low the discharge currents are, the cap makes a great rechargeable alternative. The output of the photo diode goes straight into the scope probe.
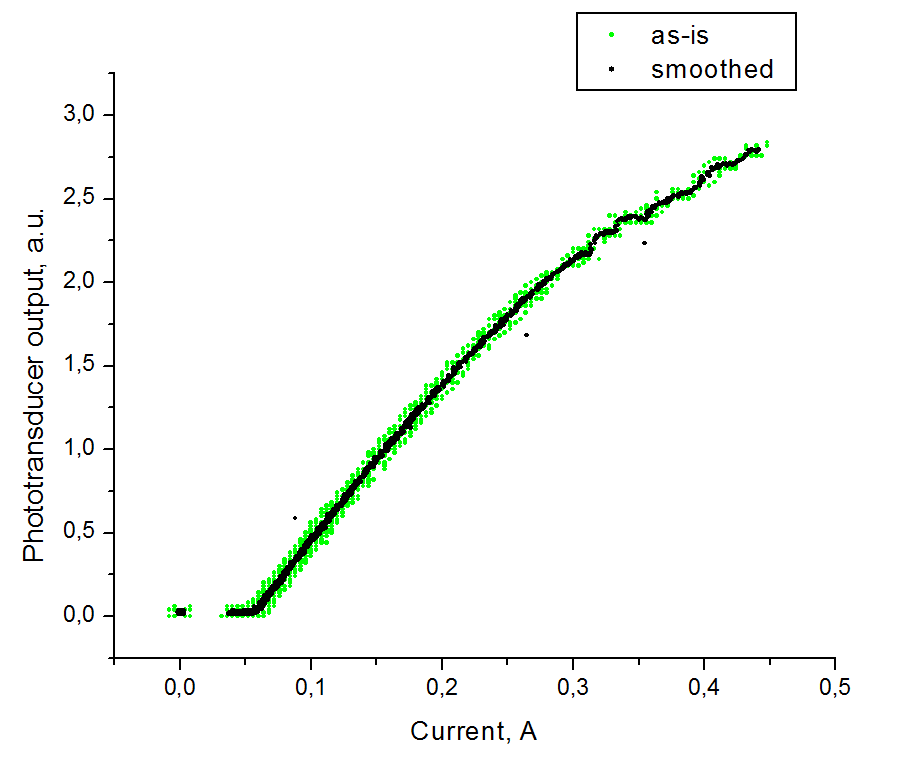
He then points the photodiode at the laser spot (on a keyboard?) and pulses the laser by charging up a capacitor and discharging it through the laser and a resistor to limit total current. The instantaneous current through the laser diode is also measured on the scope. Plotting both the current drawn and the measured brightness from the photodiode gives him an L/I curve — “lumens” versus current.
Look on the curve for where it stops being a straight line, slightly before the wiggles set in. That’s about the maximum continuous operating current. It’s good practice to de-rate that to 90% just to be on the safe side. Here it looks like the maximum current is 280 mA, so you probably shouldn’t run above 250 mA for a long time. If the diode’s body gets hot, heatsink it.
If you want to know everything about lasers in general, and diode lasers in particular, you can’t beat Sam’s Laser FAQ. We love [DeepSOIC]’s testing rig, though, and would love to see the schematic of his test driver. We’ve used “Sam’s Laser Diode Test Supply 1” for years, and we love it, but a pulsed laser tester would be a cool addition to the lab.
What to do with your junk DVD-ROM laser? Use the other leftover parts to make a CNC engraver? But we don’t need to tell you what to do with lasers. Just don’t look into the beam with your remaining good eye!
With the advent of streaming services, plenty of people are opting to forego the collection of physical media. In turn, there are now a lot of optical drives sitting unused in parts bins and old computers. If you’d like something useful to do with this now-obsolete technology, you can have a try at turning one into a laser microscope.
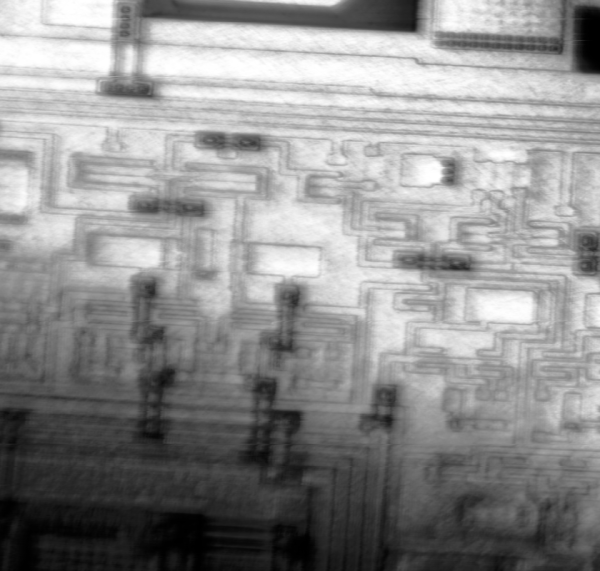
This build requires two DVD pickups. By scanning once horizontally and once vertically and measuring the returning light from the DVD laser, an image can be created. For this build, the second pickup is used to move the object itself. The entire device is controlled by an Analog Discovery 2, although this principle could be ported to other microcontroller platforms. Thanks to the extremely fine laser in a DVD and the precise movements of the motors found in the control machinery, the images obtained using this method have the potential to be more detailed than comparable visible light microscopes.
While this isn’t quite scanning electron microscope territory, it’s good enough to clearly image the internal workings of a de-capped integrated circuit. Something like this could be indispensable for reverse-engineering ICs or troubleshooting other comparably small electronics, with resolutions higher than can typically be obtained with visible light microscopes. We’ve even seen similar builds in the past which build microscopes like this as dedicated lab equipment.
For many years now a source for some of the smallest and cheapest home made CNC mechanisms has been the seemingly never-ending supply of surplus CD and DVD-ROM drives. The linear actuator that moves the laser may not be the longest or the strongest, but it’s free, and we’ve seen plenty of little X-Y tables using CD drives. It’s these mechanisms that [Nemo404] has taken a little further, freeing the lead screw and motor from the drive chassis and placing them in a 3D-printed enclosure for a complete linear actuator that can be used in other projects. (Video, embedded below.)
There seems to be no positional feedback, not even the limit switch that would grace a typical CD drive, but aside from that it makes for a compact unit. There are two versions, one for a linear bearing and the other for the brass bushes found in CD drives. It’s unclear how strong the result is, but it appears to be strong enough to demonstrate lifting a small container of screws.
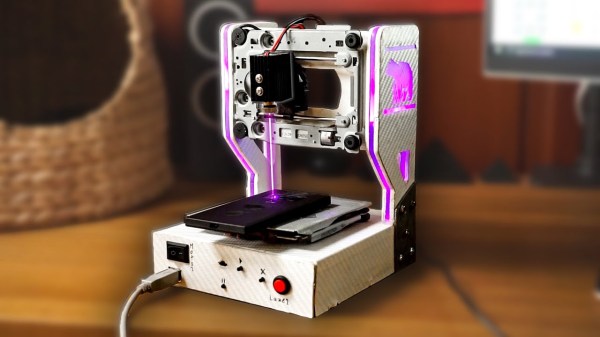
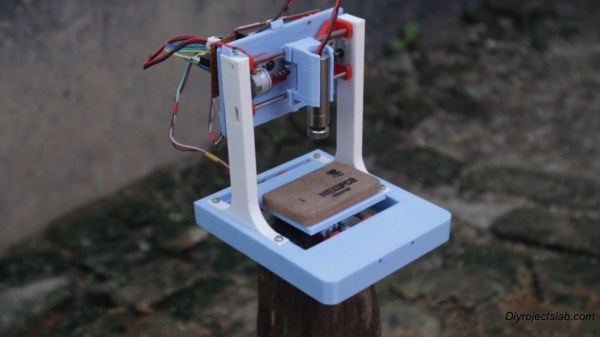
Got a couple of old DVD-RW drives lying around, just collecting dust? Of course you do. If not, you likely know where to find a pair so you can build this totally adorable and fully dangerous laser engraver for your desk. Check out the complete build video after the break.
[Smart Tronix] doesn’t just tell you to salvage the stepper motors out of the drives — they show you how it’s done and even take the time to explain in writing what stepper motors are and why you would want to use them in this project, which is a remix of [maggie_shah]’s design over on Thingiverse. As you might expect, the two steppers are wired up to an Arduino Uno through a CNC shield with a pair of A4988 motor drivers. These form the two axes of movement — the 250mW laser is attached to x, and the platform moves back and forth on the y axis. We’d love to have one of these to mess around with. Nothing that fits on that platform would be safe! Just don’t forget the proper laser blocking safety glasses!