OpenGL Shaders And An LED Cube

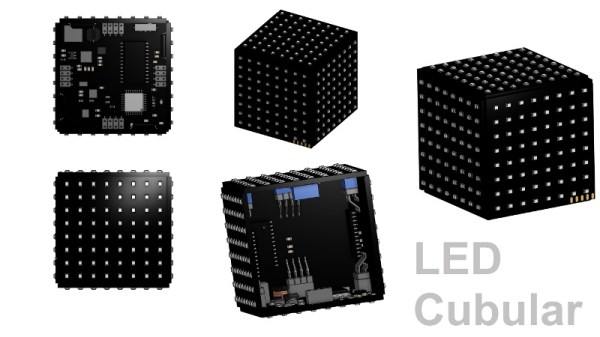
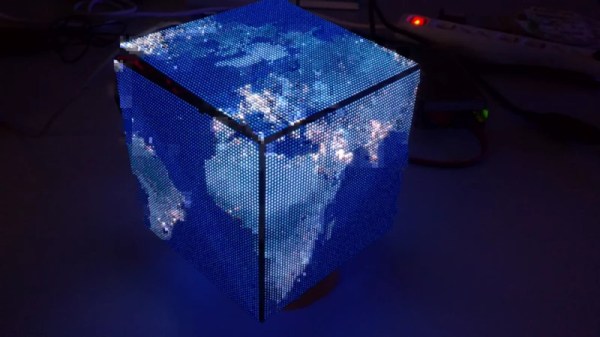
Back in February at the Hacker Hotel camp in the Netherlands, among the many pieces of work around the venue was a rather attractive LED cube. Very pretty, but LED cubes have been done many times before.

If a casual attendee had taken the time to ask though, they might have found something a little more interesting, for while the cube in question might have had the same hardware as the others it certainy didn’t have the same software. [Polyfloyd] had equipped his LED cube with OpenGL shaders to map arbitrary images to the cube’s pixels in 3D space.

Hardware-wise it’s the same collection of AliExpress LED panels and Raspberry Pi driver board that the other cubes use, in this case mounted on a custom laser-cut frame. Driver software comes from an open-source library round which he’s put a wrapper allowing input through a UNIX pipe. This can take the RGB output of an OpenGL shader, of which he has created both 2D to 3D and spherical projection versions. The must-see demo is a global map of light pollution, and the result is a rather impressive piece of work.

If LED cubes are your thing, don’t forget this recent Hackaday Prize entry.

ESP32 Adds Bluetooth To GameCube Controllers

While it might not be the most traditional design, there’s no debating that Nintendo created something truly special when they unleashed the GameCube controller on an unsuspecting world back in 2001. Hardcore fans are still using the controller to this day with current-generation Nintendo consoles, and there’s considerable interest in adding modern conveniences like USB support to the nearly 20-year-old design.

One particularly promising project is the BlueCubeMod created by [Nathan Reeves]. He’s developed a small custom PCB that can be installed into an official GameCube controller to turn it into a Bluetooth device. You do have to sacrifice the original cord and force feedback for this mod, but we think many will see the ability to use this iconic controller with their computer or phone as a pretty fair trade.

The PCB holds an ESP32-PICO-D4 which is operating as a standard Bluetooth HID controller for maximum compatibility with modern systems. Control signals are pulled directly from the controller’s original PCB with just two wires, making the installation very simple. Wondering where the power comes from? As the rumble motor isn’t supported anyway, that gets tossed and in its places goes a 700 mAh battery which powers the controller for up to six hours. Overall it’s a very clean modification that [Nathan] believes even beginners will be capable of, and he ultimately plans to turn this design into a commercial kit.

Currently you still need a receiver if you want to use the BlueCubeMod with the Nintendo Switch, but [Nathan] says he’s working on a way to get around that requirement by potentially switching out the ESP32 for a STM32 with a CC256x radio. He says this will give him more direct control over the Bluetooth communications, which should allow him to take into tackle the intricacies of talking to the Switch directly.

Of course, the GameCube did have an official wireless controller back in the day. We’ve seen modifications to get the WaveBird to get it talking to modern systems as well, but there’s something to be said for slimmer form factor of the original edition.

Continue reading “ESP32 Adds Bluetooth To GameCube Controllers”

Resistance Is Futile, You Want This LED Cube

We’re suckers for a good desk toy here at Hackaday, so this 2019 Hackaday Prize entry from [Jack Flynn] certainly caught our eye. The idea is that by using professionally manufactured dual layer PCBs and only surface mount components, you can create a cube that has an LED matrix on each face and all of the electronics hidden within. We’re not entirely sure if there’s any practical application for such a device, but we know we’d certainly like to have one blinking madly away on our shelf regardless.

Before having any of the PCBs manufactured, [Jack] is putting a considerable amount of thought into the design so he doesn’t end up painting himself info a corner (which is of course eight times as bad when you’re building a cube). By importing the PCB files into OnShape, he’s able to “assemble” a virtual representation of the final product to better understand how everything will fit together. He wants to limit the amount of times the cube will need to be pulled apart, so everything from how it will sit in its 3D printed cradle to the placement of breakaway tabs that ensure the internal power switch is accessible are being carefully planned out.

The current design puts the “brains” on the bottom board, with every other panel holding a daisy-chained MAX7219 to drive its own individual 64 LED matrix. Initially the dimensions of the ATmega328p powered cube will be 42 x 42 x 42 mm, with a total of 384 LEDs. Ultimately, [Jack] hopes the modular nature of the design could allow the size of the cube to be increased, or perhaps even take on a different shape entirely.

Generally the LED cubes we see are of the more wiry variety, so it’s particularly interesting when they take on solid forms like this one. Given the nearly universal popularity of blinking LED gadgets, we think this particular project is well positioned to make the leap from one-off hack to a commercial product.

Continue reading “Resistance Is Futile, You Want This LED Cube”

The Smallest GameCube Is Actually A Wii

Casemodding, or stuffing video game consoles into shapes they were never meant to be in, is the preserve of a special breed. Our favorites are when old consoles are stuffed into different versions of the same console. Remember that gigantic O.G. Brick Game Boy carrying case? Yes, you can turn that into a jumbo-scale Game Boy, and it’s sweet. Continuining this trend of consoles of a different size, [Madmorda] has stuffed a GameCube into a sugar cube. It’s small. It’s really small, and it’s some of the best casemodding we’ve seen.

First off, the enclosure. This is an officially licensed micro GameCube case that originally housed gummy candies crafted by gummy artisans who work exclusively in the medium of gummy. This case, incidentally, is the perfect scale to match [Madmorda]’s earlier work, a miniaturized GameCube controller. This controller was originally a keychain, but with a bit of fine soldering skills it can indeed become a functional GameCube controller.

With the candy container GameCube gutted, the only task remaining was to put a GameCube inside. This is a lot easier if you tear down a Wii, and after desoldering, resoldering, and generally cutting up the circuit board of a Wii, [Madmorda] had something very small.

The finished console is a complete GameCube, compatible with all games, and no emulation. There are four controller ports, two USB ports for memory card slots, and output is composite through a 3.5mm jack. It’s a great piece of work and looks exactly like a miniaturized GameCube.

The Magnetic Rubik’s Cube

Ernő Rubik has much to answer for when it comes to the legacy of his namesake cube. It has both enthralled and tormented generations, allowing some to grandstand in the playground while others are forced to admit defeat in the face of a seemingly intractable puzzle. It just so happens that [Tom Parker] has been working on a Rubik’s cube with a novel magnetic design.

Yes, that’s right – [Tom]’s cube eschews the traditional rotating and sliding mechanism of the original cube, instead replacing it all with magnets. Each segment of the cube, along with the hidden center piece, is 3D printed. Through using a fused deposition printer, and pausing the print at certain layers, it’s possible to embed the magnets inside the part during the printing process.

[Tom] provides several different versions of the parts, to suit printers of different capabilities. The final cube allows both regular Rubik’s cube movements, but also allows for the player to cheat and reassemble it without having to throw it forcefully against the wall first like the original toy.

It’s an interesting build, and a great one to get to grips with the techniques involved in embedding parts in 3D prints. It may not be capable of solving itself, but we’ve seen another build that can pull off that impressive feat. Video after the break.

Continue reading “The Magnetic Rubik’s Cube”

Voja Antonic: Designing The Cube

Voja Antonic designed this fantastic retrocomputing badge for Hackaday Belgrade in 2018, and it was so much fun that we wanted to bring it stateside to the Supercon essentially unaltered. And that meant that Voja had some free time to devote to a new hardware giveaway: the Cube. So while his talk at Supercon in November was ostensibly about the badge, he just couldn’t help but tell us about his newer love, and some of the extremely clever features hidden within.

It’s funny how the hardware we design can sometimes reflect so much on the creator. Voja designed then-Yugoslavia’s first widely used home computer (and published the DIY plans in a magazine!). Thousands were built from their kits. The Galaksija was a Z80-based design with a custom BASIC that was just barely squeezed into the available 4K of ROM. So you shouldn’t be shocked that the retro-badge has a working keyboard and a nice BASIC on board.

But let’s jump ahead to the Cube, because that’s even more of a passion project. On the outside, they’re very simple devices, with only a USB port and a sweet diffused LED ring visible. Aesthetic? Minimalistic? Beautiful, honestly.
Continue reading “Voja Antonic: Designing The Cube”

How One Company Cracked The GameCube Disc Protection

The Nintendo GameCube was the first console from Big N with disc-based media. Gone were the cartridges that were absurdly expensive to manufacture. In theory games could be cheaper (yeah, right), and would hold more textures, pictures, and video. Around the time the GameCube hit shelves, your basic home computer started getting DVD burners, and you could walk into Circuit City and buy those tiny little DVD-Rs. But you couldn’t do it. You couldn’t burn GameCube games, at least without advanced soldering skills.

One company did. Datel, a British company that produced the Action Replay, the ‘Game Genie of the GameCube’ figured out how to get around the GameCube’s disc protection. Not only that, but in a decade and a half since the Action Replay came to market, no one has managed to copy their methods. In a fascinating video, [Nathan] takes us around the disc to see how this disc protection scheme actually worked, and how to exploit it to load homebrew games from an SD card.

The Nintendo GameCube disc format is almost, but not quite, the same as a DVD format. On (nearly) every DVD, and almost every GameCube disc, there’s a ‘barcode’ of sorts on the inside of the optical tracks. This burst cutting area (BCA) is unique to every copy that comes off a single master. Additionally, this BCA can only be cut with a YAG laser that’s significantly more powerful than the laser diode in a DVD writer.

But the Action Replay disc from Datel didn’t have this BCA. Why not? The BCA effectively writes over the pits and lands in the first blocks of data in a DVD. Since the BCA is written over data that is already there, you can just encode whatever data the BCA should hold into the raw data of the pits and lands. It’s a brilliant technique that allows consumer equipment to create the Action Replay disc. But surprisingly, this technique wasn’t popularized with the GameCube homebrew scene.

Not that it really mattered, anyway; modchips existed, and with the SD to Memory Card adapter you could run homebrew works without having to burn a disc. That’s exactly what [Nathan] did with his GameCube setup, you can check out the video below.

Continue reading “How One Company Cracked The GameCube Disc Protection”