[3D SANAGO] is a bit of a master when it comes to using a 3D-printing pen. Their latest work involved fixing a broken humidifier and giving it a Pokemon-themed makeover. It’s an education in just what can be achieved with a tool many of us write off as a simple novelty.
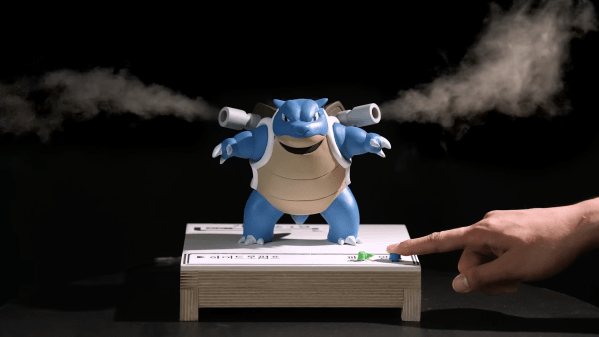
The basic idea of the build was to create a Blastoise figurine that serves as a humidifier. Work starts with marking out a basic outline on a round stone. The 3D pen is then used to create a tortoise shell with the appropriate concave shape, directly on the rock. [3D SANAGO] also demonstrates how a simple plastic framework can be heated with a blowtorch and shaped around the rock as needed to generate gentle curves. Meanwhile, a simple marker pen serves as a form for creating the gun barrels on Blastoise’s back. The legs are built with a similar technique, but with expert manipulation with a blowtorch to turn them into stubby muscular forms.
The full figurine is built up in stages, with individual wireframe components assembled into a complete body. The gaps in the frame are then filled in by hand, which takes a long time; [3D SANAGO] calls it “the most boring for sure.” Plenty of post-processing is then done with various sanding tools and a bladed tip on a soldering iron. The latter is used as the melting action allows the creation of a smooth final surface. In contrast, subtractive methods like sanding would leave holes and divots that need to be filled in before painting. There’s plenty of sealing to be done before paint, too, to ensure the interior of Blastoise can hold water without leaking. Then, the internal componets are installed and the body finished to its final cartoon form. In case you’re wondering, [3D SANAGO] says that sanding took 2-3 days to get such a great result.
If you really dig it, it’s on display at [3D SANAGO’s] cafe in Daejeon. Overall, it’s amazing to see such craftsmanship with a 3D pen. A resin printer could obviously print a wonderful Blastoise of similar quality, but there’s something about watching the level of human skill in this that’s just compelling. Video after the break.