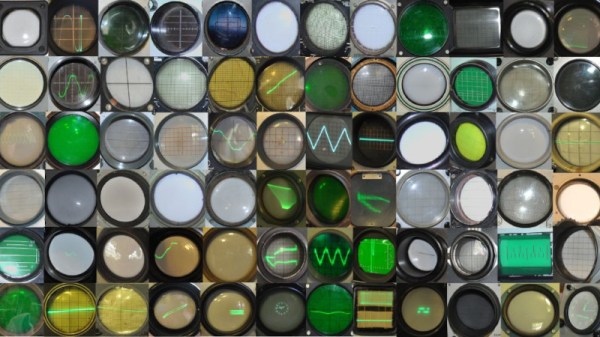
CRT TV screen showing a Super Mario Bros main screen with "Social Media Bros" written on the title screen instead. There's a NES console to the right of it, with a perfboard on top of it, wires going into the console port.

ConnectedNES Brings Twitter Into Super Mario Bros World

Back in 2016, artist and video game historian [Rachel Weil (HXLNT)] was hanging out with her friend and hacking on console stuff, as friends do. [Rachel] was galvanized by the idea of having an iconic game like Super Mario Bros be interrupted by push notifications, and set out to bring a Twitter feed to her NES gaming experience. What she ended up with is ConnectedNES — a charming combination of a custom Twitter modem and a hacked Super Mario Bros ROM, creating a social media experience you have to see for yourself.

The technical side is as immaculate as the visuals. Data is transferred to the NES through the controller port using a Particle Photon that’s emulating a NES controller, and everything is encased in an adorable shell made out of yarn needlework.

The Photon currently taps into the Twitter feed through a proxy server run locally, and listens for tweets with specific keywords, relaying them to the ROM through mimicking controller port inputs. The ROM, now bearing the name Social Media Bros, went through some careful assembly trimming work. In particular, [Rachel] had to sacrifice Green Mario to the bit bucket gods.

Playing this game has to be quite the experience. Thankfully, source code for everything — the proxy server, the Photon firmware and the NES ROM — is on GitHub for all of us NES enthusiasts to hack at. If simply reading the feed is not enough, you can send tweets from your NES as well.

Building A Poketch Powered By An Apple Watch

In Pokemon Diamond and Pearl and the ensuing modern re-releases, the player is given a computer called a Poketch to assist on their journey. [DistressedOwl] decided to build one for real.

The build starts with an Apple Watch, which provides a capable smartwatch platform and a quality display. It’s then given a snap-on case that’s 3D printed in PLA. [DistressedOwl] decided to use model painting techniques to give the build a worn-in, distressed look, which feels fitting for a watch belonging to a rough-and-tumble Pokemon trainer.

The Apple Watch runs a custom app via Test Flight which mimics the appearance of the in-game Poketch. It includes various screens like a basic map and Pikachu looking melancholy next to a digital watch. Sadly, the dowsing app in the Poketch won’t help you find hidden items on the ground.

It’s a build that reminds us of some great Pip-Boy builds over the years. It would make the perfect addition to a Pokemon cosplay, too. Just don’t forget to take some Pokeballs along too!

Rib Cage Lamp Kicks It Up A Notch With Party Mode

We think [Michelle]’s sound-reactive rib cage lamp turned out great, and the photos and details around how it was made are equally fantastic. The lamp is made of carved and waxed wood, and inside is a bundle of LED lighting capable of a variety of different color palettes and patterns, including the ability to react to sound. Every rib cage should have a party mode, after all.

The LED strip is fashioned into an atom-like structure.

Turns out that designing good rib cage pieces is a bigger challenge than one might think. [Michelle]’s method was to use an anatomical 3D model as reference, tracing each piece so that it could be cut from a flat sheet of wood.

The resulting flat pieces then get assembled into a stack, with each rib pointed downward at a roughly 20 degree angle. This process is a neat hack in itself: instead of drilling holes all at exactly the same angle, [Michelle] simply made the holes twice the diameter of the steel rod they stack on. The result? The pieces angle downward on their own.

The LED lighting is itself a nice piece of work. The basic structure comes from soldered solid-core wire. The RGB LED strip gets wound around that, then reinforced with garden wire. The result is an atomic-looking structure that sits inside the rib cage. An ESP32 development board drives everything with the FastLED library.

Code for everything, including the sound-reactive worky bits, which rely on an INMP441 I2C microphone module is all available on GitHub. And if you want to make your own sound-reactive art, make sure to check out these arms as well.

Want to see the rib cage in action? A short demo video is embedded below that demonstrates the sound reactivity. Equally applicable to either party or relaxation modes, we think.

Continue reading “Rib Cage Lamp Kicks It Up A Notch With Party Mode”

EEG graph with activity sections highlighted, one part highlighted as "F" and other as "6"

DREEMWORK Lets You Code Morse From Inside Your Dream

Lucid dreaming fascinates hackers. Every few years for over a decade now, we’ve seen a serious project dedicated to studying or taking advantage of this phenomenon, and the interest in this topic hasn’t faded still. [Michael] has contacted us to tell about a small and unconventional breakthrough that a few lucid dream hackers have accomplished — communicating in Morse code from their dream using eye movements.

These hackers are using Dreem 2 and 3 headbands, which include clinical-grade polysomnography features like EEG measurements, which is instrumental for decoding eye movements. [Michael] tells us that one of the participants, [Sebastiii], was able to transfer the letter F by looking twice to the left, then right and left again – ..-. in Morse. With an off-the-shelf headband, this information transmission method is quite accessible to anyone willing to learn Morse, and [Michael] himself is now working on an automated decoding solution. We might forget what happens in our dreams fairly quickly, but this unexpected side channel could be a good counter.

[Michael] has tipped us off to many of the projects we’ve covered, and himself has quite a history in the field. His own research into using Morse to communicate out of lucid dreams dates back as far as 2012. If your ham exam preparations have you dream in Morse, perhaps this is the perfect project to join. A lot of projects we’ve seen focus on gaining enough awareness to achieve lucidity first, like the variety of lucid dream-invoking masks we’ve covered over the years. This part being thoroughly explored, it makes sense that communication is the next frontier to be tackled.

Building A Tessellated NeoPixel Clock

Anyone can buy a clock, but building your own lets you express your creative flair along the way. [Edison Science Corner] did just that with this neat sci-fi looking design.

The build relies on an Arduino Pro Mini to run the show, paired with a DS3231 real-time clock module. The latter part is of great importance, as without it, the Arduino would not keep accurate time. The 3D printed enclosure looks nondescript from the outside. However, inside, it’s got a neat triangular structure which allows the time to be displayed in that attractive tessellated triangular fashion. There’s a black plastic separator between all the segments which stop unattractive bleed-through and really help with the final effect. The individual triangles are each lit by a NeoPixel LED, which are both addressable and capable of lighting up in RGB colors. It makes for an attractive and colorful display.

If you want to try something more traditional yet challenging, consider whipping up your own 7-segment displays. Video after the break.

Continue reading “Building A Tessellated NeoPixel Clock”

2022 Cyberdeck Contest: A Chorded-Keyboard Wearable Cyberdeck

Those of us who are unreformed hunt-and-peck typists are often baffled by the keyboard skills of those with more formal training. Home row? Specific fingers for specific keys? The mind boggles. And chorded keyboards? That’s straight-up witchcraft!

But, there are times when only a chorded keyboard will do, such as when you want to build a wrist-wearable cyberdeck like this one. It’s called the ComputeDeck-B3, and it comes to us from [Nate Damen], better known as someone who goes around with a TV on their head, which sort of fits with the total device immersion this cyberdeck enables.

The deck is designed to fit on the forearm in the position of function — basically, the posture your arm, wrist, and hand take on naturally when everything is relaxed. There’s a small display mounted at a good angle for viewing, but the star of the show is the keyboard. The fingers slip inside a slot to find three mechanical key switches positioned for each finger. It looks like the idea is to use the finger pad, fingertip, and fingernail to press each key, and then to press different combinations of keys to make specific characters. The thumb isn’t left out of the action; there’s a five-position “hat switch” located right where the thumb naturally falls, to add to the input possibilities. The short video below gives a tour and some background on design goals, and why this isn’t really a PipBoy.

For as much as chording isn’t our thing, we can see how this could work for input on the fly. And we have to compliment [Nate] on paying attention to ergonomics here, even though extending the fingers to press the nail buttons seems like a somewhat unnatural movement. We’d love a follow-up on this after he’s had some time to put it through its paces. Continue reading “2022 Cyberdeck Contest: A Chorded-Keyboard Wearable Cyberdeck”

DIY Wind Tunnel Aims To Educate The Youth

Typically, when we talk about wind tunnels, we think of the big facilities in use by the aerospace and motorsports industries. However, there’s nothing stopping you building a wind tunnel of your very own, and it may even be easier than you think! [Jude Pullen] has whipped up just such a design with DIY in mind.

Intended for high school Design & Technology (D&T) classes, it uses relatively simple materials construction techniques. The airflow straightener is built out of PVC pipes, and the end boxes built out of cardboard. The transparent walls for observation are created out of acrylic, while a simple fan provides the necessary flow. The desk-sized wind tunnel can then be instrumented with a manometer, tachometer, and anemometer to measure pressure, fan speed, and wind speed. [Jude] also explores experiments that can be run in the wind tunnel, such as working with a small balsa wood glider and measuring the lift it generates with a scale.

[Jude] has a very pragmatic and real-world understanding of such projects, too. He notes the difference between making things to measure, and making them to fit, and highlights the values of both approaches. It’s a much more holistic approach than simply berating students to “do it right” or “do it better” when making things in a D&T class.

Use of a basic wind tunnel is often not taught to engineering students until at least the second or third year of an engineering degree, after all the boring math and static analysis has been dealt with. However, there’s no reason high school physics students can’t understand the physics involved, and they’re more than capable of undertaking such a build. Starting such education early often nets huge benefits for individuals and their eventual careers.

Once you’ve got yourself a wind tunnel, you might want to start thinking about some flow visualization, which gets really exciting.

Continue reading “DIY Wind Tunnel Aims To Educate The Youth”